NOTE: this software is for Classic Mac OS (eg: OS 9) and cannot be used on Mac OS X.
Nisus Writer Classic is no longer for sale. This page is only for archival purposes.
Step Up To The Bar!
As you already know, Nisus Writer is a word processor. And, at least until now, the best way to get the words from your brain into the computer is by using the keyboard. We find that most writers like to keep their fingers on the keyboard and not use the mouse unless they absolutely have to. We'll offer some tips about that soon, but, now, due to popular demand (and because we raised the subject already) we'll share some more hints about using the Floating Tool Bars.
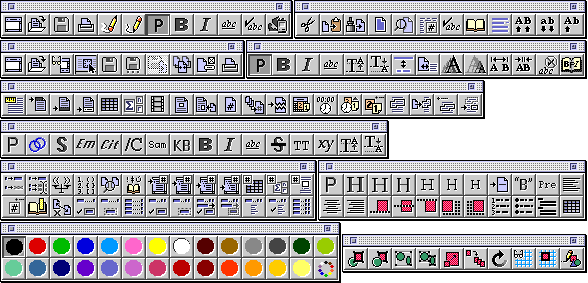
Those button pushers who understand and know how to use all the buttons in the Nisus Writer document window described in Button, Button, Who's Got the Button are probably ready to use at least some of the buttons on the Nisus Writer Floating Tool Bars. If you follow the Nisus Writer Tips, you've seen a collection of them all [we've reproduced them here], but you would probably use only one or two at a time.

To display the Nisus Writer Floating Tool Bar you want:
Once again, to learn what each of the buttons does:
Press CONTROL and point to the button.
Whoa! Up above, this Tool Bar displayed horizontally. How did it get vertical?
To switch any Floating Tool Bar's display between horizontal and vertical:
Click the Tool Bar's Zoom box in the upper right corner of the windoid.
To move a Floating Tool Bar:
Click the Tool Bar's title bar and drag it wherever you want.
To make sure the Floating Tool Bars are there the next time you start Nisus Writer:
Don't close the tool bar before you quit Nisus Writer. Nisus Writer "remembers" the fact that they were open and where (on the screen) you had put them.
You've probably noticed that certain buttons appear on more than one Tool Bar. We grouped the buttons into "meaningful" sets. Therefore, certain tasks you might want to do with others and not want to open yet another Tool Bar. The various Tool Bars (displayed horizontally) are:
Your basic set of tools.
Here you can create a new file, open an existing one, save the file, print it, undo, redo, make the text Plain, Bold, Italic, or underlined, check your spelling, or quit Nisus Writer.
Your text editing tools.
Here you can cut, copy, paste, select all, open the Find & Replace window, check the word count, check your spelling, consult the thesaurus, hyphenate selected text, make the selection UPPERCASE, lowercase, or Capitalized.
Your set of tools for styling text.
Use these to make your text "Plain," Bold, Italic, Underline, Superscript, Subscript, and to use these more complex styles: Keep on Same Line, Keep on Same Page, Increase (size), Decrease (size), Track Wider, Track Narrower, Ignore Spelling, and Define Styles.
Your set of graphics tools.
Use these tools (when on the Graphics Layer) to do a variety of graphics editing tasks such as putting one graphic in front of or behind another; group and ungroup various selected graphics; scale, duplicate and rotate selected graphics; display a grid and have your graphics snap to that grid and edit various attributes of the graphic using the Edit Graphic dialog.
Your set of tools for inserting objects into your text.
From here you can insert a paragraph ruler to govern the shape of paragraphs, a header or a footer to appear on every page, a footnote, an table, an equation, a QuickTime movie, a character graphic, another Nisus Writer page as a graphic, the current page number variable, the last page number variable (so you can have your pages numbered "page x of y", a page break, the current date (variable - updates on command) and the current time (variable - updates on command). You can also update all your time variables from a button on this bar or change the format of the dates that appear in your document. You can also use the various commands related to Publish and Subscribe from here.
Tools for file management.
Nisus Writer has a variety of unique file management tools, some of which are available from this Tool Bar. You can, of course, create a new file or open an existing file. You can show the Nisus Writer Catalog (which has additional file management tools), close the current window, save the current file to disk, call the Save As dialog and even revert to the previously saved version of the file. You can call the mail merge command get to the Page Setup dialog and print your file.
This large collection of buttons is useful for working with large documents.
You can create a new abbreviation for any of your Nisus Writer glossaries or open the glossary file for editing. You can select all text between matching parentheses and recount for unmatching parentheses. You can compare two open documents, open the character table to check the ASCII (or HEX value of any character and see all the available characters of a particular font (and enter it into your document). You can insert a variety of automatic numbers for a variety of aspects of your document from chapters to tables, equations and "figures". You can click a button to open the dialog that allows you to determine aspects of those automatic numbers. You can place an invisible electronic bookmark to which you can jump or cross-reference. You can mark or unmark text for a tables of contents and indexes as well as create the contents and index documents.
A set of tools for HTML formating.
Use these buttons to add various HTML format styles to your Nisus Writer document so that when you save the file as a Nisus® HTML file Nisus Writer can write the code correctly.
A set of tools for HTML styling.
Use these buttons to add normal HTML styles to your Nisus Writer document so that when you save the file as a Nisus® HTML file Nisus Writer can write the code correctly.
A set of tools for coloring text.
Use these buttons to add color styles to your Nisus Writer document.
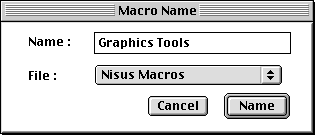
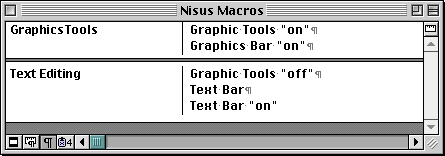
So, let's say that you have very limited screen "real estate" and you want to use the Graphic Tools Floating Tool Bar when you edit your graphics in Nisus Writer. However, you neither want to have this tool bar around all the time you can't use it in the text editing area, nor do you want to use additional mouse drags to get to the submenu where the Graphic Tools Floating Tool Bar command resides. So, use this simple macro and switch from your text to the graphics layer and display your Tool Bar in one or two easy keystrokes on the keyboard.
To switch to the Graphics Layer and turn on the Graphics Tools Floating Tool Bar in "one fell swoop":
 or "Cogwheel" menu.

So far, so good. However this still requires you to reach from the keyboard to the mouse. We have one more step.
Stay tuned.... In our next tip we'll explain to you how to add keyboard shortcuts to any of Nisus Writer's menu commands.