
Change the Display of the Toolbar
There are two ways to change the display.
Choose different displays of the Toolbar
1. Right-click the Toolbar and choose:
You can remove and/or move the icons on the Toolbar to different locations.
1. Press and hold down the Command key on your keyboard.
2. Click and drag any toolbar icon on the Toolbar to:
▷ Drag any icon off the Toolbar to remove that item.
▷ Drag any icon to another location on the Toolbar.
1. Choose the menu command: View > Toolbar > Customize Toolbar….
Figure 337
The Customize Toolbar sheet
2. Drag the icon of the tool you
a. want to remove from the Toolbar to the area below…
b. want to add to the Toolbar from the collection up to location you want…
c. or drag the default set into the toolbar.
Nisus Writer Express currently offers a wide variety of icons you can put on the Toolbar including Undo and Redo (as grouped buttons or separately), in addition to line and space separators, and others. In order to save space, some commands’ names are changed (Back and Forward refer to Previous Selection and Next Selection respectively).
You might want to change the menu command associated with a custom toolbar item, or change the image that appears on the Toolbar.
1. Choose the menu command: View > Toolbar > Manage Custom Toolbar Items….
2. Select the item you want to edit in the Custom Toolbar Items window.
You can add or subtract commands to or from the group, or rearrange their sequence by dragging them, as illustrated in Figure 338.
4. When you are satisfied, click OK.
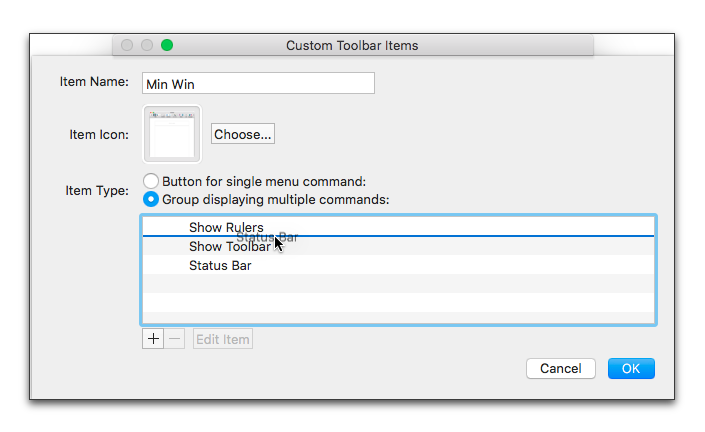
Figure 338
Editing the “Min Win” (minimum window) custom group button on the Toolbar
If you find that you no longer need or want a particular icon on the Toolbar you can remove it.
1. Choose the menu command: View > Customize Toolbar….
2. Drag the appropriate icon from the Toolbar.
When you release the mouse button the alert illustrated in Figure 339 appears.

Figure 339
The remove icon from toolbar alert
► Click Remove From Toolbar to remove the item but keep it available to restore in the Customize Toolbar sheet.
► Click Delete Permanently to completely remove the icon from your version of the application.
As illustrated in Figure 340 you can also delete a custom Toolbar item from the Custom Toolbar Items window.
1. Choose the menu command: View > Toolbar > Manage Custom Toolbar Items….
2. Select the item you wish to remove.
3. Click the - (Remove selected item) button in the lower left corner of the dialog.

Figure 340
The delete custom toolbar item alert
| Previous Chapter Make the Toolbar Your Own |
<< index >> |
Next Chapter Customize the Dock and its Palettes |