
The spelling checker checks for more than misspelled words.
Check spelling using the Language palette
Nisus Writer Express can check the spelling of the word where your insertion point appears whenever you pause to think.
► Keep the Language palette visible (either in the Palette Dock or on your Desktop) the Language palette unobtrusively interacts with your text.
• If the word is misspelled the Language palette suggests corrections.
Figure 241
The Language palette in check spelling mode
• If the word is spelled correctly the Language palette switches to search in the Nisus Thesaurus (English only) and may suggest alternative words.

Figure 242
The Language palette in Nisus Thesaurus mode
☞ You can open the complete Nisus Thesaurus by clicking its icon, which appears in the Language palette, illustrated in Figure 242 above, when in thesaurus mode.
Correct your typos as you type
Nisus Writer Express can correct the spelling of many commonly misspelled words as you type.
1. Choose the menu command: Nisus Writer Express > Preferences > QuickFix.
To learn more about the various items QuickFix can “fix” see “QuickFix Preferences” on page 365.
Set your dictionary preferences
1. Choose the menu command: Nisus Writer Express > Preferences > New File.
3. (Un)Check Check Spelling as You Type as you prefer.
This applies only to new documents. You can change this on a per-document basis by choosing the menu command: Edit > Spelling > Check Spelling as You Type.
☞ Misspelled words appear with a red squiggly line beneath them. You can change the color of this squiggly underline by editing the “Misspelled” option in your Appearance Preferences.
Correct your spelling using the keyboard and without calling up the Spelling window
You can correct your spelling without removing your hands from the keyboard.
1. Press ⌘⌥; (Command-Option-Semicolon).
This selects the next misspelled word and draws a “menuoid” with possible corrections.
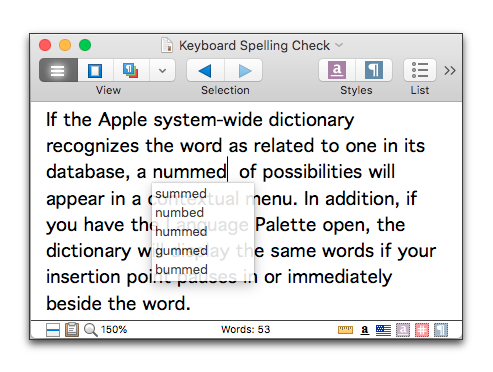
Figure 243
The correct spelling menuoid
2. Press → or ← to replace the misspelled word with the selected word in the list or ↓ to select another word from the list, then press → or ← to use that word.
☞ If the spelling checker has only one suggestion it will replace the word immediately (without offering a menu).
Correct your spelling using the mouse or trackpad and without calling up the Spelling window
1. Right-click the misspelled word.
If the Apple system-wide dictionary recognizes the word as related to one in its database, a number of possibilities will appear in a contextual menu. In addition, if you have the Language palette open, the dictionary will display the same words if your insertion point pauses in or immediately beside the word.
2. Choose the word that matches your choice from the list that appears in the Correct Spelling submenu as illustrated in Figure 244 below.
If the word is correctly spelled, you can have the dictionary “Learn” the word or “Ignore” it during this session. Choose Ignore Spelling or Learn Spelling from the contextual menu.
Correct your spelling using the mouse or trackpad and without calling up the Spelling window and add the word to your QuickFix abbreviations
1. Right-click the misspelled word.
If the Apple system-wide dictionary recognizes the word as related to one in its database, a number of possibilities will appear in a contextual menu. In addition, if you have the Language palette open, the dictionary will display the same words if your insertion point pauses in or immediately beside the word.
2. Choose the word that matches your choice from the list that appears in the Correct Spelling & Add to QuickFix submenu.
The same words appear at the top of the contextual menu and the Correct Spelling & Add to QuickFix submenu as illustrated in Figure 244.
The Correct Spelling & Add To QuickFix submenu also has a command to Open QuickFix Preferences…. The QuickFix preferences are explained in the section “QuickFix Preferences” beginning on page 365.

Figure 244
The correct spelling (and much more) contextual menu
1. Open the document in which you want to check the spelling.
2. Choose menu command Edit > Show Spelling and Grammar > Spelling Window….
3. Click the button that corresponds to the operation you want.

Figure 245
The Check Spelling dialog
As the spelling checker window opens, it automatically searches for and selects the first misspelled word following the current insertion point.
☞ You can change the color or the selection highlight in the Appearance window of the Nisus Writer Express preferences, as explained in “Set “Defaults” for the Application” on page 352.
Nisus Writer Express checks the words between the insertion point and the end of the document, and then checking continues from the beginning of your document to the starting point. When the whole document has been checked, the spelling checker beeps.
When Nisus Writer Express finds an unknown word it presents you with a list of correctly-spelled suggestions. The spelling checker also flags words it does not recognize. It ignores lowercase letters at the start of a sentence, and repeated words.
When the spelling checker finds a word not in the Apple system dictionary, it suggests alternatives and allows you to correct it, ignore it, or learn the word.
Set the starting point of the spelling checker
1. Click at any point in your document where you want the spelling checker to begin.
2. Click Find Next in the Spelling window.
The Spelling window acts as a “floating” window. Even though it is visible above the document window and you can click any of its buttons, if it is not active as illustrated in Figure 246 typing enters text in the document window.
When the window is active one of its text windows has a highlighted edge as in Figure 247. In this state typing enters text in the Spelling window.
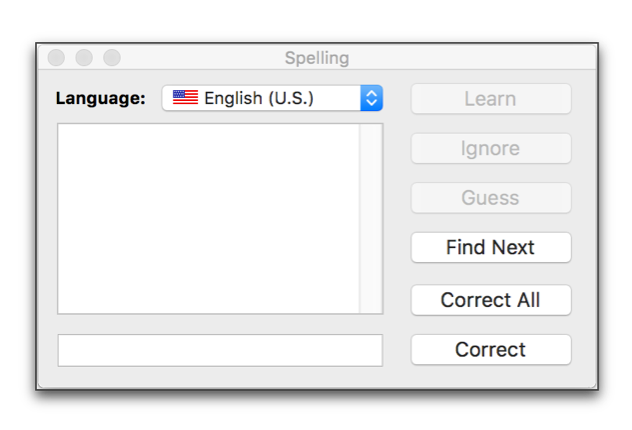
Figure 246
The Spelling window when it is not active does not have a highlighted edge

Figure 247
The Spelling window when it is active has a highlighted edge (in this case beside the Correct button)
Activate the Spelling floating window
► Click your insertion point in the “Correct” text edit box.
You can then type alternative spellings in it or select various words from the “Guess” list using the arrow keys of your keyboard.
Replace a misspelled word using the spelling checker
When the spelling checker finds a word which is not in its dictionary, it suggests alternatives and allows you to correct it. The suggestions given are based upon both the actual characters and the phonetic sounds of the unknown word.
1. Use the scroll list to view suggestions for misspelled words.
2. Click one of them to place it in the Correct box.
3. To replace the word in your document with the word in the Replace with box
▷ click Correct or Correct All, or
▷ if the Spelling window is the active window, press ⏎ or ⌤.
► If you cannot find the word you want in the suggestion list, select the unknown word in the text edit box at the bottom of the Spelling window and edit it, then click Correct or press ⏎.
Skip words flagged by the spelling checker
You can make the spelling checker skip words that it might otherwise flag in a number of different ways.
• Skip the word in a session.
• Mark the word while a particular file is open.
• Add the word to the Dictionary (by clicking Learn).
If the spelling checker comes to a word that it does not recognize, yet is accurately spelled.
► Click Ignore to leave all instances of the unknown word unaltered in the file during that session.
► Click Find Next to leave the unknown word unaltered.
Skip all instances of a particular word
There are three ways you can add a word to the dictionary so that the spelling checker does not flag it again in any document or application.
► Click Learn when the Check Spelling dialog displays a word not in its dictionary that you want to add to your Dictionary.
► Select the word and choose the menu command: Edit > Show Spelling and Grammar > Learn Spelling.
► Select the word, press ⌃ and choose Learn Spelling from the contextual menu that appears.
Remove a “learned” word to the Dictionary
There are three ways you can remove a learned word from the dictionary so that the spelling checker begins to flag it again in any document or application.
► Type or paste the learned word into the Spelling Window and click Unlearn.
► Select the word and choose the menu command: Edit > Show Spelling and Grammar > Unlearn Spelling.
► Select the word, press ⌃ and choose Unlearn Spelling from the contextual menu that appears.
Nisus Writer Express can find the next spelling error in your document without opening the Check Spelling window.
► Choose the menu command: Edit > Show Spelling and Grammar > Check Spelling.
Nisus Writer Express selects the word that the Check Spelling dialog would find if it were open.
► Click the Spelling window’s Close button.
| Previous Chapter Proof Documents |
<< index >> |
Next Chapter User Dictionaries |