
Understanding Template (Stationery) Documents
Whenever you choose the menu command: File > New, Nisus Writer Express opens a document window called “Untitled”.
Where did this come from?
We, the nice people at Nisus Software Inc. supply you with a versatile tool, the Nisus New File. This file is variously called (in different applications) a “stationery”, “template” or “master” document.
Apple uses the phrase “Stationery pad” in the Finder. You can turn any file into a “Stationery pad” by clicking the appropriate checkbox in the window that appears when you choose the menu command: File > Get Info in the Finder. The stationery pad is like one of those little pads your physician has for his or her prescriptions, or those pads of paper you get from your local realtor with his or her photograph and contact information at the top of each page and room for you to make your own “to do list” or “shopping list” or simply doodle to your heart's content.
So it is in Nisus Writer Express. You can create any number of “stationery” documents. Each one can have whatever name, text and/or formatting (even window shape and location) you want. Every time you open that stationery document the information you've saved in it appears and the file is called “Untitled”… ready for you to add new content and save as a unique document.
☞ Your Nisus New File new uses the system paper size as explained in “Set the preferred paper size for all your documents” on page 158 unless you change it here.
As a convenience Nisus Writer Express will at first pick up the paper size set in your system’s “Print & Fax” preferences as explained in “Set the preferred paper size for all your documents” on page 158. You can customize the paper size of new documents, by editing the Nisus New File.
The Nisus New File is special “stationery” which opens whenever you choose the menu command: File > New.
In addition to the Nisus New File, Nisus Writer Express also enables you to create a Plain Text Template, the file that is used whenever you open a file that is plain text (as identified by the “.txt” at the end of the files name).
Creating and using “template” files for specific tasks saves you time. For example, create different stationery for letters, memos, reports, and forms. You can create as many template files as you want. A template file always opens as an untitled file.
You can create and maintain a collection of different template files using the Document Manager. This is explained in detail beginning on page 69.
There are several tools for creating and modifying stationery (template) files. The first among these is the Nisus New File which is explained in detail on pages 379 - 381.
1. Choose the menu command: File > Save As….
2. Choose Document Template from the File Format pop-up menu in the Save As dialog.
Figure 319
Saving a file as a document template
3. Name the file what you want.
4. Save the file in any location you want (preferably some place where you’ll remember you left it).
☞ The Document Manager (explained in detail beginning on page 69) can help you keep track of these files.
5. Click Save as illustrated in Figure 319.
Set the appearance “View” of your Nisus New File
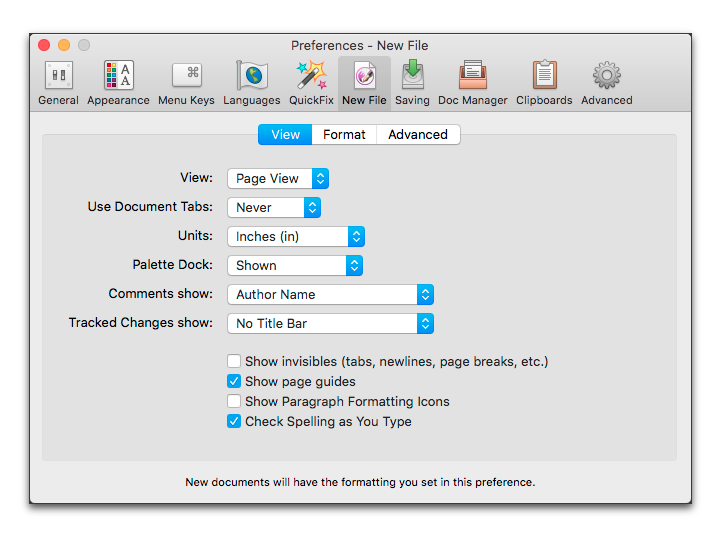
Figure 320
The View portion of the New File preferences window
Determine which of the three primary views of your document displays when you choose New
In the View portion of the New File preferences window you can:
► Choose Draft View, Page View or Style Sheet from the View pop-up menu to determine the mode in which your new file opens.
Determine how your document uses Apple’s tabbed interface
You can display multiple documents in the tabs of one window (as with a Web browser). This is explained in the section: “Document Tabs” beginning on page 252. While you can set this on a window by window basis, if you always want your new documents to appear in a tab beside existing documents you can choose:
from the Use Document Tabs pop-up menu in the View portion of the New File preferences.
Choose Measurement Display Options for New Documents
You can display measurements in either centimeters, inches, millimeters, points, or picas. Whichever option you choose in the View portion of the New File preferences determines their display on the ruler and in any dialog in which measurement options display – unless you change the unit of measurement for that particular file.
1. Choose the menu command: Nisus Writer Express > Preferences > New File.
2. Choose the unit type you want from the Units pop-up menu in the View area at the top of the dialog as illustrated.
You can change the unit of measurement on a per document basis.
Determine the unit of measurement in any document
Choose the units you want from the menu View > Rulers.

Figure 321
The various units of measurement options on the ruler
► Choose Centimeters (cm), Inches (in), Millimeters (mm), Picas (pc), or Points (pt) from the (measurement) Units pop-up menu to determine what your ruler displays.
Determine how the Palette Dock appears in relation to new files
► Choose Most Recent, Shown, or Hidden from the Palette Dock pop-up menu to determine whether or not the Palette Dock appears as you open a new document window.
Most Recent means that, if you have opened a file and displayed the Palette Dock, the next New (“Untitled”) file you open will have the Palette Dock open. If, on the other hand, you have opened a file and closed the Palette Dock, the next New (“Untitled”) file you open will display without the Palette Dock.
☞ If, however, you Palette Dock floats, these options are disabled.
Determine whether or not “Invisibles” display in all new files
Turn on or off “Invisibles” to have Nisus Writer Express display or hide “formatting” characters including a box surrounding any images in your document.
► Check Show invisibles (tabs, newlines, page breaks, etc.) to either display of invisibles in all new documents.
☞ At any time, you can choose the menu command: View > Show Invisibles to display
• Dots for spaces
• Tildes ~ for non-breaking spaces (⌥-spacebar)
• Little boxes for the ideograph space (used in East-Asian languages),
Unicode U+3000
• Vertical bar with arrows for reverse direction markers for bidirectional text
• Arrows where tabs occur (left to right and right to left, depending on the direction of the text)
• Paragraph symbols at the end of paragraphs (left to right and right to left, depending on the direction of the text)
• “Turn around arrows” where soft returns appear (left to right and right to left, depending on the direction of the text)
• Inserted page breaks (using the menu command: Insert > Page Break)
• Section breaks (using the commands of the menu Insert > Section Break)
• “X-ed out boxes” for “gremlins” (see the Glossary (page 451) for a definition of gremlin).
• Shape bounding boxes around inline images
• Anchors indicating where floating shapes are attached
Some are rather esoteric. You can see all of them illustrated in Table 29.
|
Invisibles |
||
|
Character Name |
Invisible Mark |
Unicode |
|
Space |
|
U+0020 |
|
Tab |
|
U+0009 |
|
Return |
|
U+000A |
|
Soft Return |
|
U+2028 |
|
Page Break |
|
U+000C |
|
Section Break |
|
U+000C |
|
Non-breaking Space |
|
U+00A0 |
|
Ideographic Space |
|
U+3000 |
|
Zero-width Space |
|
U+200B |
|
Left-to-Right Marker, Push Left-to-Right |
|
U+200E U+202D |
|
Right to Left Marker, Push Right-to-Left |
|
U+200F U+202E |
|
Pop Direction |
|
U+202C |
|
Zero-Width Non-Joiner |
|
U+200C |
|
Zero-Width Joiner, Word Joiner |
|
U+200D U+2060 |
|
Gremlin |
|
many |
|
Anchor (appears at the end of a paragraph to which a floating shape is attached) |
|
|
|
Indicator that paragraph Grouping controls are associated with the paragraph |
|
|
Customize the color of your Invisibles
1. Open Nisus Writer Express’s Appearance preference pane.
2. Select Invisibles & Guides in the left column, at the bottom.
3. Select Invisibles in the second column.
4. Click the Invisibles color swatch and choose the color you want from the Colors panel.
Determine whether or not Page guides display in all new files
Turn on or off “Page Guides” to have Nisus Writer Express add (or remove) a color-customizable line around the area of the page (in Page View) which indicates the page’s margins. This also determines the display of the “Click for Header” and “Click for Footer” (and their variants) prompt that appears at the top or bottom of each page.
► Uncheck Show Page Guides to prevent the guides from appearing in new files.
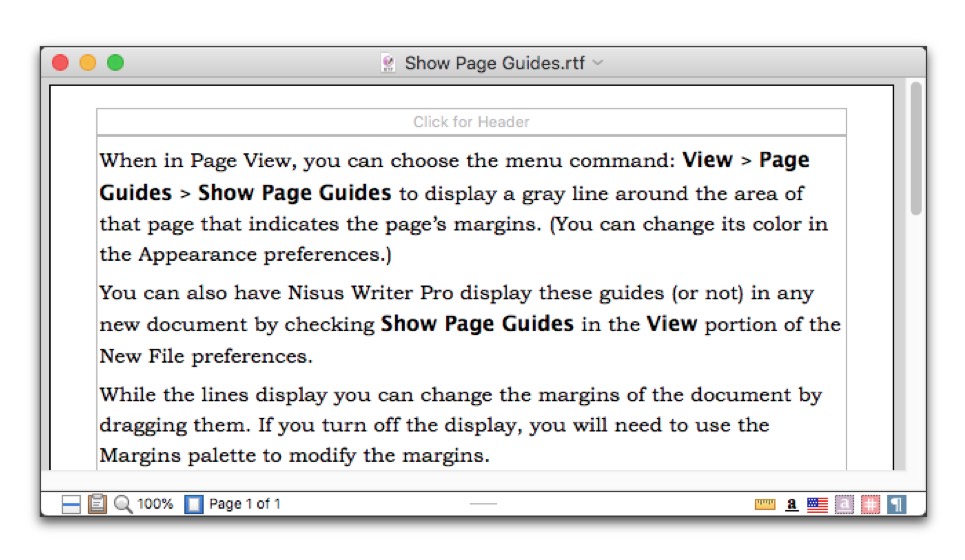
Figure 322
Page Guides (with “Click for Header”) showing

Figure 323
Page Guides not showing
If the page guides do not show you cannot drag them to alter the margins. If however the page guides show you can drag them. To prevent accidental dragging choose the menu command: View > Page Guides > Lock Page Guides.
Customize the color of your Page Guides
1. Select Invisibles & Guides in the left column at the bottom of the Preferences window.
2. Select Page guides in the second column.
3. Click the Page guides color swatch and choose the color you want from the Colors panel.
Determine whether or not your spelling is checked as you type in all new files
You can change this in each individual file. However, if you want to have
► Turn on or off Check Spelling as You Type to have Nisus Writer Express show squiggly red lines under misspelled words. You can change the color of these squiggly underlines by changing the “Misspelled” setting in the Appearance Preferences.
Set the “Format” of your Nisus New File

Figure 324
The Format portion of the New File preferences window
In the Format portion of the New File preferences window you can
► Choose the Style you want your New file to be in by choosing that Style from the Style pop-up menu.
A Sample of how your text will appear (in whatever style you chose as the primary style in the Nisus New File appears in the right-hand portion of the window.
☞ To learn more about how to use styles in your document see “Style Sheets” on page 128.
The following options override the settings determined by the style you choose as the primary style in the document.
► Choose the language you want your New file to be in by choosing that language from the Language pop-up menu.
☞ To learn more about how to set the language of your document see “Set up language support” on page 37.
☞ Nisus Writer Express determines the direction of your document from the language you select.
► Click Font to set the font Family, Typeface and Size of your text in the Font panel:

► Check any options you want for Bold and/or Italic.
Click Color to open and choose a color from the Colors panel as illustrated in Figure 270 on page 301.
► Click the alignment and enter the values you want for line and paragraph spacing in the area provided.
☞ All New documents will have the formatting you set in this preference.
Set certain “Advanced” aspects of your Nisus New File
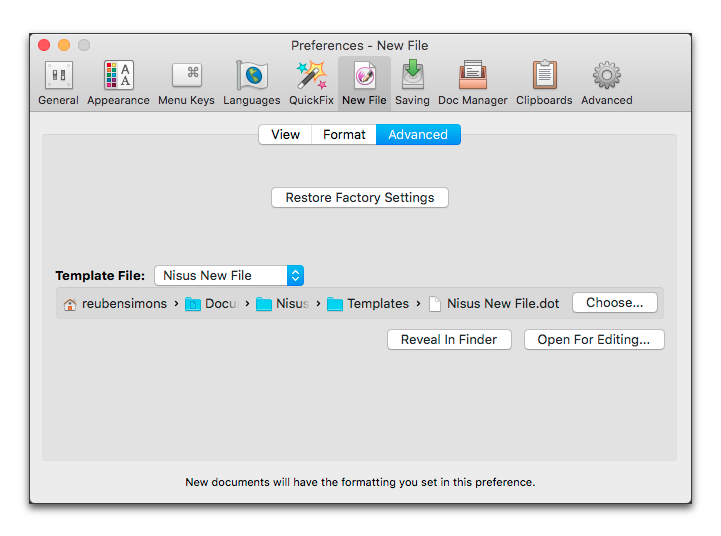
Figure 326
The Advanced portion of the New File preferences window showing default location of the Nisus New File
The Nisus New File shipped with Nisus Writer Express illustrated in Figure 12 on page 8 represents little more than a blank sheet of paper with area for headers/footers and a number of embedded styles. If you want to modify your Nisus New File, for example change the margins or add information (such as the page number variables) you need to make these alterations in the actual file.
1. Choose the menu command: Nisus Writer Express > Preferences > New File.
2. Click the Advanced tab immediately beneath the Toolbar.
3. Choose Nisus New File from the Template File pop-up menu.
5. Make the changes as desired.
☞ Your Nisus New File new uses the system paper size as explained in “Set the preferred paper size for all your documents” on page 158 unless you change it here.
As a convenience Nisus Writer Express will at first pick up the paper size set in your System Preferences “Printers & Scanners” as explained in “Set the preferred paper size for all your documents” on page 158. You can customize the paper size of new documents, by editing the Nisus New File.
6. Save and close the file.
Create a template for plain text documents
If you work with many plain text files (files that have no special formatting) you can determine the basic font, size, etc. of the file that Nisus Writer Express uses as a template when you open them.
1. Choose the menu command: Nisus Writer Express > Preferences > New File.
2. Click the Advanced tab immediately beneath the Toolbar.
3. Choose Plain Text Template from the Template File pop-up menu.
5. Make the changes as desired.
6. Save and close the file.
See the Nisus New File. Plain Text, or Macro Template in the Finder
If you have saved and used a version of the Nisus New File and/or the Plain Text Template in a location on your disk other than the original location, you can have Nisus Writer Express show the files in the finder.
► Click Reveal In Finder… in the Advanced portion of the New File preferences window.
Use an existing file as a Nisus New File
When you choose the menu command: File > New, Nisus Writer Express looks for a template document called “Nisus New File.dot” in the Templates folder inside the Nisus Documents folder which is in the Documents folder of your User folder. If it is found, it will be opened and named Untitled.
You can, however, use any Nisus Writer Express readable file on your hard drive as the file opened when you choose New.
Choose a different file for your Nisus New File
You can designate any Nisus Writer Express readable file on your hard drive as your Nisus New File.
1. Follow steps [Referenced content is missing.] through 2 on page 379 above.
2. Click Choose… in the Advanced portion of the New File preferences window.
3. Navigate in the Open dialog to the file you want to use.
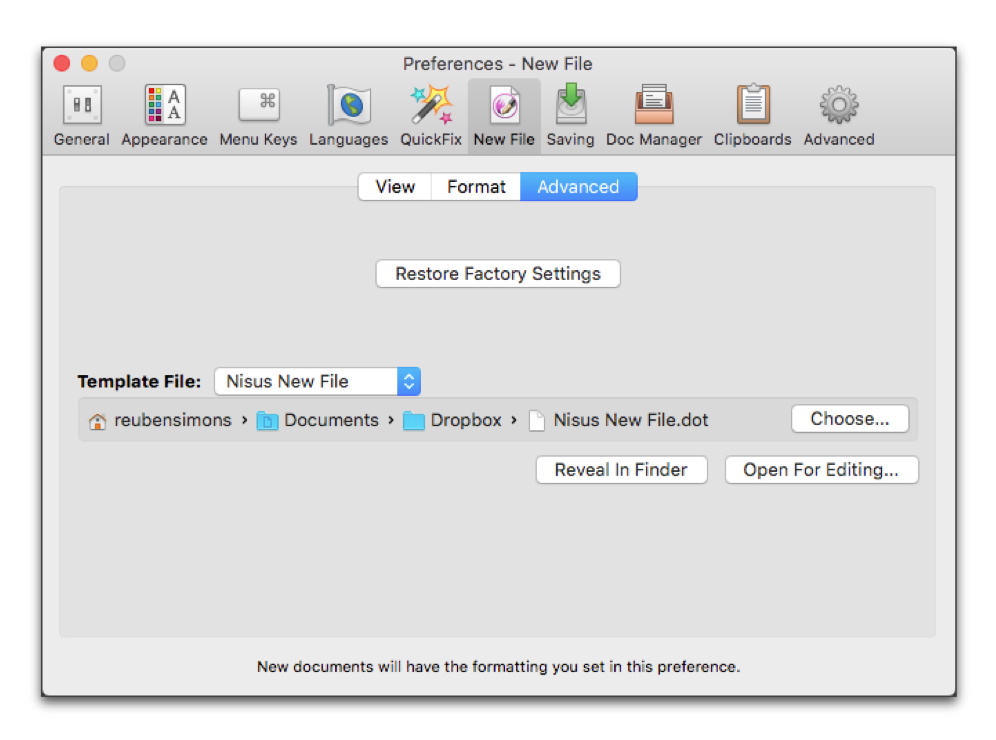
Figure 327
The Advanced portion of the New File preferences window showing a different Nisus New File selected
Nisus Writer Express indicates the location of the file in the field at the top of the preferences window.
You can create any file you like and save it as your Nisus New File. The Nisus New File is a special case of a template or stationery file. The Nisus New File is the file that Nisus Writer Express opens when you choose the menu command: File > New. The easiest way to “create” a new Nisus New File is to edit the existing Nisus New File as explained in “Edit your Nisus New File” on page 379. However, you can also use the following procedure.
1. Choose the menu command: File > New.
2. Configure the document however you'd like: adjust the margins, customize view settings, add styles, edit default formatting and text insert automatic numbers and document properties to the headers and/or footers.
3. Choose the menu command: File > Save As….
4. Name the file Nisus New File.
5. Choose Document Template from the File Format pop-up menu.
7. Designate this as the preferred Nisus New File by following the instructions described in the section: “Choose a different file for your Nisus New File” on page 380.
Restore the “factory settings” of your Nisus New File
If, for any reason you want to begin anew (Spring Cleaning, and all that) and, after many modifications, you want to use the formatting and file which Nisus Writer Express ships as your Nisus New File, the process is simple.
► Click Restore Factory Settings in the Advanced portion of the New File preferences window.
Figure 320 on page 371, Figure 324 on page 377 and Figure 326 on page 379 illustrate these settings.
| Previous Chapter QuickFix Preferences |
<< index >> |
Next Chapter Saving Preferences |


