Work with Various Types of Graphics
Nisus Writer Express handles two kinds of graphic images: those that flow along with a line of text we call “inline”. Other images, while attached to a particular paragraph, float independently are called “floating”.
In addition you can create various shapes, from lines and arrows to complex geometric forms and (linked) text boxes that can float with your text.
As explained in further detail in “Import Images” on page 182, you can place an Inline image in your text either by:
► copying and pasting an existing image
► choosing the menu command: Insert > Image…
► dragging an image file into your document from the Finder.
► selecting a floating image and
▷ choosing (uncheck; turn off) the menu command: Tools > Shapes > Wrap Text Around Shape
▷ choosing Inline with Text from the Placement pop-up menu in the Shapes Wrap palette.
When an inline image first appears in your document, Nisus Writer Express treats it as though it were a character in your text.
As you work with inline images, keep these guidelines in mind
• You can copy, paste, as well as drag and drop images like any other character in your text.
• You can select more than one inline image at a time while pressing ⌘ or ⇧.
☞ You don’t see image selection handles with multiple images selected. A tight bounding box (explained in the section: The Shape Bounding Box “195” on page ) may obscure the selected nature of an image. There must be some whitespace around the image for Nisus Writer Express to highlight and indicate that the image is selected with the selection color. Therefore, be careful how you proceed.
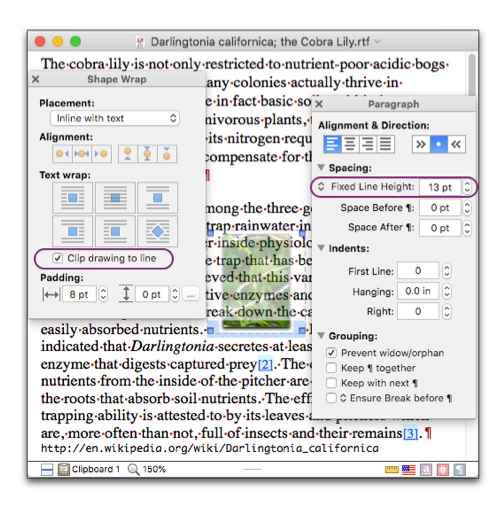
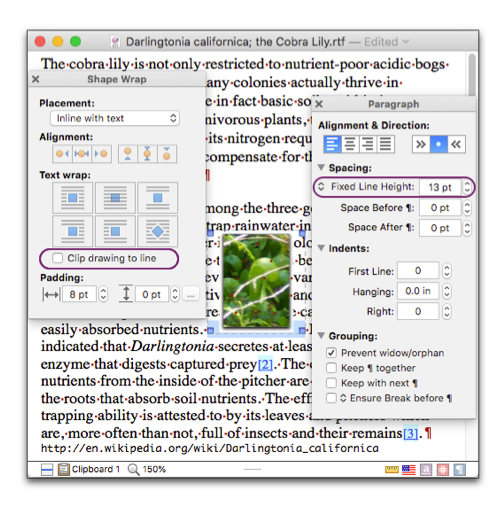
If you include an inline image in a sentence, the height of the line in which it appears will likely increase. This means that a 12-point image inserted next to 9-point text increases the sentence’s line height. The results of clipping an image to the line or not are illustrated in Figure 166.
• You can prevent an inline image from drawing over or behind surrounding text.
☞ This would only be necessary if the image height happens to exceed your line height, or if you wanted some special effect.
1. Select the inline image.
2. Choose Multiple from the Spacing portion of the Paragraph palette (or increase the line height).
3. Click (turn on) Clip drawing to line in the Shape Wrap palette.
Figure 166
An inline image with “Clip drawing to line” turned on (displays the image behind the text), then off (displays the image in front of the text)
Any image you can display in your document you can cause to float so that it appears above, behind, or alongside the text. You can also have the text wrap around the image in various ways.
Floating images are explained in more detail in “Work with Floating Images” beginning on page 190; briefly, you can cause an inline image to float by selecting it and:
► choose (check; turn on) the menu command: Tools > Shapes > Wrap Text Around Shape
► choose Floats with Paragraph or Floats on Page of ¶ from the Placement pop-up menu in the Shape Wrap palette.
Once the image is floating, rather than inline, a number of additional tools become available. You can always convert a floating image into an inline image, but the effects applied to it when it was floating will be removed.
As you work with floating images, keep these guidelines in mind
• You can copy, paste, as well as drag and drop floating images like any other object in your text.
• You can select numerous floating images and modify them all at once.
| Previous Chapter Graphics: Images and Shapes |
<< index >> |
Next Chapter Import Images |