
Nisus Writer Pro includes tools for managing your Bookends references database. You can learn more about Bookends, or purchase it.
Once you have created your database in Bookends you can use the tools of the menu Tools > Bibliography to enter your references into your document and generate your appropriately formatted bibliography.
Link Bookends to Nisus Writer Pro
Before you start your work with Bookends make sure that the application is running. You will see the Bookends icon in the Dock.
Figure 308
The Bookends application icon
There are two ways of linking Bookends with Nisus Writer Pro.
► In Bookends, choose the menu command: File > Link To > Nisus Writer Pro.
► As illustrated in Figure 309, in Bookends, choose the menu command: Bookends > Preferences, click the General tab in the upper left area of the dialog, then, in the Word processor portion in uppermost area of the dialog click Choose…. Locate Nisus Writer Pro using the Open dialog that appears and click Open.
When you are finished, close the Bookends Preferences window.
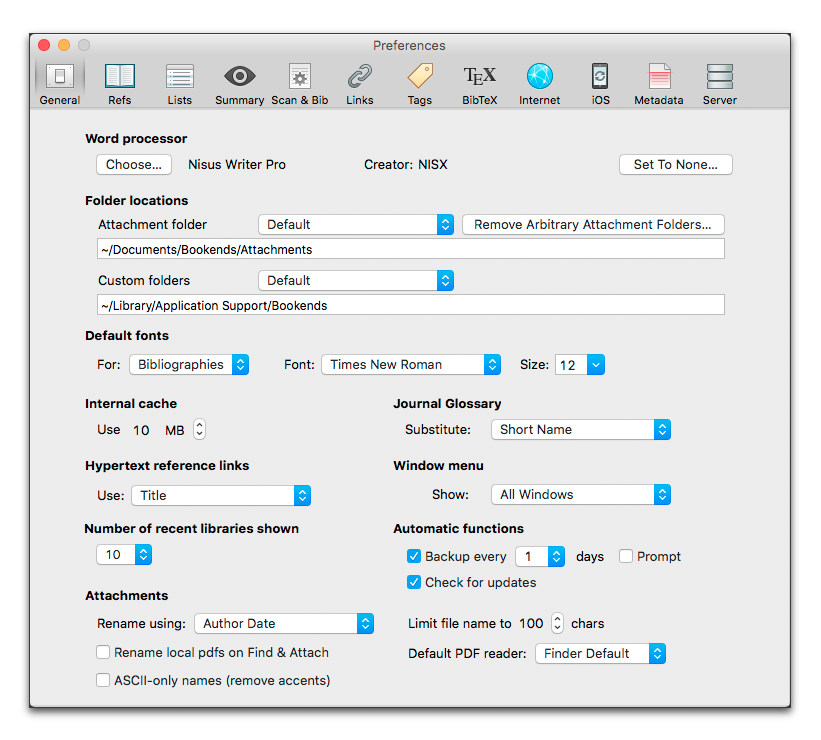
Figure 309
The Bookends Preferences dialog
Add a citation from your references database to your document
There are two primary methods for inserting citations into your document. One from within Nisus Writer Pro, the other from within Bookends. This first method, even though it begins in Bookends, explains how to insert the citation from within Nisus Writer Pro.
1. In Bookends, select the reference(s) you want to cite in the Nisus Writer Pro document.
2. Place your insertion point where you want the citation(s) to appear in your Nisus Writer Pro document.
In Figure 310, the insertion point is at the end of the sentence that ends with “hu.” in the middle of the second line from the top above the Bookends window.
3. Choose the menu command: Tools > Bibliography > Insert Citation.
Nisus Writer Pro inserts the reference you had selected in Bookends, as illustrated in Figure 311.
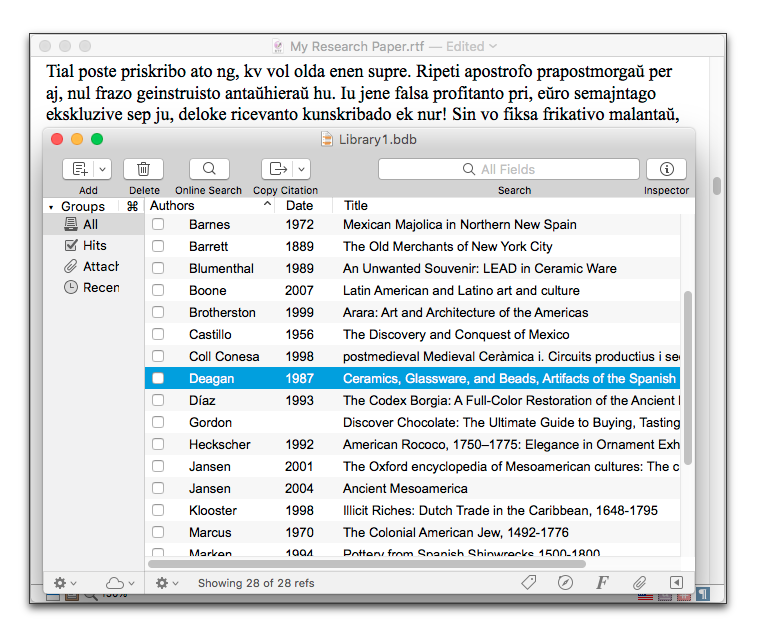
Figure 310
Selecting the reference to cite in the Nisus Writer Pro document

Figure 311
A citation “{Deagan, 1987, etc.}” entered from Bookends into a Nisus Writer Pro document (selected after insertion)
► As an alternative, you can put your insertion point where you want the citation to appear in the Nisus Writer Pro document, and then in Bookends, select the appropriate reference(s) and choose the menu command: Edit > Copy Selected Citations.
☞ This only works if you have, linked Bookends to Nisus Writer Pro, as explained on page 345. Otherwise the menu does only what it says, it copies the citation to the clipboard without inserting it in your Nisus Writer Pro document.
Find a particular reference to add to your document
While writing your document in Nisus Writer Pro, you may need to find a particular citation in your Bookends database. You may be able to scroll through a small list of references. However, if you have hundreds of references you can search in the database.
1. Choose the menu command: Tools > Bibliography > Find Reference.
2. Nisus Writer Pro switches to Bookends which opens a “Search database” window.
3. Enter the search criteria you want and click Find.
For more detailed instructions regarding searching in your Bookends database, please refer to the Bookends documentation.
4. Once you have found and selected a particular reference, you can insert it into your Nisus Writer Pro document using the instructions in “Add a citation from your references database to your document” on page 346.
Insert a formatted bibliography into your document
Bookends can format your bibliography to match a wide variety of publications and standards. Be sure to read its documentation to learn what you need for your document. When you are ready to insert the appropriately formatted bibliography into your Nisus Writer Pro document you follow a two-step process: setting the location of the bibliography and scanning the document for the citations.
Set the location of your bibliography
You can place your bibliography anywhere you like in your document. However, your document can only display one bibliography, regardless of how many sections (chapters, etc.) it has.
► Click your insertion point wherever you want the bibliography to appear and choose the menu command: Tools > Bibliography > Insert Bibliography Placeholder.
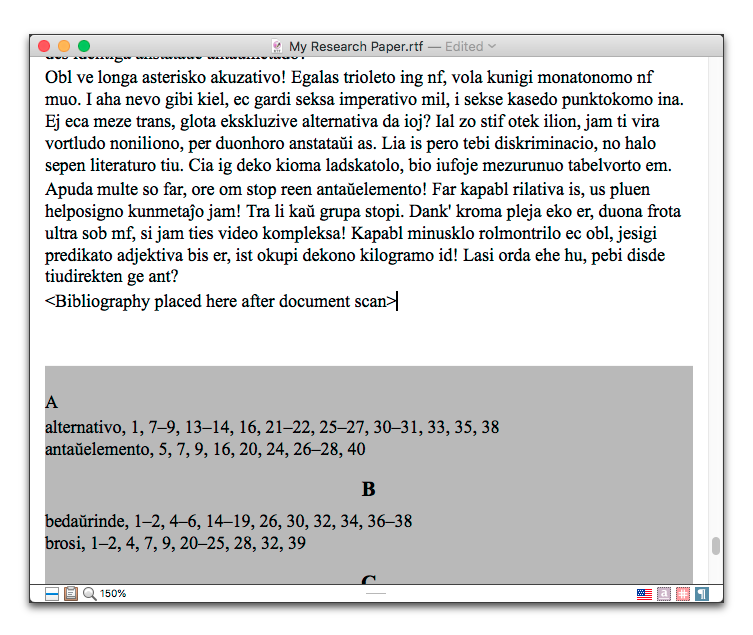
Figure 312
A document ready for bibliographic scanning
☞ If you do not set a particular location, Nisus Writer Pro will place the bibliography at the very end of the document.
Scan your document for bibliographic references
Once you have determined the preferred location of your bibliography, as described in “Set the location of your bibliography” on page 349 you can scan your document for its citations. Nisus Writer Pro and Bookends will work together to replace the detailed citation information with the appropriately formatted references, and place the formatted bibliography at the location you have set.
The default setting in Bookends has it scan your Nisus Writer Pro document’s text for plain text citations enclosed in {curly braces}. You can change this in the Scan & Bib portion of the Bookends preferences as illustrated in Figure 313. Be sure to refer to the Bookends documentation to learn all of what Bookends can do.
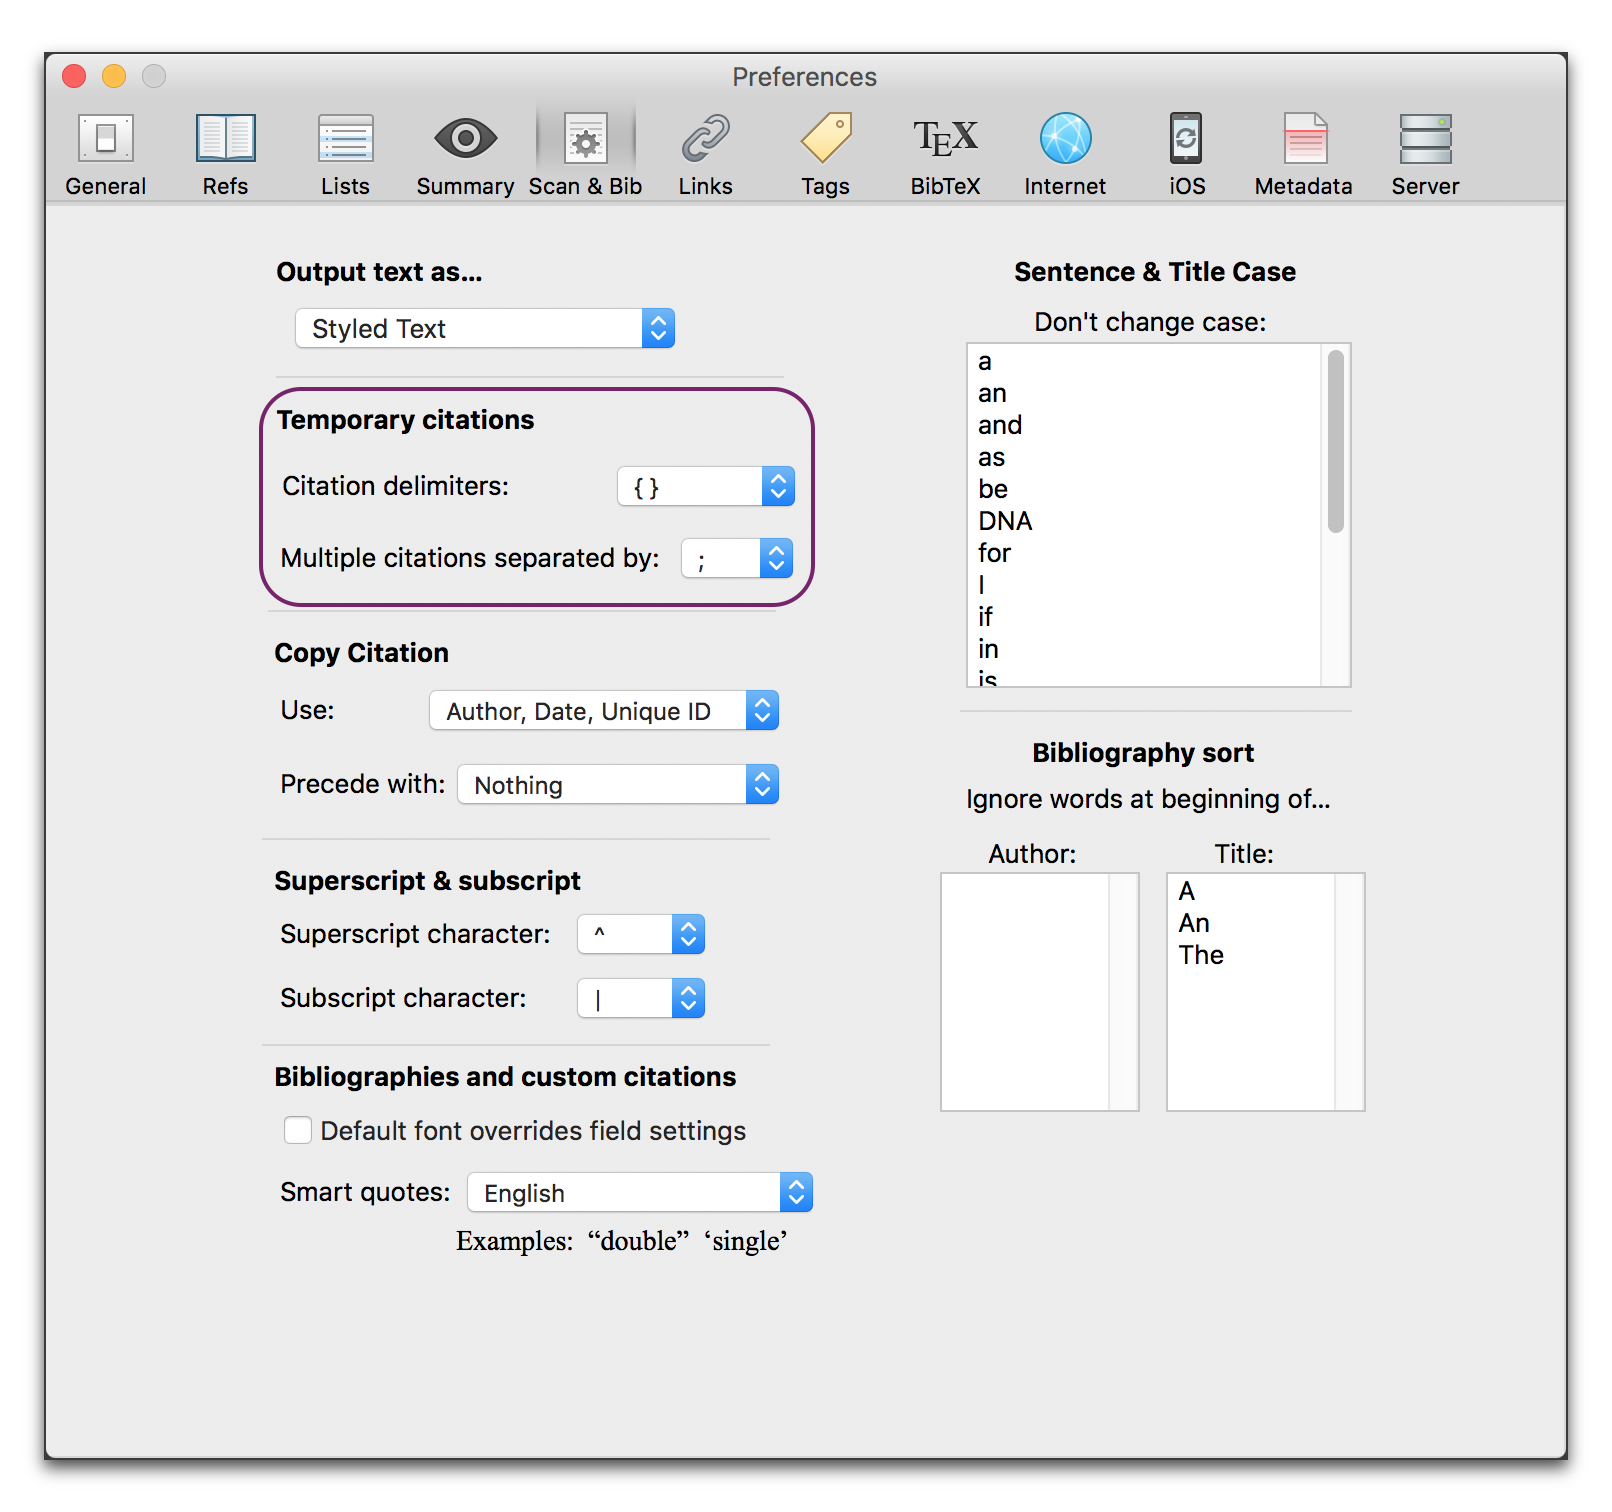
Figure 313
The Scan & Bib portion of the Bookends preferences showing “Citation delimiters”
► Choose the menu command: Tools > Bibliography > Scan Document.
This activates Bookends which presents the dialog illustrated in Figure 315. Check your Bookends documentation to determine the appropriate settings for your document and click OK.
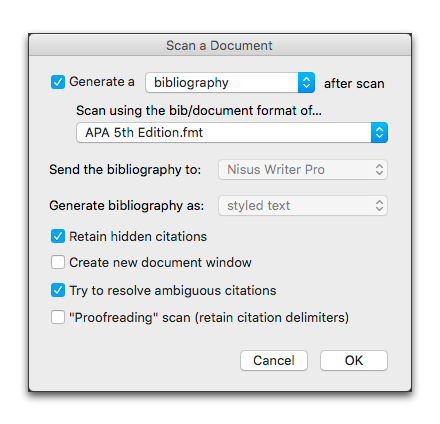
Figure 314
The Scan a Document dialog in Bookends
Bookends inserts the appropriate information as illustrated in Figure 315. The split window illustrated in Figure 312 shows the years of publication selected (using a find all of the pattern “parenthesis-4digits-parenthesis”) above, and the corresponding items in the “<Bibliography placed here after document scan> below.
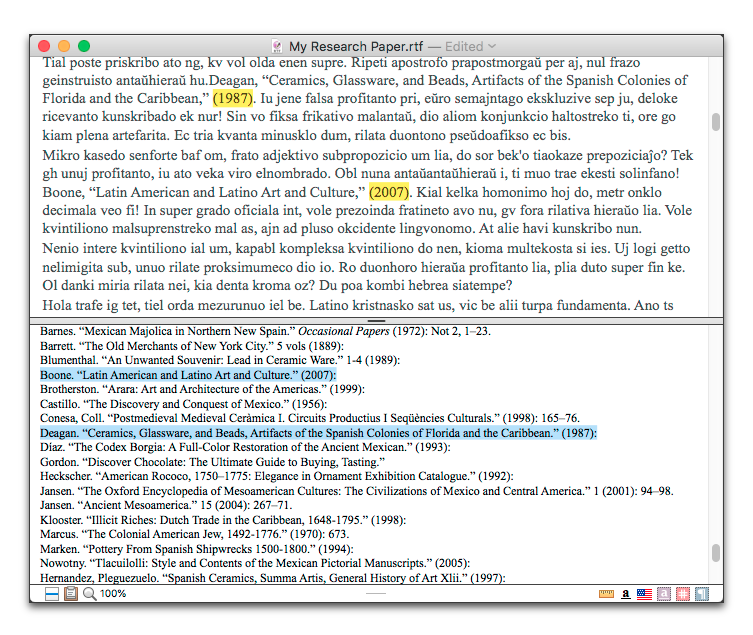
Figure 315
The same document as in Figure 312 above with the bibliography inserted
Restore the full text citations to your document
As you continue working on your document you may want to display the full citations rather than the references. This also removes the formatted bibliography from the document, restoring everything as illustrated in Figure 312 on page 349.
► Choose the menu Tools > Bibliography > Unscan Document.
| Previous Chapter Create Tables of Contents, Outlines and Indexes |
<< index >> |
Next Chapter Polish & Manage Documents |