
NOTE: this software is for Classic Mac OS (eg: OS 9) and cannot be used on Mac OS X.
Nisus Writer Classic is no longer for sale. This page is only for archival purposes.
Keep Those Fingers On The Keyboard
On our previous excursion we explored how to add keyboard shortcuts to Nisus Writer's commands. Nisus Writer's keyboard shortcuts can call a variety of commands outside of Nisus Writer directly. This works for all the commands on the top level of the Apple Menu. This technique, however, does not work with command deeper inside the Apple Menu's submenus (when you choose the command inside the Keyboard Shortcuts portion of the Preferences dialog the command calls that application/file/etc.). A similar behavior occurs if you call the commands of the Keyboard menu or the Applications menu. However, because Nisus Writer's macros can call commands beyond Nisus Writer, you can use Nisus Writer to access these latter two menus.
Beware, that if you do call one of the items on the Apple Menu or Application Menu you end up outside of Nisus Writer. However, you can also call any of the Keyboard input methods on the Keyboard menu and this keeps you inside of Nisus Writer, ready to type in that language.
The process is really quite simple.
To assign your own keyboard shortcuts to menu commands beyond Nisus Writer:
Remember, if you're calling a command on the Apple menu,
you can skip this "macro creating" step.
We have noticed that (for some unknown reason)
you cannot always call an Apple menu
item directly from the Nisus Writer Keyboard Shortcuts...
"your milage may vary."
Creating the macros:
 Gear or Cogwheel menu.
Now, for assigning the shortcuts:
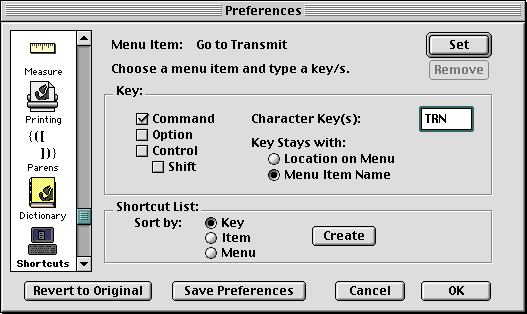
It's that easy.
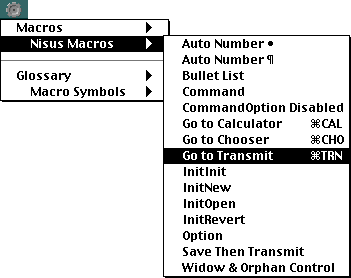
Those paying attention should be able to abstract from this lesson the ability to save a file on which you're working and automatically transfer to Transmit ready to move that file to your server in two simple keystrokes.
In addition, we have a page for you linguiphiles out there: keyboard switching via the keyboard!
To the FAQ (Frequently Asked Questions).
To the Tips Table of Contents.