
Nisus Writer Pro enables you to automatically save files and then easily find and open your files using the Document Manager.
If you are new to Nisus Writer Pro or Nisus Writer Express (and have never used the Document Manager in either of these applications) the first time you display the Document Manager it will appear empty as illustrated in Figure 65.
The Document Manager window resembles an iPhoto or iTunes window as illustrated in Figure 51. Various groups appear in the sidebar on the left, a list of files in those groups display in the main pane. A search field is available in the upper right corner of the window. At the bottom, instead of “Cover Flow” the Document Manager presents a preview of the contents of your document.
Figure 65
An empty, unused, Document Manager
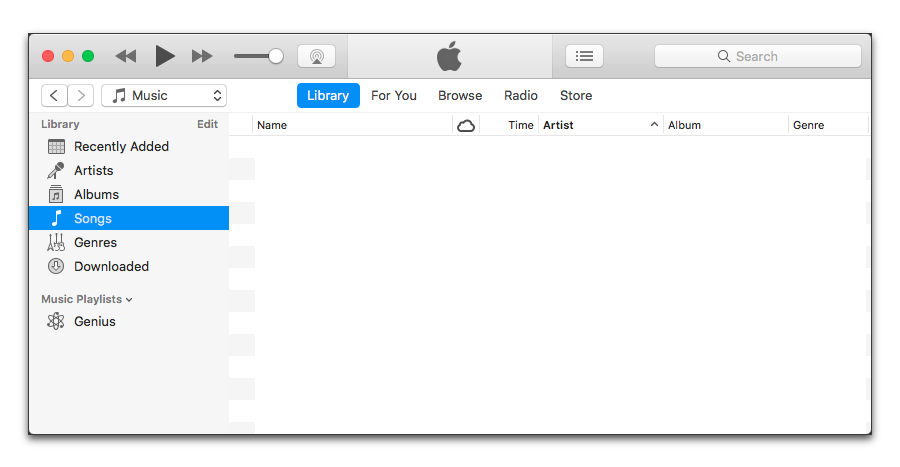
Figure 66
An empty, unused, iTunes
The Document Manager can help you find and open a file you are working on in much same way as iTunes can help you find a song you want to listen to. However, instead of taking you to Apple’s iTunes Music Store, the Document Manager shows you (at least, and initially) a list of the contents of the Nisus Documents folder inside the Documents folder in your Home directory (as illustrated in Figure 52), in much the same way as iTunes displays a list of all the music files you have in your iTunes Music folder.
► Choose Document Manager from the Window menu.
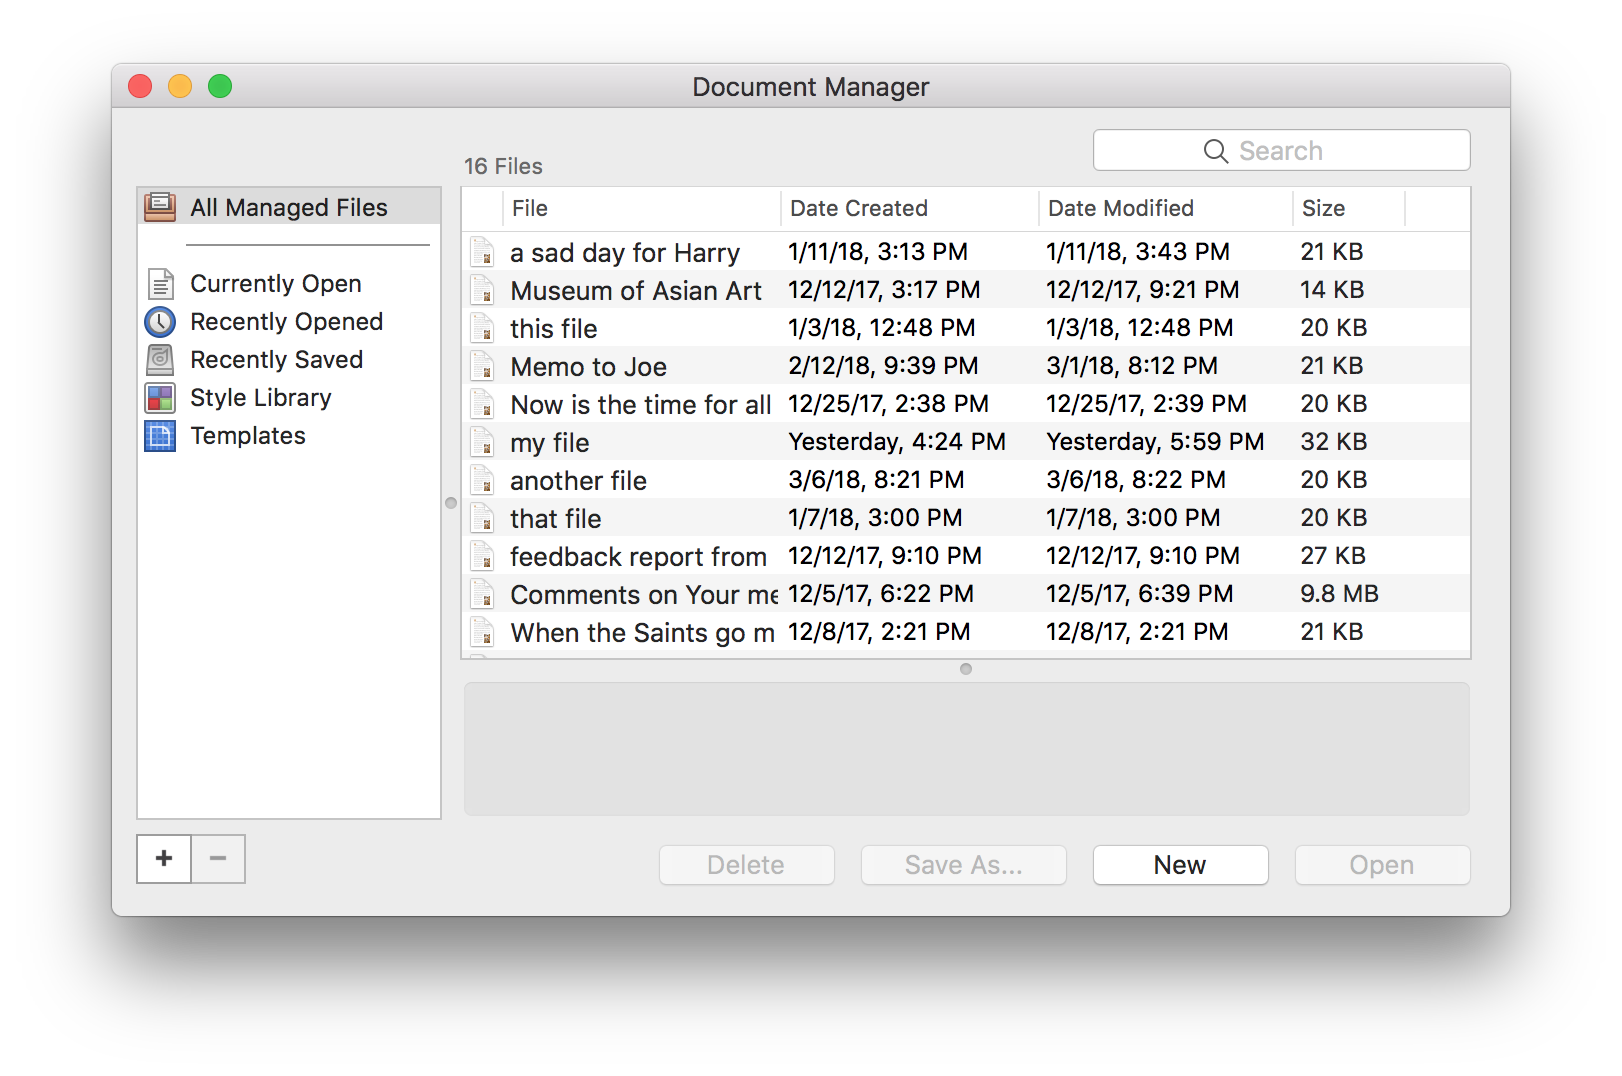
Figure 67
The Document Manager showing All Managed Files
You can display and sort your files by a wide variety of categories. Initially, those available are
• Icon (the icon represents simply the icon of the file as it appears in the Finder)
• Date Created (as illustrated in Figure 71)
You can resize the columns. You can also rearrange their sequence by dragging their headings around in the window.
The Doc Manager preferences, illustrated in Figure 53, show that you can also sort by:
• Folder (the folder in which the file resides)
• Path (the full path to the file)
• Kind (this is “File Type”, i.e. rtf, pdf, tiff, etc.)
• Last Accessed (The Mac OS “accesses” files in odd ways and at odd times. You may want to test this option before using it as a category for sorting.)
► Press ⇥ to move the focus from the File List to the Group List (and then to edit the name of a selected Group List item).
► Choose the menu command: Edit > Find > Show Find… to open the Advanced Search… capability in the Document Manager, explained beginning on page 91 through page 95. (This does not open the Find & Replace window.)
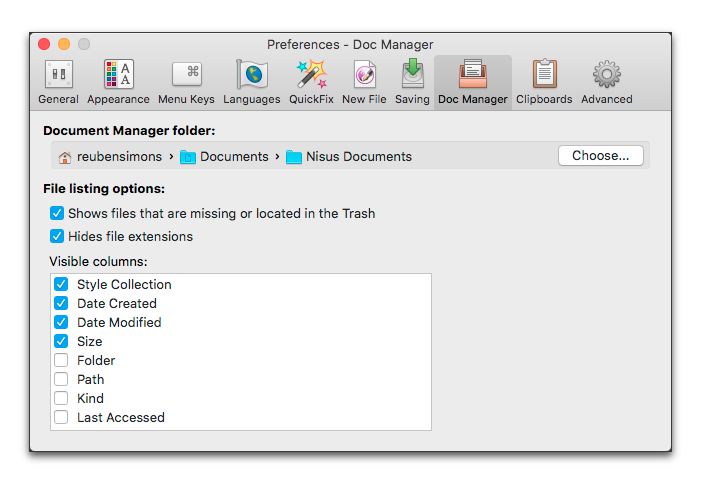
Figure 68
The Doc Manager preferences
Set up the Document Manager using the Doc Manager preferences
Determine the location of your Document Manager folder
As illustrated in Figure 68, the “default” location of the Document Manager folder is the Nisus Documents folder inside the user’s Documents folder. You can set any location you want. In fact, you can set the Shared folder on the computer so that other users each have access to the files saved and managed by the Document Manager.
1. Choose the menu command: Nisus Writer Pro > Preferences > Doc Manager.
3. Navigate to the location you want to use as the Document Manager folder and select it.
Choose file listing options for the Document Manager window
As explained at the very end of this section, on page 100, you can choose to show or hide any files that are missing from the Document Manager window. Whether or not they display by default you can set in the Doc Manager preferences.
1. Choose the menu command: Nisus Writer Pro > Preferences > Doc Manager at the top of the Preferences window.
2. Check Shows files that are missing or located in the Trash.
Choose whether or not to show file extensions in the Document Manager window
As explained at the very end of this section, on page 100, you can choose to show or hide any file extensions (this is “File Type”, i.e. rtf, pdf, tiff, etc.) in the file listing of the Document Manager window.
1. Choose the menu command: Nisus Writer Pro > Preferences > Doc Manager at the top of the Preferences window.
2. Check or uncheck Hides file extensions (as desired).
Work with your files so that the Document Manager can help you manage them
☞ The heading of this section is worded oddly because there are three distinct verbs that we use to “get” files into the Document Manager. Each one has a slightly different function and result. These verbs are:
• Save
• Move
• Add
There are many ways that you can get your files into the Document Manager.
Save all your files automatically to the Document Manager
Perhaps the easiest is simply to use the Document Manager as a your default Save as location as explained in “Autosave new files without interruption” on page 74.
► Set your Saving preferences to Keep all new documents without asking me.
Each and every file you create gets saved to the Document Manager unless you purposely and consciously save the file elsewhere.
Save your file (as needed/desired) to the Document Manager
You may be working on a new, untitled file, or on an existing file that is saved in some other folder on your hard drive. You can save this file in the Document Manager without Nisus Writer Pro interrupting your work, and asking for a name, or where to keep the file with the Save as dialog. This can also keep the original copy of the file in its existing location.
► Choose the menu command: File > Save in Document Manager.
Nisus Writer Pro automatically gives your file a name and saves the file in the top level of the folder you have designated as your Document Manager folder. This is the same as if you had chosen the menu command: Save in Document Manager > All Managed Files.
The Save in Document Manager command has a submenu with a number of commands. You can choose any of these commands to save the file to either the
This makes any styles in the saved file available to any other files. Maintaining a Style Library is explained in detail beginning on page 154.
This makes the entire file available as a template (“.dot”). You can then open a copy of this file, with all its current content, and it will open as Untitled. You can learn more about the Nisus New File and other template documents in the section “Understanding Template (Stationery) Documents” beginning on page 586.
• Custom Group or Folder Group
If you have set up any custom or folder groups, as explained in “Create special groups of files”, on page 89, you can move your file to any of those.
Save your file to the Document Manager with a new name
You may be working on a new, untitled file, or on an existing file that is saved in some other folder on your hard drive. You can save this file in the Document Manager and give it a new name (if you want). This will keep the original copy of the file in its existing location.
► Choose the menu command: File > Save As in Document Manager….
Nisus Writer Pro opens the Save as dialog at the top level of the folder you have designated as your Document Manager folder ready for you to name the file. It suggests a name based on the first few words of the document.
The Save As in Document Manager… command has a submenu with a number of commands. You can choose any of these commands to save the file to either the
• Style Library
This makes any styles in the saved file available to any other files. Maintaining a Style Library is explained in detail beginning on page 154.
• Templates
This makes the entire file available as a template (“.dot”). You can then open a copy of this file, with all its current content, and it will open as Untitled. You can learn more about the Nisus New File and other template documents in the section “Understanding Template (Stationery) Documents” beginning on page 586
• Custom Group or Folder Group
If you have set up any custom or folder groups, as explained in “Create special groups of files”, on page 89, you can save a copy of your file to any of those.
Move your file to the Document Manager
You may have a file in one or another folder on your hard drive. You can move this file into the Document Manager. The original file will no longer appear in its former location. You cannot use this command on files that reside on external drives, as this would not move, but copy them.
► Choose the menu command: File > Move to Document Manager.
Nisus Writer Pro moves the active file to the top level of the folder you have designated as your Document Manager folder.
The Move to Document Manager command has a submenu. You can choose to move the file to the All Managed Files group or the Style Library or a Folder Group
• Style Library
This makes any styles in the moved file available to any other files. Maintaining a Style Library is explained in detail beginning on page 154.
• Folder Group
If you have set up any custom or folder groups, as explained in “Create special groups of files”, on page 89, you can save your file to any of those.
1. Open the Document Manager.
2. Select either the All Managed Files or the Style Library group or a Folder Group in the sidebar on the left.
3. Press ⌃ and click your mouse or trackpad inside the Document Manager window as illustrated in Figure 71.
4. Choose Move Files to Group… from the contextual menu that appears.
5. Select the files you want to move to the Document Manager from the variant of the Open dialog that appears.
☞ This action actually “physically moves” the active document from its current location on disk to the designated folder where it can be managed by the Document Manager as illustrated on page 86 in Figure 69 (before) and Figure 70 (after).
.png)
Figure 69
Moving a file to the Document Manager (before)
.png)
Figure 70
Moving a file to the Document Manager (after)
Add your file to the Document Manager
You may have a file in one or another folder on your hard drive. You can add an alias to this file into the Document Manager. The original continues to exist in its former location.
► Choose the menu command: File > Add to Document Manager.
► Drag a file from any folder in the Finder into the Document Manager window.
Nisus Writer Pro creates an alias to the file on the top level of the folder you have designated as your Document Manager folder, or into the custom group you may have added it.
The Add to Document Manager command has a submenu. You can choose to add an alias for the active file to the All Managed Files group or the Style Library to a Folder Group or to a Custom Group.
• Style Library
This makes any styles in the moved file available to any other files. Maintaining a Style Library is explained in detail beginning on page 154.
• Templates
This makes the entire file available as a template (“.dot”). You can then open a copy of this file, with all its current content, and it will open as Untitled. You can learn more about the Nisus New File and other template documents in the section “Understanding Template (Stationery) Documents” beginning on page 586.
• Custom Group or Folder Group
If you have set up any custom or folder groups, as explained in “Create special groups of files”, on page 89, you can add your file to any of those.
1. Open the Document Manager.
2. Select either the All Managed Files, the Templates group a Folder Group or a Custom Group in the sidebar on the left.
3. Press ⌃ and click your mouse or trackpad inside the Document Manager window as illustrated in Figure 71.
4. Choose Add Files to Group… from the contextual menu that appears.
5. Select the files you want to add to the Document Manager from the variant of the Open dialog that appears.
Display and sort files managed by the Document Manager
Once you have saved, moved and/or added your files to the Document Manager, you can display, sort and group them to make your files easier to find, open and edit. In addition to the categories you can sort by, listed in the section “Display the Document Manager” beginning on page 82, the Document Manager lists a set of default groups in the sidebar on the left, as illustrated in Figure 71.
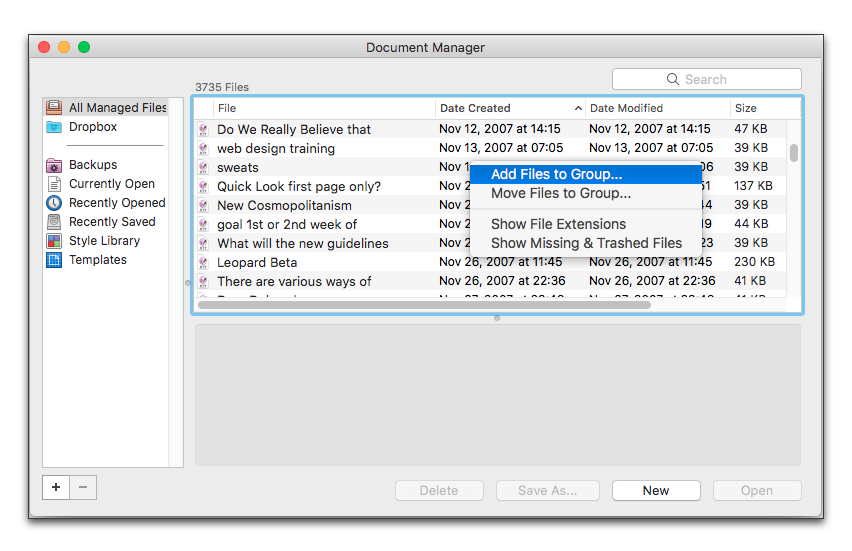
Figure 71
The Document Manager sorted by date created with the contextual menu options showing
• All Managed Files
This refers to any file in any of the Document Manager sub-groups, whether they are resident in the folder designated as the Document Manager folder or if they only have aliases to those files.
This group acts as a file sponge. It includes:
◦ All files physically residing in the Document Manager folder.
◦ Any file that has been saved to the Document Manager folder, even if it has been moved somewhere else in the meantime.
◦ All files in non-special groups. Special groups are the built-in groups like “Currently Open”, so non-special groups are those custom or folder-backed groups you may have added, for example: “Current Projects”.
• Currently Open
As it implies, this lists any and all files opened by Nisus Writer Pro, regardless of where the file might be stored on disk.
• Recently Opened
As with Currently Open, this lists any and all files opened by Nisus Writer Pro, regardless of where the file might be stored on disk. The number of files listed here is determined by the number you set in the General preferences of Nisus Writer Pro: Keep “x” documents in Open Recent menu.
• Recently Saved
Once again, as with Currently Open and Recently Opened, Recently Saved lists and all files saved by Nisus Writer Pro regardless of where the file might be stored on local or external hard drives, nor does it matter whether the file was saved as a Nisus Writer Pro .rtf file or in some other proprietary format. The number of files listed here is determined by the number you set in the General preferences of Nisus Writer Pro: Keep “x” documents in Open Recent menu.
• Style Library
Lists all the files you have saved to the Style Library making any styles in them available to use in other documents. The Style Library is explained in detail in the section “Maintain a Style Library” beginning on page 154.
• Templates
Lists all the files you have saved to the Templates group, making any of those files available to open with all their existing content and formatting as Untitled. You can learn more about the Nisus New File and other template documents in the section “Understanding Template (Stationery) Documents” beginning on page 586.
• Backups
If you set your Saving preferences to Save duplicate copy of each file to another location, Nisus Writer Pro adds a Backups folder group to the groups available in the sidebar on the left of the Document Manager, as is visible in the background of Figure 72.
Create special groups of files
You may have a special hobby with various files associated with it scattered around your hard drive, or collected in the All Managed Files group of the Document Manager. Perhaps you are an amateur chef. You have recipes in one folder, lists of and receipts for tools you have or wish to purchase in another folder, locations of farmers’ markets within a 20 mile radius of your home in a third folder. These folders and their files might even be on different hard drives or with the recipes saved in the computer’s shared folder so various users have access to them. Or, you may have files spread throughout your hard drive that deal with various correspondence, but each has a hint that it is a “letter”. The Document Manager can help you keep these “together”.
A Custom Group is a way to keep track of diverse files in different locations on your hard drive(s) which may be related to each other in a special way.
1. Choose the menu command: Window > Document Manager.
2. Click the Plus (+) button in the lower left corner of the Document Manager window.
3. In the dialog that appears, click Add Custom Group
4. Type the name you want to use in the Group Name field as illustrated in Figure 72.
☞ As explained in the dialog, a Custom Group will display any files that you add to it. You cannot move files to a Custom Group, you can only add (aliases to these) files. The Custom Group you create keeps track of the files added to it, regardless of where the files may be (moved) on your hard drive(s).
☞ Because only an alias to the file appears in the Custom Group, the same file can appear in more than one Custom Group.

Figure 72
Adding a custom group to the Document Manager
1. Choose the menu command: Window > Document Manager.
2. Click the + button in the lower left corner of the Document Manager window.
3. In the dialog that appears, click Add Folder Group
4. Click Choose… and navigate to and select the folder you want to add.
5. Click Choose Folder in the variant of the Open dialog that appears
The path to the folder will appear in the text field in the dialog as illustrated in Figure 58.
☞ As explained in the dialog, a Folder Group will display only those files that are currently in the designated folder. You can move files to a Folder Group, you can also add (aliases to these) files. The Folder Group tracks only those files (and aliases) actually in the designated folder.
☞ Because you can add an alias to a Folder Group, the same file can appear in more than one Folder Group, but only if it is added, not moved.
One useful Folder Group on a computer used by different people would be the Shared folder. That way all users could keep their files available to each other.
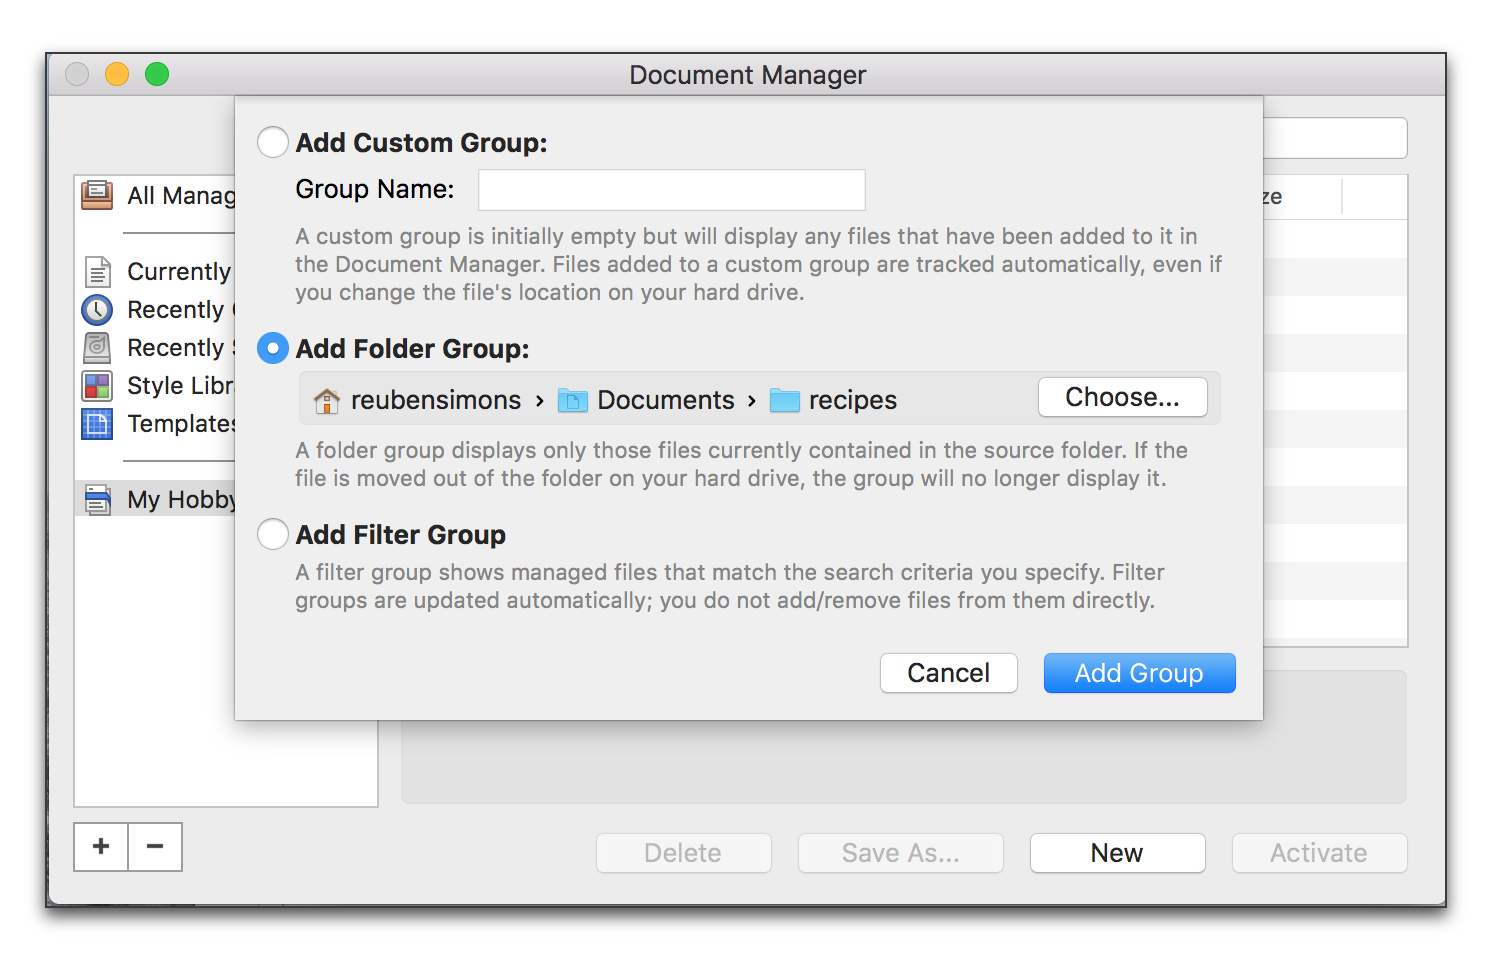
Figure 73
Adding a folder group to the Document Manager
Nisus Writer Pro enables you to create a variety of filter groups using various criteria.
1. Choose the menu command: Window > Document Manager.
2. Click the + “Plus” button in the lower left corner of the Document Manager window.
3. In the dialog that appears, click Add Filter Group.
The Document Manager window changes to display additional Advanced Search criteria as illustrated in Figure 59.
Using "double quotes" around a search phrase will only match content that contains exactly that quoted phrase. If you do not surround the phrase with “double quotes” the words in the phrase are always split at the white spaces before any matching is done.
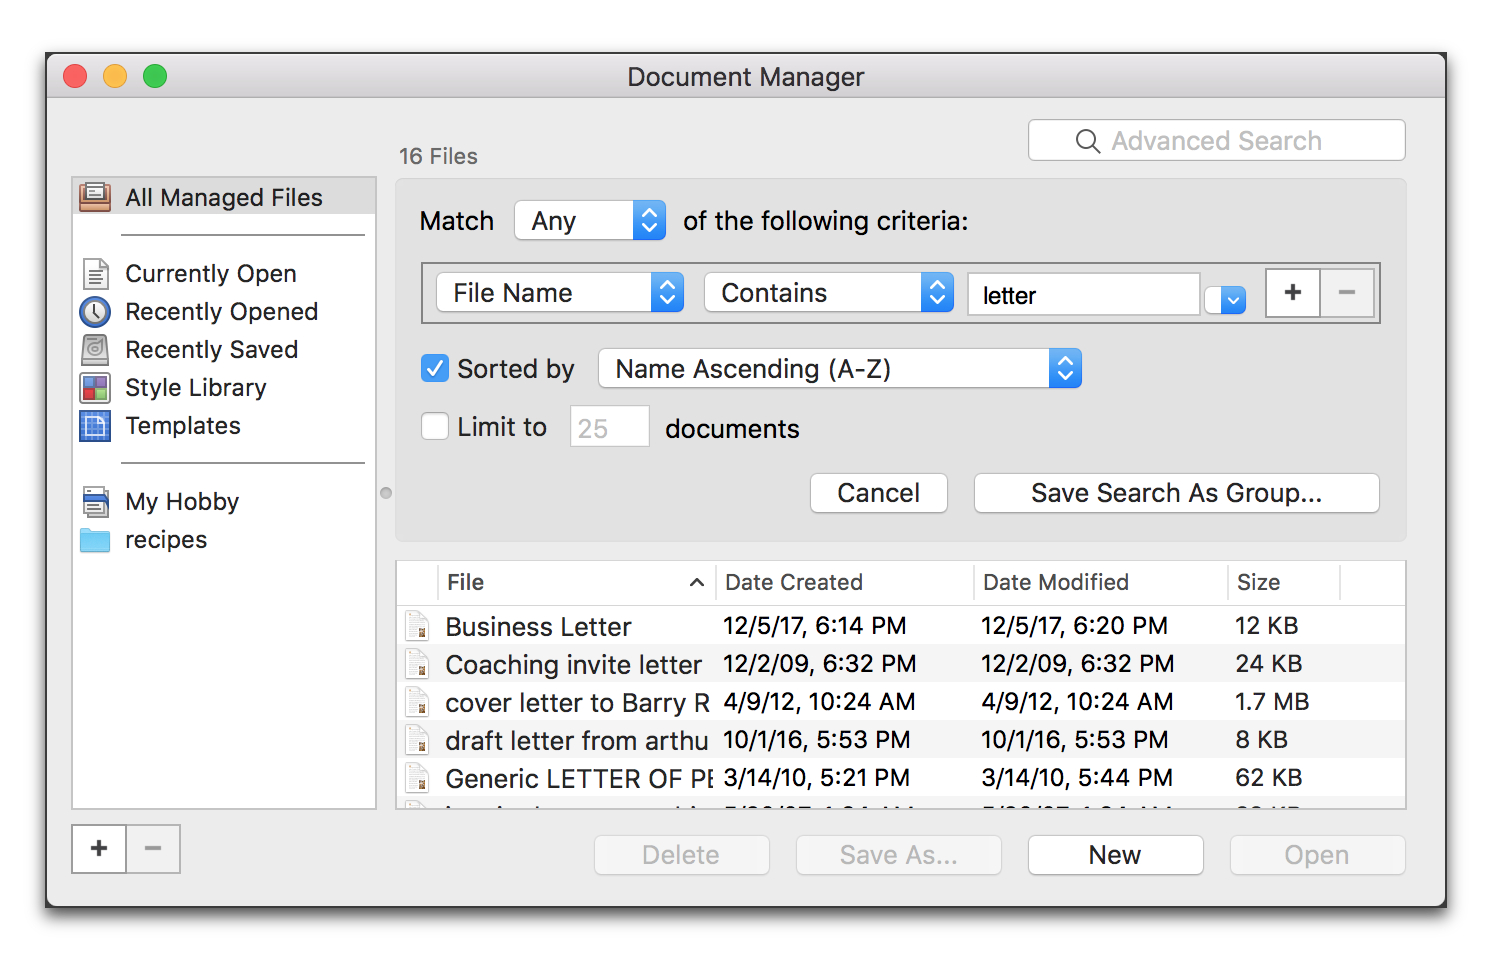
Figure 74
Adding a filter group using a file name criterion to the Document Manager
5. From the Match All/Any of the following criteria pop-up menu you can choose from either:
6. Choose the criteria you want from the two pop-up menus available.
The first pop-up menu offers:
◦ Content
The Document Manager uses the Mac system Spotlight tool to search file content. Files not indexed by Spotlight will not have their content searched.
◦ Author
This is based on what you have entered in the dialog available when choosing the menu command: File > Properties….
◦ Keywords
This is based on what you have entered in the dialog available when choosing the menu command: File > Properties….
◦ Document Properties
This is based on what you have entered in the dialog available when choosing the menu command: File > Properties….
The second pop-up menu offers:
◦ Does Not Contain (works on any text search: file name, author, content, etc.)
7. Enter the term you want to search for in the text field provided.
8. If there is more than one possible term separate them and designate whether the search should be for one OR the other, or one AND the other, using the little arrow pop-up menu on the right edge of the text field, as illustrated in Figure 76 on page 94.
9. If you have additional sets of criteria you want to use, click the Plus (+) button on the right side and continue from step 6 as illustrated in Figure 76.
☞ You can later remove any of these criteria by clicking the corresponding the Minus (-) button.
10. You can choose to force Nisus Writer Pro to sort the resulting list. The options available are:
11. You can limit the resulting list to a number you designate in the Limit to x documents portion of the dialog.
12. When you are satisfied with your selections, click Save Search As Group….
13. Give the search group a name in the sheet that appears, as illustrated in Figure 75.
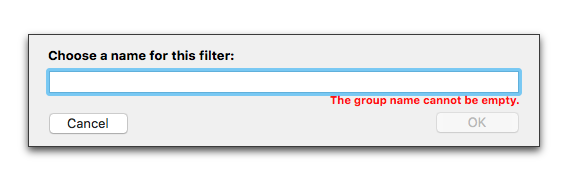
Figure 75
Naming a Document Manager search filter
Your newly named search group appears in the sidebar on the left of the Document Manager identified by name and a magnifying glass indicating its type of group as illustrated in Figure 76.
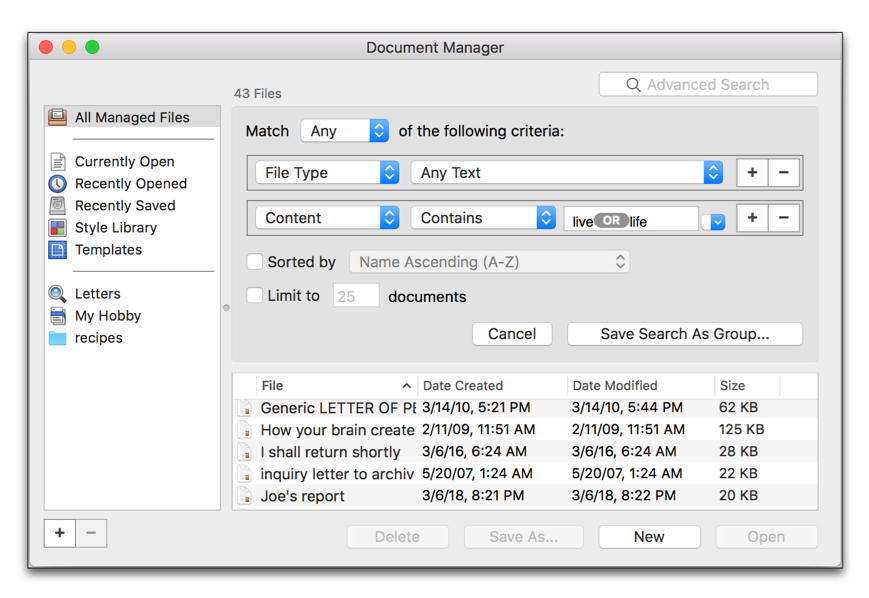
Figure 76
Adding a filter group using content criteria to the Document Manager
► Choose the menu command: Window > Document Manager and follow steps 2 through 14. Use Figure 77 as a model.
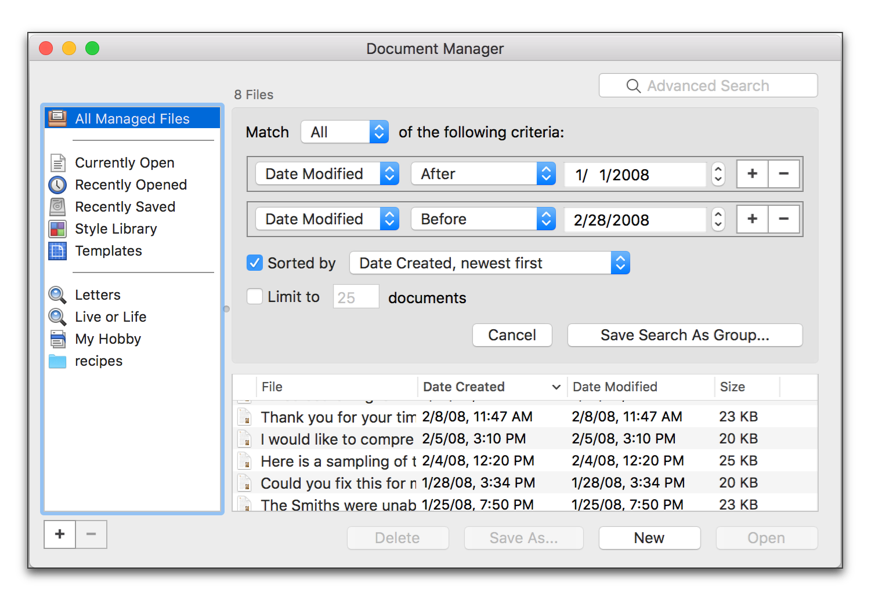
Figure 77
Adding a filter group using a date criterion to the Document Manager
Remove a group from the Document Manager
A time may come when you no longer need a particular group. You can remove any group from the Document Manager except for All Managed Files.
1. Select the filter group’s name in the sidebar on the left of the Document Manager.
2. press ⌃ and click the selected group’s name.
3. Choose Remove Group… from the contextual menu that appears.
An alert appears, illustrated in Figure 63, which asks if you are certain you want to remove the filter group:
No files will be deleted from your hard drive; they will simply no longer be accessible through the removed Document Manager group. This operation is not undoable.
4. Continue with caution and choose either Cancel or Remove.
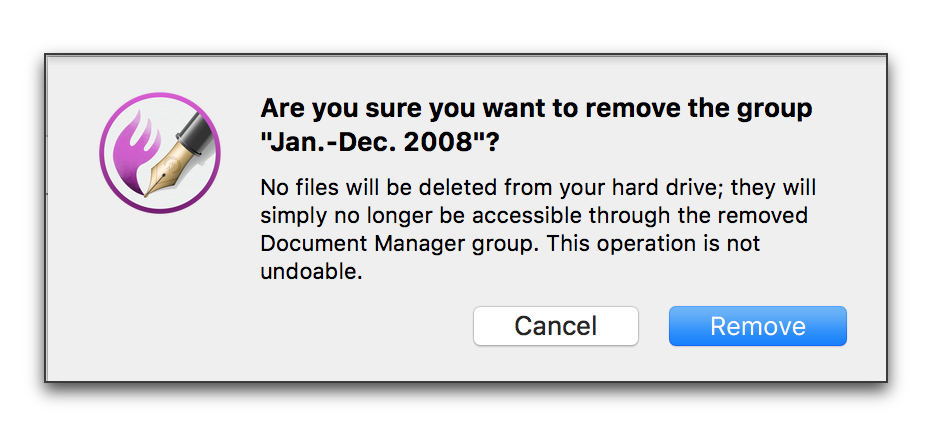
Figure 78
The remove filter group alert
Rename a group in the Document Manager
You may decide that you want to change the name of the groups you have in the sidebar on the left of the Document Manager.
1. Either:
► Double-click the name of the group in the sidebar on the left of the Document Manager, or
► Select a filter group’s name and right-click in the sidebar on the left of the Document Manager and choose Rename from the contextual menu that appears.
2. Type the text you want.
3. Press ⏎ or ⌤.
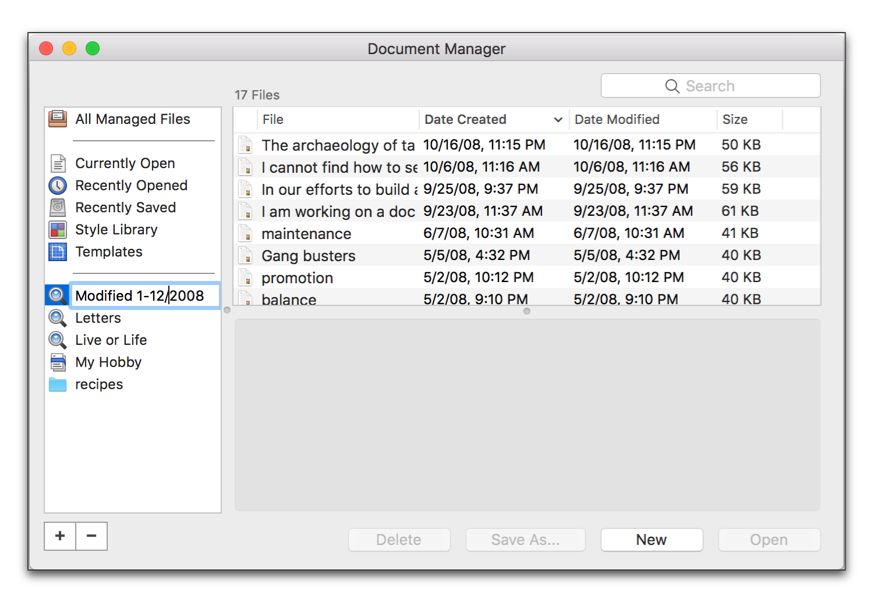
Figure 79
Editing the name of a group in the Document Manager
Find a particular file or files among those listed in the Document Manager
Once you have created a particular listing of files, you still might want to narrow the list further to find the precise file you need to open.
► Type the search term you need in the field in the upper right corner of the Document Manager window.
Note, however that there are, even here, additional options available.
◦ Filename
Finds the file with the search term only if the term appears in the name of the file.
◦ Document Content
Finds the file with the search term only if the term appears in the content of the file, as illustrated in Figure 80. The Document Manager uses the Mac system Spotlight tool to search file content. Files not indexed by Spotlight will not have their content searched.
◦ Either
Finds the file with the search term if it appears in the name or in the content of the file
◦ Advanced Search…
Opens the Document Manager window to display the advanced search capabilities illustrated in Figure 74, Figure 76 and Figure 77. When you choose Advanced Search… Nisus Writer Pro automatically selects all the groups in the sidebar on the left. You can de-select those you do not wish to search in.
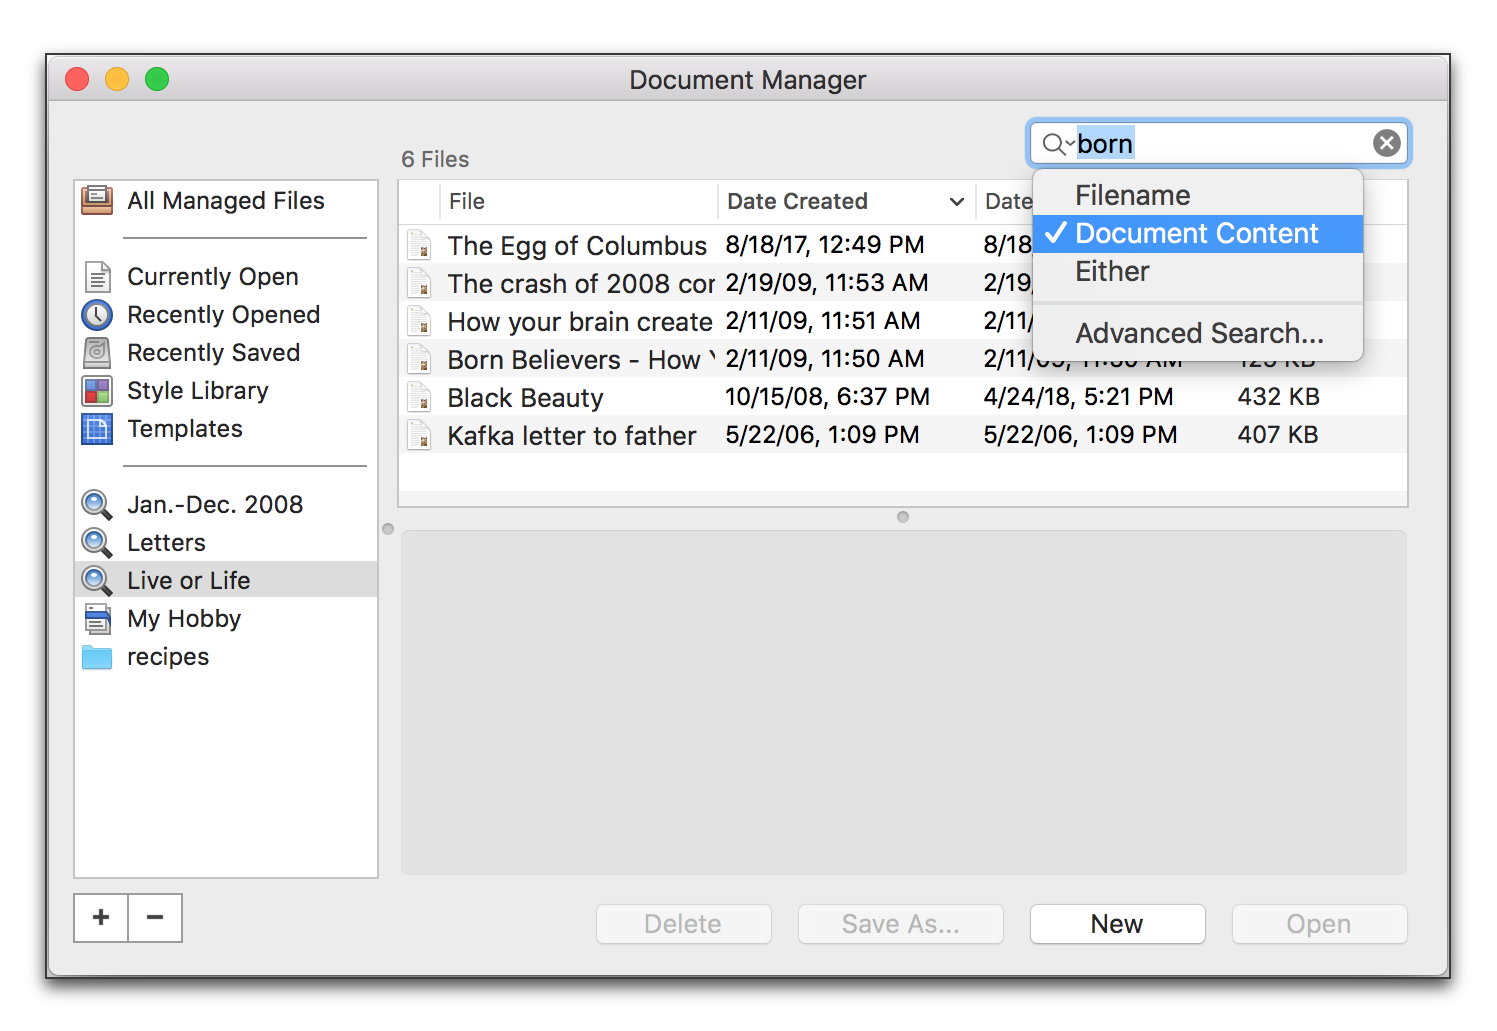
Figure 80
Searching in a filter group of the Document Manager for specific text
► Select any file in the Nisus Writer Pro Document Manager.
The first few lines of text appear in the pane at the bottom of the window
If the file is a graphic file or a PDF, the preview displays the contents (or in the case of the PDF, the first page) of the file as illustrated in Figure 82.
☞ If you click Open, Nisus Writer Pro will open a graphic file and display the image as a character in a newly created Nisus Writer Pro file. It will open a PDF file and display the first page of that file as an image. Or, if you choose Open in Default Application from the contextual menu, Nisus Writer Pro will open the file in the originating application (as if you had double-clicked the file in the Finder).
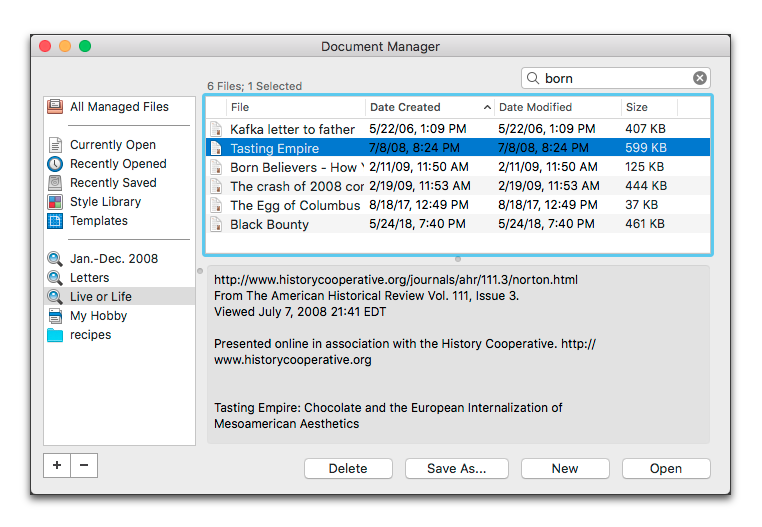
Figure 81
The Preview portion displays the first few lines of text
☞ Note that the Document Manager displays the total number of files and the selected number of files in the upper left area above the file list as illustrated in Figure 81 along with the first few lines of text of the first of any selected documents.
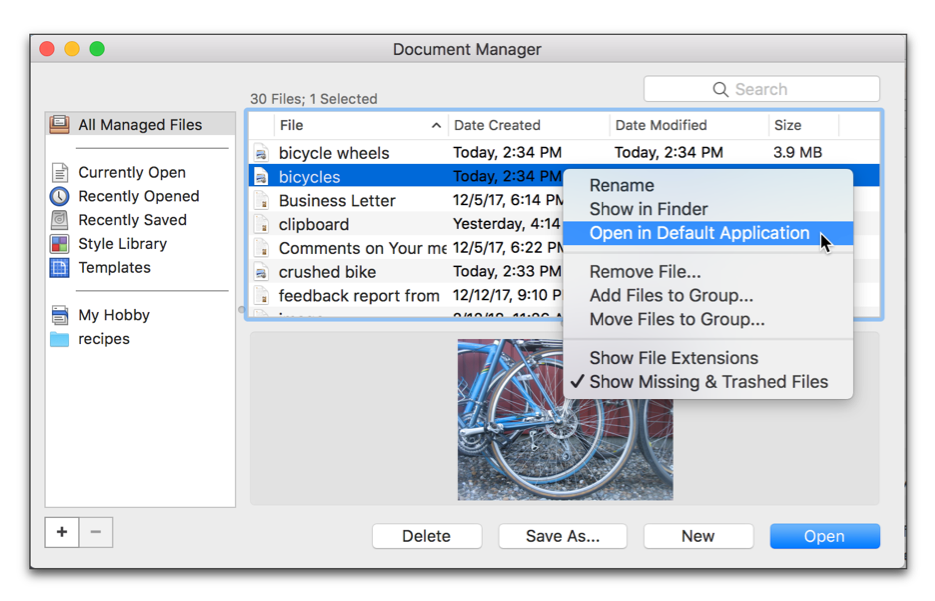
Figure 82
The Preview portion of the Document Manager with a graphic file selected and the contextual menu showing
Open a file using the Document Manager
1. Select any file in the Nisus Writer Pro Document Manager.
2. Either:
double-click the file in the Document Manager window
or
click Open at the bottom right corner of the Document Manager window.
If you press ⌥ as you do either of the above actions, Nisus Writer Pro closes the Document Manager window as it opens the file.
Additional features of the Document Manager
Using the buttons of the Document Manager window
In addition to the Open button at the bottom of the Document Manager window:
► You can also use the available buttons to
• Save a file under a different name and/or in a different location by clicking Save As….
► Select any item(s) in the Document Manager and choose the menu command: Edit > Copy to put the path to the file on the Clipboard.
► Select any item(s) in the Document Manager and choose the menu command: Edit > Copy > Copy Text Only to put whatever details of the file you have set the Document Manager to display on the Clipboard.
► Select a file and you can then select and copy the “preview text”.
► If a file is selected in the Document Manager and it is already open, the Open button reads Activate instead. If multiple files are selected and even one of them is not already open, the button reads Open and not Activate.
Using the contextual menus of the Document Manager window
Depending on what you have selected and what is active a number of commands appear on a contextual menu when clicking ⌃ and the mouse or trackpad in the Document Manager window:
► When clicking in the sidebar on the left of (groups), you can:
• Rename a selected group or filter.
• if you select any particular group you can choose Show in Finder to display that folder in the Finder.
• if you select the All Managed Files group or the Style Library group you can Move Files to Group….
• if you select the All Managed Files group or any group other than the Style Library group you can Add Files to Group….
• if you select any particular group(s) you can Remove Group….
☞ No files will be deleted from your hard drive; they will simply no longer be accessible through the removed Document Manager groups. This operation is not undoable.
► When clicking in the right, File List pane you can…
• depending on which group of filter is listed, and,
• whether or not you select a file, or,
• click in an area where no file is listed:
◦ Show in Finder a selected file.
◦ Open in Default Application a selected file.
◦ Remove File… (or files) selected from the Recently Opened and Recently Saved groups.
◦ if the displayed files are from the All Managed Files group or the Style Library group you can Move Files to Group….
◦ if the displayed files are from the All Managed Files group or any group other than the Style Library group you can Add Files to Group….
◦ you can Show File Extensions (or not).
◦ You can Show Missing & Trashed Files (or not).
☞ Missing and trashed files (and folders) have their own icon (a dotted box indicating nothing is there) and the files’ names appear in red.
| Previous Chapter Open Files |
<< index >> |
Next Chapter Format Text |