.png)
The QuickFix preference of Nisus Writer Pro can fix your typos as you type, it can turn on or off “Smart Punctuation” (including curly quotes) and it can automatically superscript ordinal numbers. Other common terms for QuickFix are text substitution, autocomplete and abbreviation expander.
In addition to these tools QuickFix enables you to create and use Glossary files.
Use the Glossary to save time. A glossary contains abbreviations with corresponding entries. When you expand an abbreviation, its entry replaces the abbreviation you typed. Glossary entries can contain both images and text.
You can have many different glossaries for different collections of abbreviations related to specific tasks. Note that in this context, “open” really means load (place its contents in the active memory of the computer).
QuickFix entries are per-language, they are stored along with all other Nisus Writer Pro language settings. You can edit this list in the Languages preferences.
Each of the following features is language specific. Whenever you apply a language style (as explained in the section “Write in Multiple Languages” which begins on page 40), Nisus Writer Pro uses the “abbreviations” appropriate for that language. Similarly whenever you make a change to one of the options in the top portion of the QuickFix preferences be sure you choose the language to which you want it to apply from the Language Sensitive QuickFix For: pop-up menu at the top of the dialog. The languages that appear in the pop-up menu are all those that appear in the Nisus Writer Pro Languages preference
Figure 501
The QuickFix preferences (lower portion controls the glossaries)
Enter smart quotes as you type
1. Choose the menu command: Nisus Writer Pro > Preferences > QuickFix.
2. Check Use Smart Punctuation (Including “curly” quotes).
Many different quotation symbols and styles are available. They are listed in alphabetical order. Choose the one you want from the pop-up menu.
|
“International” Curly Quotes |
|
|
“Style” |
sample |
|
„sample“ |
|
|
“sample” |
|
|
„sample“ |
|
|
«sample» |
|
|
« sample » |
|
|
”sample” |
|
|
„sample” |
|
|
”דוגמה“ |
|
|
”sample” |
|
|
“sample” |
|
|
“sample” |
|
Table 31
International Smart or “curly” Quotes
☞ You can change all quotes in the current selection to Smart Quotes or "Plain Quotes" by choosing Plain Quotes to Smart Quotes or Smart Quotes to Plain Quotes from the menu Edit > Transform Text.
Superscript ordinals as you type
1. Choose the menu command: Nisus Writer Pro > Preferences > QuickFix.
2. Check Superscript ordinals (1st, 2nd, etc.).
This changes “1st, 2nd, etc.” to “1st, 2nd, etc.” as you type.
Capitalize the first word of sentences as you type
1. Choose the menu command: Nisus Writer Pro > Preferences > QuickFix.
2. Check Fix capitalization at the start of sentences.
Any of these characters always signals the end of a sentence:
◦ line break
◦ exclamation point
◦ question mark
◦ horizontal ellipsis (U+2026)
◦ ideographic full stop (U+3002)
◦ halfwidth ideographic full stop (U+FF61)
1. Choose the menu command: Nisus Writer Pro > Preferences > QuickFix.
Add or subtract, or modify a “typo” that gets fixed
► Click the Plus (+) button at the bottom right of the field of typos and corrections to add a typo.
1. Type the “typo” in the left column.
2. Type the correction in the right column.
► Select a “typo” to remove from the correcting list and the Minus (-) button to remove it.
► To modify an existing correction,
1. Double-click the right (correction) portion of the item in the list.
2. Type what you want it to “correct” to.
3. Click your pointer elsewhere.
☞ Be careful, as pressing ⏎ causes the next item in the list to be selected for editing.
Glossaries and macOS System-Wide Replacements
The bottom portion of the QuickFix preferences are language independent (unless you designate otherwise in the System Preferences).
The Keyboard System Preferences of the Mac system enable a number of text replacements as illustrated in Figure 502. Among these are customizable text expansions and automatic spelling corrections, which can be language-specific, and a couple of which duplicate those of Nisus Writer Pro. Nisus Writer Pro is shipped set to use these replacements.
1. If you do not want to use the system-wide replacements choose the menu command: Nisus Writer Pro > Preferences > QuickFix.
2. Uncheck Expand Mac system-wide text replacements as you type.
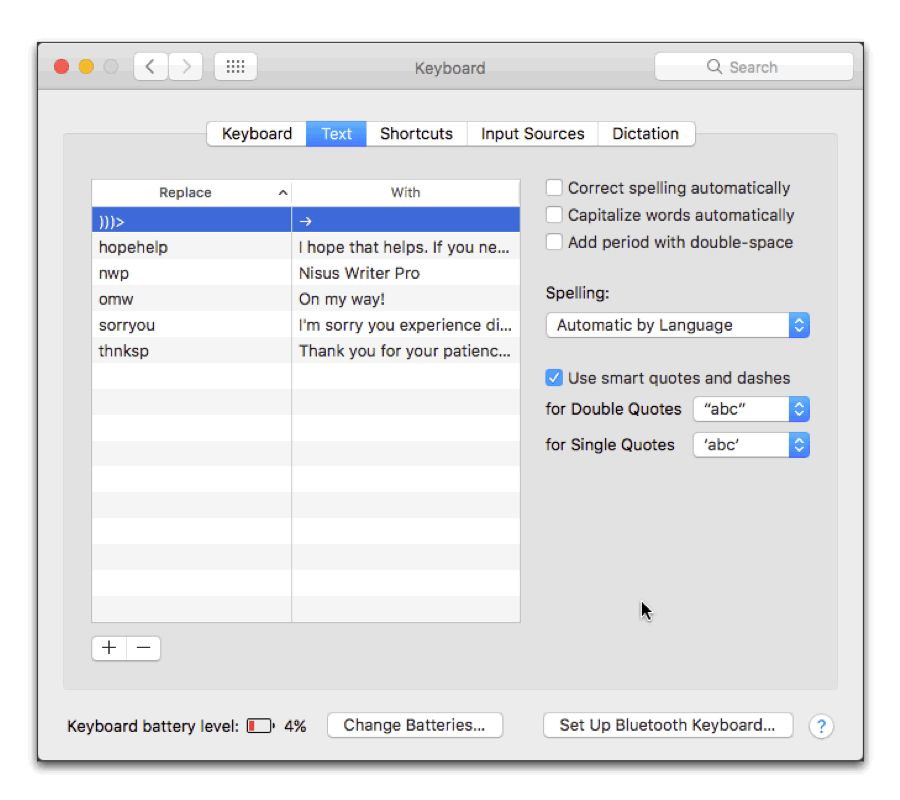
Figure 502
The Text portion of the Keyboard System Preferences
You can use the Nisus Writer Pro Glossaries to save time. A glossary contains abbreviations of many more characters than the simple replacements of a QuickFix typo. When you expand an glossary abbreviation, its entry replaces the abbreviation you typed. Glossary entries can contain both graphics and text.
You can have many different glossaries for different collections of abbreviations related to specific tasks.
1. Choose the menu command: Nisus Writer Pro > Preferences > QuickFix.
2. Click New Glossary in the upper right area of the QuickFix portion of the Preferences dialog.
This creates an empty New Glossary file.
3. Double-click the name of the file in the list area on the left and give the new glossary file a unique name.
A Nisus Writer Pro Glossary document window opens. All the tools available in any other Nisus Writer Pro document are available in this document as well.
At the top of the document the following text appears, explaining how to add glossary entries:
You should edit this file to contain a list of glossary entries. Each entry should be separated from the others by a glossary break. Choose the menu command: Insert > Glossary > Glossary Entry Break. Each entry consists of an abbreviation and an expansion. The expansion is separated from the abbreviation by either a tab or newline character.
5. Type the characters you want to use (something you’ll easily remember) as the abbreviation.
6. Press ⇥ or ⏎.
7. Type (or paste) the full text to which you want that abbreviation to expand.
8. Choose the menu command: Insert > Glossary > Glossary Entry Break.
9. Repeat steps 5 through 8 as needed.
10. Save and close the file.
Glossary abbreviations and expansions are stored in a special file on your hard drive located in the Glossaries folder of the Nisus Documents folder inside your Documents folder:
/Nisus Documents/Glossaries
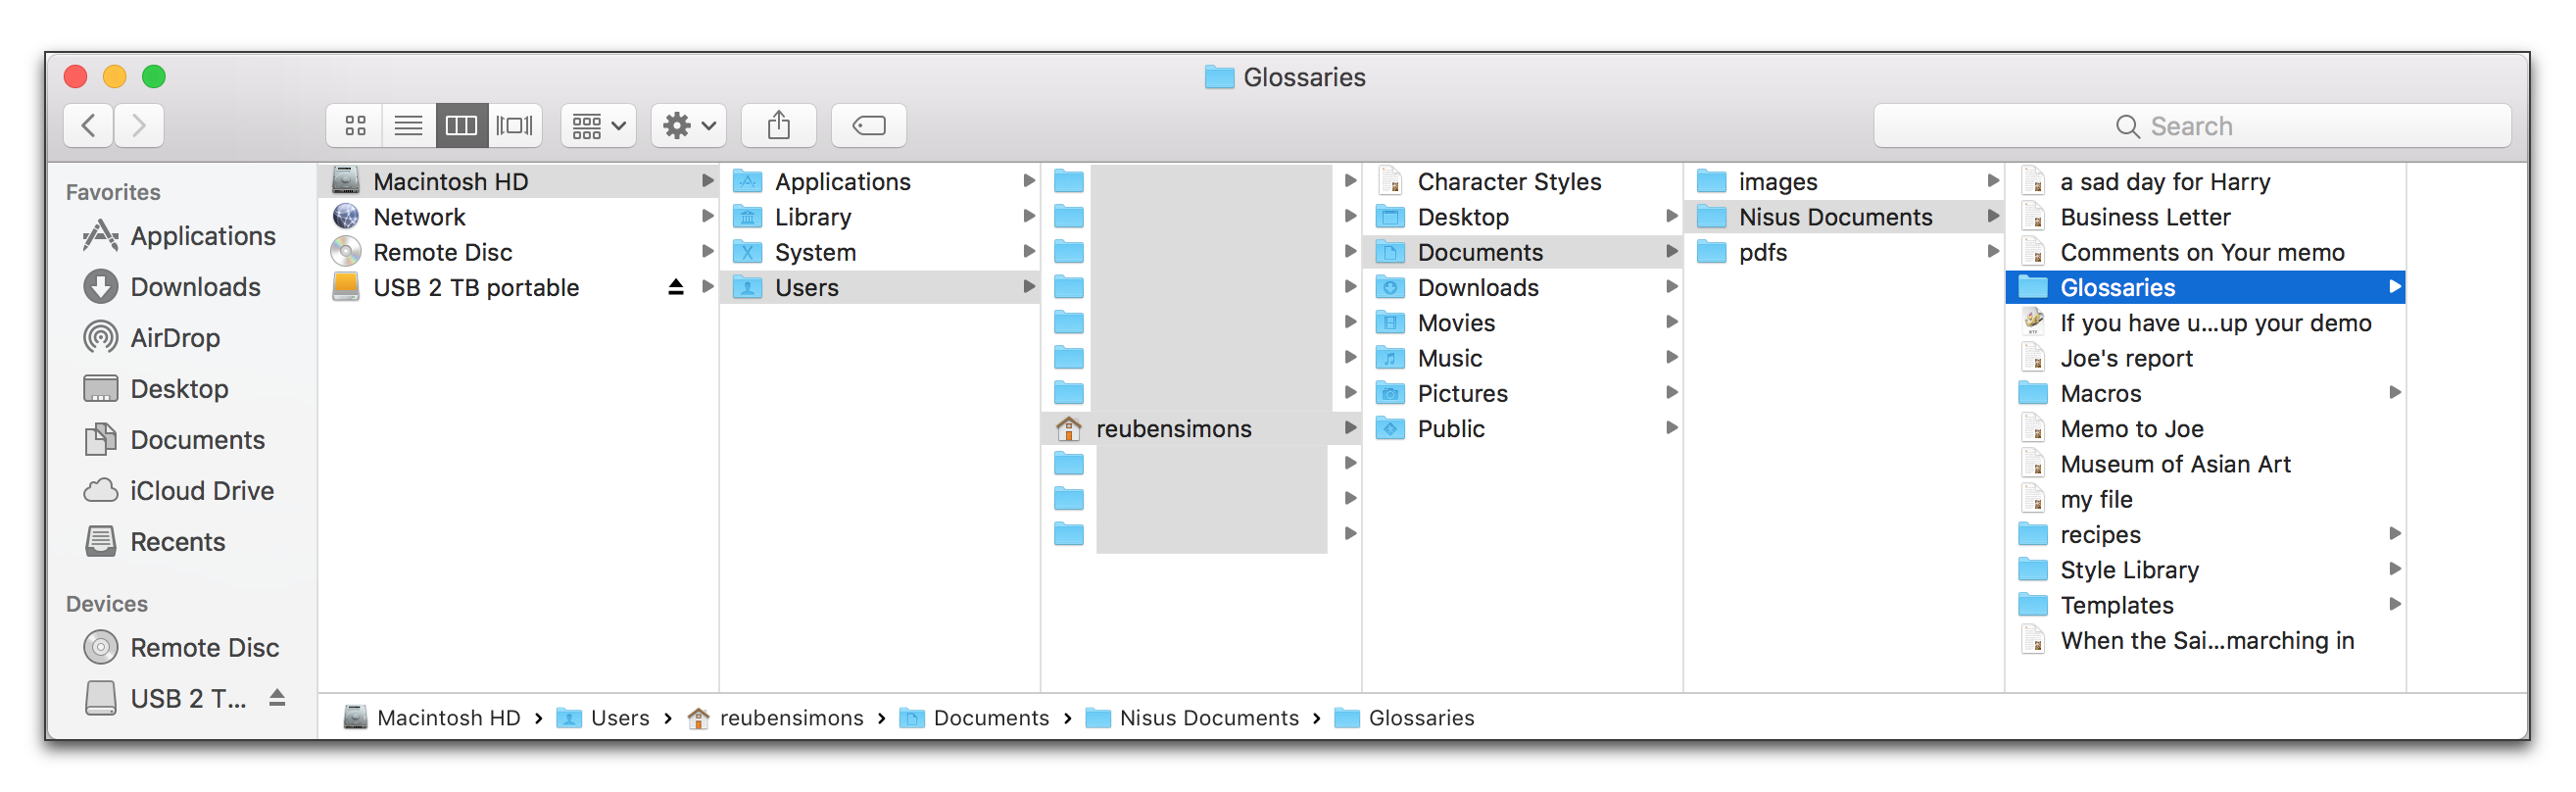
Figure 503
Glossary files location
Nisus Writer Pro makes any file of a type “.ngloss” inside this folder available to use the next time you restart the application.
Your Glossary files names appear at the bottom of the Glossary submenu and the glossary abbreviations appear as a submenu of those.
Add or remove an entry to or from a Glossary file
1. Choose the menu command: Nisus Writer Pro > Preferences > QuickFix.
2. Select a Glossary file to edit.
A Nisus Writer Pro Glossary document window opens. All the tools available in any other Nisus Writer Pro document are available in this document as well.
4. Type the characters you want to use (something you’ll easily remember) as the abbreviation.
5. Press ⇥ or ⏎.
6. Type (or paste) the full text to which you want that abbreviation to expand.
7. Choose the menu command: Insert > Glossary > Glossary Entry Break.
8. Repeat steps 4 through 7 as needed.
Or, if you want to remove an entry, delete everything between one Glossary entry break and the next.
9. Choose the menu command: Insert > Glossary > Glossary Entry Break so that the file is ready to receive new abbreviations at some later date.
10. Save and close the file.
1. Choose the menu command: Nisus Writer Pro > Preferences > QuickFix.
2. Click the checkbox to the left of the glossary’s file name.
If you leave the file checked when you quit Nisus Writer Pro, it will be available to you the next time you restart the application.
Enable automatic expansion of Glossary file abbreviations
1. Choose the menu command: Nisus Writer Pro > Preferences > QuickFix.
2. Check Expand glossary entries as you type at the bottom of the Glossary Files list.
☞ For East Asian and other languages that do not use spaces you can trigger a glossary abbreviation’s expansion by assigning a keyboard shortcut to the command Expand Glossary on the Edit menu as explained in “Menu Keys for Menu Commands” on page 578.
Enter a glossary abbreviation directly from the menus
You might have glossary abbreviations that you use infrequently enough that you forget how to type them. In such circumstances you can choose them directly from the Glossary submenu.
► Choose the menu command: Insert > Glossary > [Glossary Filename] > [Abbreviation].
☞ While typing an abbreviation in the Find & Replace dialog will not cause the abbreviation to expand, you can enter an abbreviation directly into the Find & Replace dialog directly using the menu command.
Create a new glossary abbreviation, or edit an existing abbreviation
1. Choose the menu command: Nisus Writer Pro > Preferences > QuickFix.
3. Edit the file following steps 5 through 9 as explained in “Create a new Glossary” on page 584.
Import a Nisus Writer Classic Glossary file
1. Choose the menu command: Nisus Writer Pro > Preferences > QuickFix.
3. A variant of the standard Open dialog appears, find your old Glossary file and click Open.
4. Your imported glossary file appears in the list of Glossary Files, checked, enabled, ready to use.
1. Choose the menu command: Nisus Writer Pro > Preferences > QuickFix.
3. An alert appears asking you to confirm that you want to delete the file: “The file will be moved to the trash immediately. This action cannot be undone.”
☞ Nisus Writer Pro moves the file to the Trash where it remains until you choose Empty Trash. You can retrieve the file returning it to the Glossaries folder as illustrated in Figure 503 on page 584. If you do this, the next time you restart Nisus Writer Pro the glossary file will once more be available to you.
| Previous Chapter Language Preferences |
<< index >> |
Next Chapter New File Preferences |