Though it is invisible, “Language” is an attribute of your text. If the language attribute is applied correctly, changing the language of a portion of the text changes the
• dictionary and/or thesaurus (if there is one for that language),
• font and size (if appropriate),
• QuickFix typo and related corrections, including quotation mark styles (if you have set them).
While Nisus Writer Pro is set up “out of the box” to write in American English, it supports writing in any version of English (or other European romanic3 and Cyrillic languages), or in a mixture of these languages. It supports writing in languages where the shape of the alphabetic character changes depending on its position in relation to other characters (Devanagari, Thai, etc.—similar in concept to “script” in romanic handwriting where letters following the b, o, v and w have slightly different shapes because these letters end above the baseline). It also supports writing in East Asian languages where writing is syllabic or ideographic rather than alphabetic such as Chinese, Japanese and Korean (including vertical text).
The Macintosh uses the concept of "script" to refer to a variety of phenomena:
• instructions for the computer to follow (as in the script of a play or a movie)
• the shape of certain romanic fonts (as in the word “script”
• methods of writing
◦ “left to right” such as English (or other European romanic and Cyrillic languages)
◦ “right to left” such as Arabic, Aramaic, Hebrew, Ladino, Persian, Syriac, Yiddish
◦ where the shape of the alphabetic character changes depending on its position in relation to other characters such (Arabic and Thai, as well as with a few characters in English)
◦ where writing is syllabic or ideographic (East Asian languages) rather than alphabetic such as Chinese, Japanese and Korean.
Nisus Writer Pro supports Unicode which is explained in the “Glossary of Useful Terms” on page 705. It can mix and match characters from any language in any document, page, paragraph, sentence and/or word.
Nisus Writer Pro allows you to edit text in any language supported by macOS.
This allows you to use specialized dictionaries, thesauri (if available), a localized keyboard (input method) and a specific font for characters unique to that language if the primary font (the one you have set in that document (or the Nisus New File)) does not have them. This also enables you to use the QuickFix Preferences you set in relation to that language. For more information about QuickFix see “QuickFix Preferences” on page 581.
☞ Remember, “Language” is an attribute of your text.
You will achieve best results with languages if you take a few minutes to set your Languages preferences in advance.
► Choose the menu command: Nisus Writer Pro > Preferences > Languages.
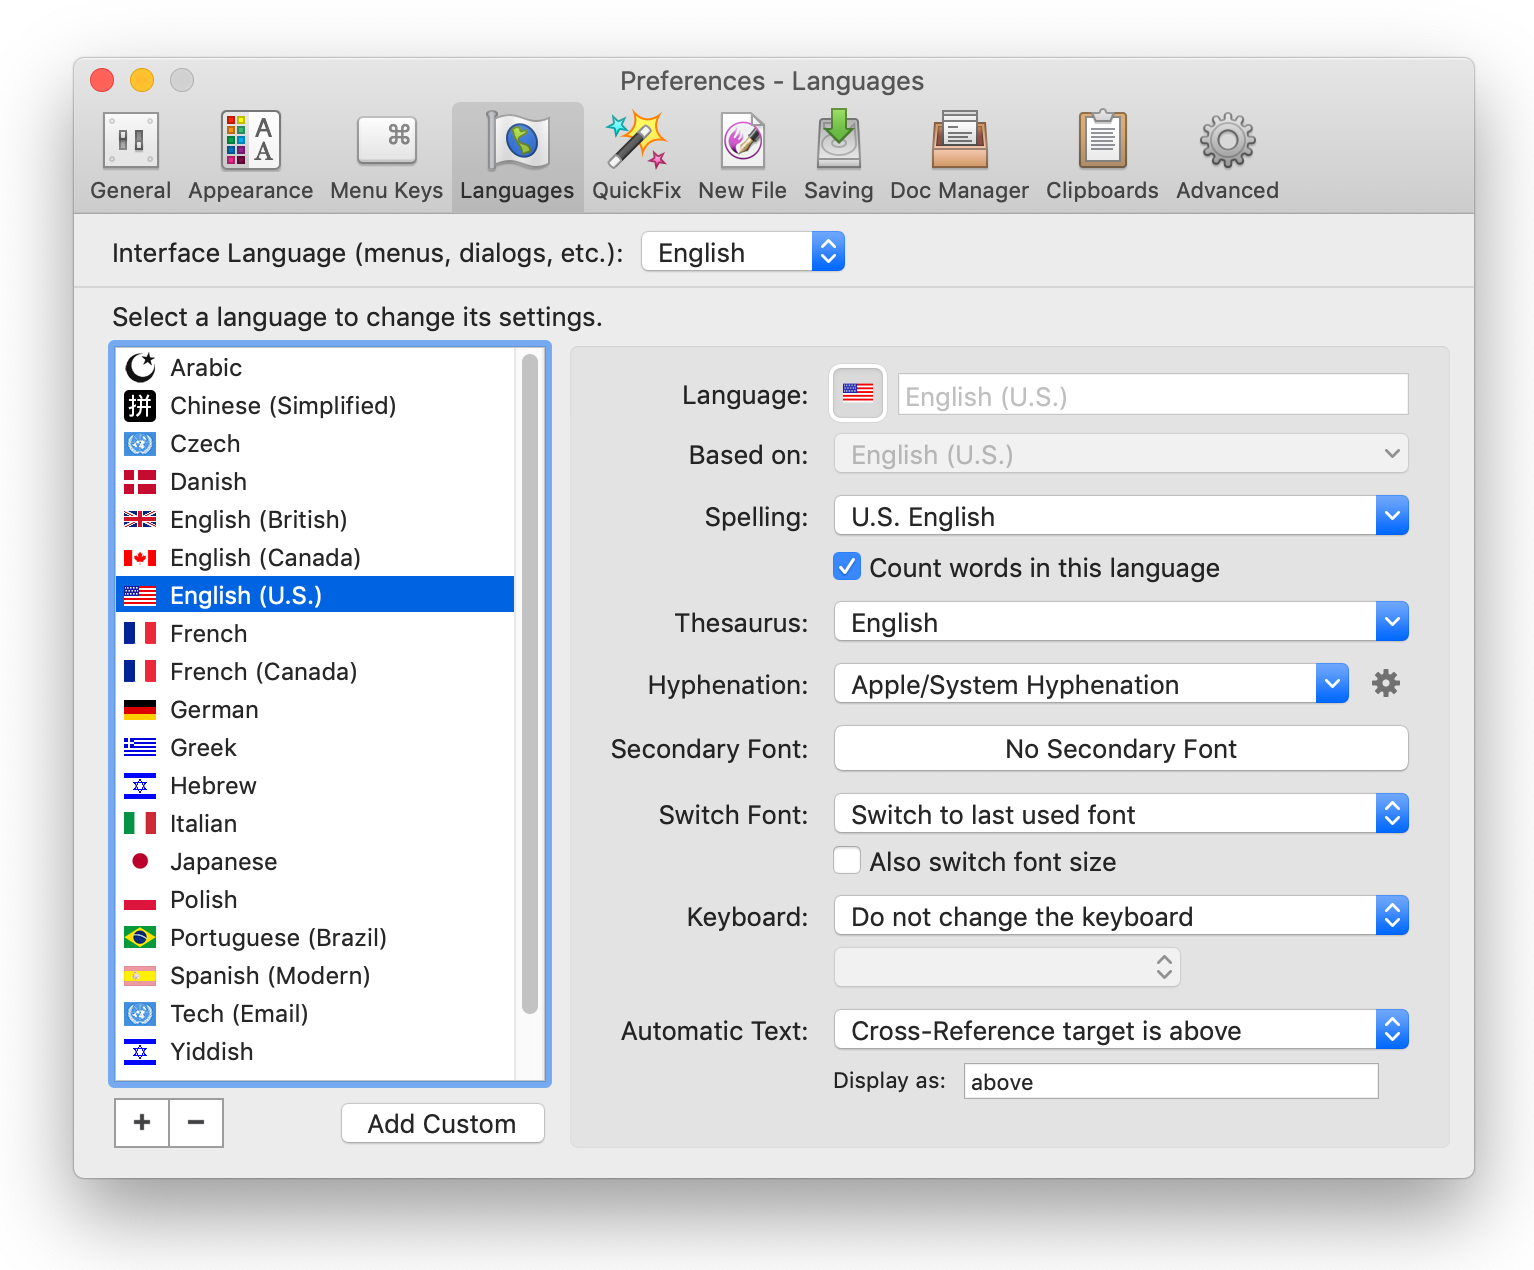
Figure 35
The Languages portion of the Preferences dialog
Along the left side of the Language preferences you will see a list of your preferred languages. These are the languages that Nisus Writer displays for easy access in its interface (e.g.: the Language palette). However, Nisus Writer supports a great many more languages.
To add or remove languages from your list of preferred languages:
1. Click the + (Plus) or - (Minus) buttons below the list of languages.
→ A dialog appears listing all available languages.
2. Change which languages are checkmarked in the dialog.
3. Dismiss the dialog to confirm your changes.
If you don’t see the language you want, consider adding a custom language as explained in “Custom languages”. To do so click the button Add Custom.
The settings for a language are displayed on the right side of the Language preferences pane (as shown in Figure 35). To customize a language’s settings select any single language from the list of preferred languages on the left, and then modify the following settings:
Spelling: choose an appropriate dictionary to check the spelling of text.
Nisus Writer Pro supports any spelling dictionary available in macOS. For details on adding dictionaries see “Installing spelling dictionaries”. Other alternatives are also possible such as Cocoa Aspell, which also has its own extendible set of free dictionaries, and Spell Catcher X. If you install a new spelling dictionary or service, restart Nisus Writer and it should automatically appear in the Languages preferences.
Aside from flagging misspelled words using a spelling dictionary, you can also configure automatic typo correction in the QuickFix Preferences.
Count words in this language: whether or not to count words marked in this language for document statistics (word count).
Thesaurus: choose an appropriate thesaurus for synonyms. Only English and Disabled are available.
Hyphenation: choose an appropriate hyphenation dictionary to split words between wrapped lines. For more details on hyphenation see “Hyphenate your text”.
Secondary Font: click the font button to open the font panel (as shown in Figure 510), where you can choose a secondary font. The secondary font is used for a few purposes, including as a fallback font in situations where the primary (applied) font fails. Fallback font calculation is described in more detail in “Font substitution”.
Switch Font: whether or not to change the font when you switch into this language. The available options are as follows:
◦ Do not change the font: no font change will occur.
◦ Switch to last used font: the font will automatically switch to the font you last used when working in this language.
◦ Switch to secondary font: always switch to the language’s secondary font.
Also switch font size: if you’ve enabled font switching for the language, you can optionally checkmark this option to also change the font size when switching into this language.
Keyboard: whether or not to change the keyboard layout when you switch into this language. The available options are as follows:
◦ Do not change the keyboard: no keyboard change will occur. You may still change the keyboard manually using the system keyboard menu.
◦ Switch to last used keyboard: the keyboard will automatically switch to the keyboard you last used when working in this language.
◦ Switch to chosen keyboard: always switch to the keyboard shown on the popup menu just underneath this setting. If you don’t see the desired keyboard you need to add it to your available system keyboards.
Automatic Text: these bits of automatic text may be used by Nisus Writer in your text. They are language sensitive so the appropriate translation is used in the context it appears. The following bits of automatic text are customizable:
◦ Cross-Reference target is above: the text to display after a cross-reference when its target is above. For example, the text might appear as part of the phrase “see page 5 above”, where “5” is an automatically generated cross-reference, and “above” is this customizable text.
◦ Cross-Reference target is below: just like Cross-Reference target is above, but for when the target is below its cross-reference.
Choose a language in which to write
You can have new document windows set to the language of your choice by editing your Nisus New File template. For more information on editing that template, see “New File Preferences”.
While working in a document you can change the language in a variety of ways:
• Language button on the Toolbar at the top of your document window
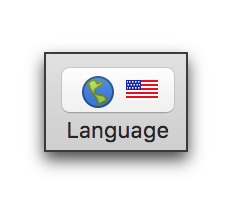
Figure 36
The Language button on the Toolbar
• Language tag on Status Bar at the bottom of the document window

Figure 37
The Language tag on the Status Bar
☞ The flag or icon displayed implies no political allegiance or association. The flag is of the entire people (and it represents the language of that people), not a particular party. This has been an Apple convention. (The Language & Region System Preference does not use flags or other symbols from the various languages’ writing systems, though the Keyboard preferences Input Sources does use flags that attempt to iconographically represent a linguistic group.)
• Language pop-up menu in the Language palette of the Palette Dock.
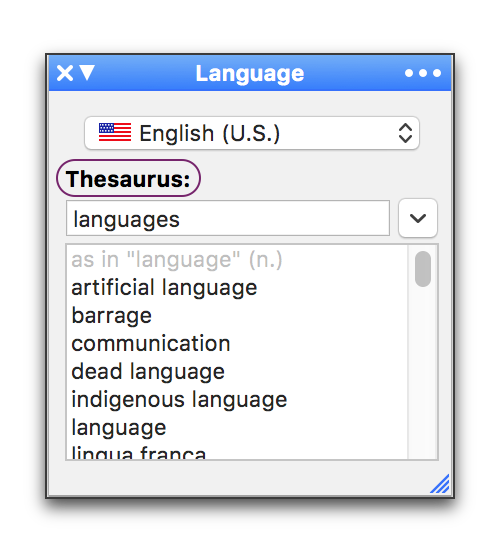
Figure 38
The Language pop-up menu in the Language palette (shows the Thesaurus when a word is spelled correctly)
☞ For quick access to any of your languages you can assign a keyboard shortcut as explained in “Menu Keys for Menu Commands” on page 578.
• any Character Style or Paragraph Style that has the designated language associated with its formatting.
1. Make sure that you have set your System Preferences and your Nisus Writer Pro Language preferences as indicated in Appendix IV - “Set up language support on your Macintosh” on page 716 and “Set up language support” on page 40.
2. Choose the language you want to type in from the Language palette (or the Language button on the Toolbar at the top of the window, or the menu Format > Language, or from the Language tag on the Status Bar at the bottom of the document window).
3. Begin typing.
☞ Nisus Writer Pro enables you to set the language in four different locations as explained above. If you have set your Languages preferences in Nisus Writer Pro so that switching the language also changes the keyboard, you will see a changed icon on the right side of the Menu Bar. This icon has nothing to do with causing a change of the language in Nisus Writer Pro. This changes the “Input Source” or “Input Method” only (there may be more than one input method for any particular language as illustrated in Figure 39).
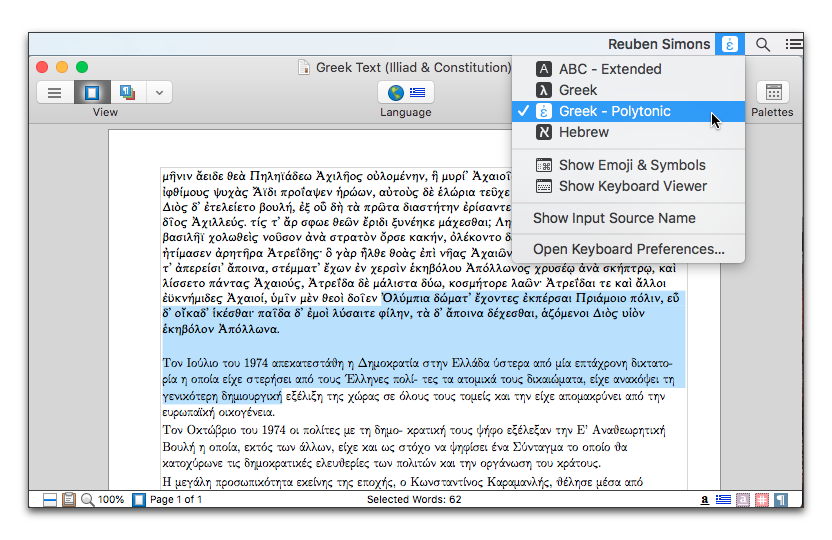
Figure 39
The Input Menu showing two input methods (keyboards) for the current language in Nisus Writer Pro
Once you have set your Nisus Writer Pro Languages preferences appropriately (as explained in “Set up language support” on page 40), typing in right to left (or “Bidirectional”) languages (such as Arabic, Hebrew, Ladino, Pashtun, Persian, Urdu, or Yiddish) is the same as in any other language.
However, in order to get you started quickly the following information deals with matters explained in more detail later in the documentation.
1. Choose the language you want to type in from the Language palette (or the Language button on the Toolbar at the top of the window, or the menu Format > Language, or from the Language tag at the bottom of the document window).
If this is a new document that has no text in it, a dialog appears asking if you want the document to be primarily right to left.
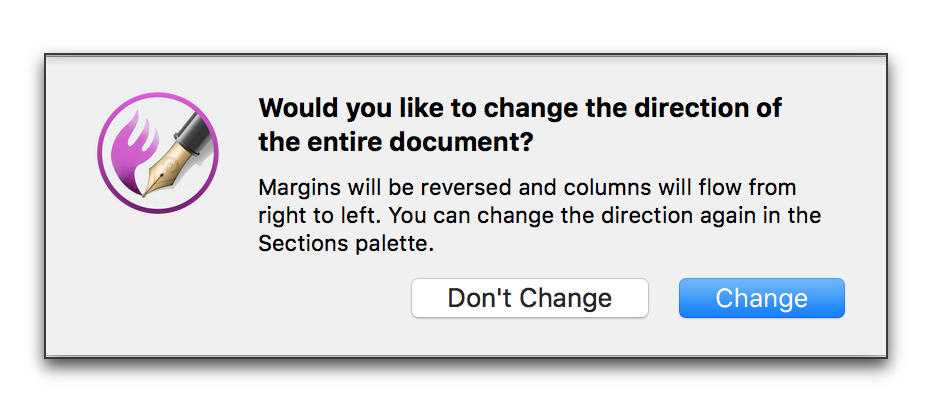
Figure 40
The change direction of document dialog
2. Choose the option you want. In either case, Nisus Writer Pro will switch the display of the ruler as well as the indent and outdent buttons on the Toolbar.
☞ The Indent and Outdent buttons, illustrated in Figure 41, are available if you customize your Toolbar, as explained in the section “Make the Toolbar Your Own” on page 611.
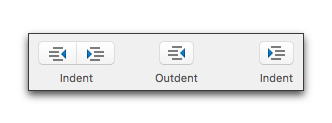
Figure 41
The Outdent and Indent buttons available when customizing the Toolbar.
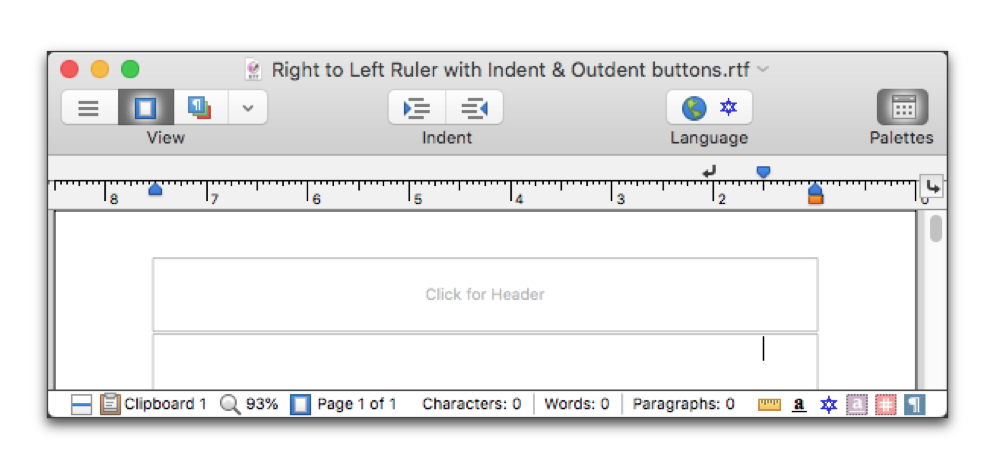
Figure 42
The right to left ruler and Indent/Outdent buttons
Mix right to left and left to right text
If your insertion point is inside a left to right paragraph (of a left to right document) and you want to write something in a right to left language, all you need do is choose the language you want to write in from the Language palette (or the Language button on the Toolbar at the top of the window, or the menu Format > Language, or from the Language tag at the bottom of the document window). Nisus Writer Pro keeps the direction of the paragraph but switches the keyboard and the font based on your preferences.
If you have text that includes “part numbers” or addresses or other strings of numerals, or similar mixtures of right to left and left to right characters, you can assure the correct flow of the text by choosing the menu command: Insert > Directionality Marker > Reverse Direction Marker. Insert the character as soon as you need to switch the directionality, or the direction will not switch. These characters do not display, nor do they have any other semantic effect.
Be sure to turn on Show Invisibles (near the bottom of the View menu, as explained on page 589). This will enable you to confirm that the directionality markers have been inserted. You can see what they look like in Table 32 on page 590.
Have an exclamation point appear correctly in a left to right string of right to left text
• The problem… the exclamation point appears at the beginning of the English phrase, not at its end:
מִשְׁפְחוֹת (Be Careful!)
• Solution (be sure you have your Languages preferences set correctly in Nisus Writer Pro.
1. Choose the menu command: Format > Language > Hebrew.
2. Type the Hebrew text including the space that follows the letters.
3. Choose the menu command: Insert > Directionality Marker > Left to Right Marker.
4. Choose the menu command: Format > Language > English.
5. Type the English text, beginning with the open parenthesis “(” (above the 9; don’t worry, it looks wrong, be patient).
6. Once again, choose the menu command: Insert > Directionality Marker > Left to Right Marker.
7. To continue in Hebrew, choose the menu command: Format > Language > Hebrew.
8. Type a space followed by the additional Hebrew text.
מִשְׁפְחוֹת (Be Careful!) שָׁלוֹם
Have the period appear correctly in a left to right sentence that ends with a right to left word
• The problem… as received by technical support:
First I write English then עברית. אבל the עברית comes out on the wrong side of the period.
• Diagnosis
In areas of mixed languages, you might switch the “Keyboard” “input method” rather than change the actual language associated with that text as explained in step 2 of “Write in a different language” on page 44.
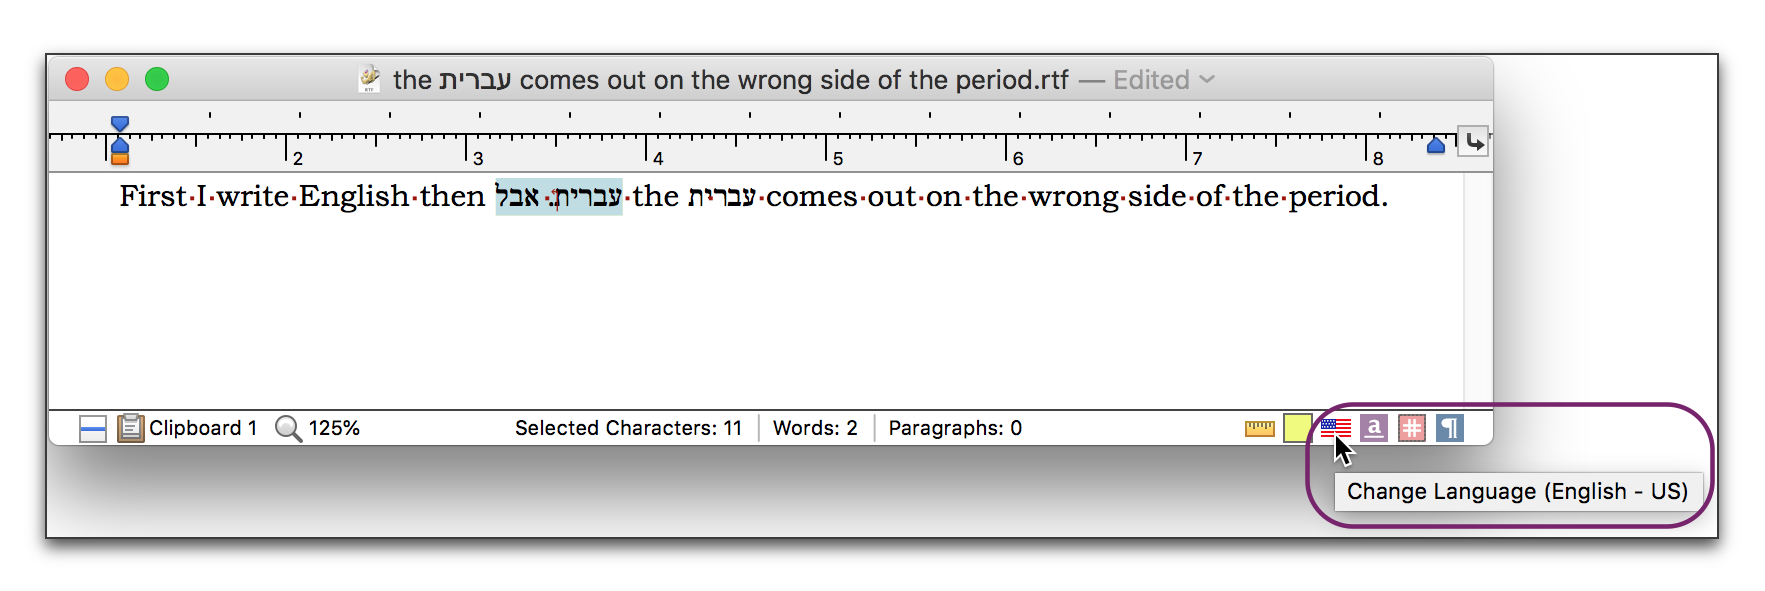
Figure 43
“Hebrew” text written in “English”
In Figure 43 above, the two Hebrew words are selected and yet the flag below, in the Status Bar, indicates that the language set for the two words (and the period and space) is English.
• Problem:
First I write English then עברית. אבל the עברית comes out on the wrong side of the period
• Solution:
1. Type:
First I write English then[space]
2. Choose Hebrew from the Language tab on the Status Bar or the Language button on the Toolbar or the Language pop-up menu in the Language palette (not simply the input method from the flag at the top of the menu bar, but Hebrew inside Nisus Writer Pro) and type the word:
עברית
3. While still in Hebrew, choose the menu command: Insert > Directionality Marker > Reverse Direction Marker
4. Type the period followed by a space:
.[space]
5. Type the space and the word:
אבל [space]
6. Choose English from the Language tab on the Status Bar or the Language button on the Toolbar or the Language pop-up menu in the Language palette (not simply the input method from the flag at the top of the menu bar, but English inside Nisus Writer Pro) and type the word:
the
7. Switch back again to Hebrew (again using the methods inside Nisus Writer Pro as explained in 2 above) and type:
עברית [space]
8. Switch back again to English (again using the methods inside Nisus Writer Pro as explained in 6 above) and type:
comes out on the wrong side of the period.
Insert a right to left table in a left to right section
You can adjust the direction of the tables using the Paragraph palette.
☞ New tables derive their direction from whatever you have set for that section (or the document if you only have one section). Therefore, if you insert a table while in right to left text of a left to right section or document, the insert table pop-up menu and the actual table display in left to right.
1. Select all the cells in the table.
2. Choose the right to left language you want to use from the Language tab on the Status Bar or the Language button on the Toolbar or the Language pop-up menu in the Language palette (not simply the input method from the flag at the top of the menu bar.
Nisus Writer Pro presents a dialog asking if you want to change the direction of the table.
Advanced language customizations
The following section details some of the more specialized and advanced ways you can configure languages in Nisus Writer.
Installing spelling dictionaries
You can install Hunspell dictionary files and macOS will automatically make them available in Nisus Writer and other apps.
1. If Nisus Writer is running, quit it.
2. Download a Hunspell dictionary from the Internet.
There are many places that offer Hunspell dictionaries, but you might check the LibreOffice dictionary repository or OpenOffice extension repository. Some Hunspell dictionaries there can be downloaded directly, while most will download as OpenOffice Extension “.oxt” files. Once a “.oxt” file is downloaded, rename it to “.zip”, extract it, and look inside the “dictionaries” folder. It will contain the necessary “.dic” and “.aff” Hunspell files. Keep those handy, as you’ll need to move them later in the installation process.
3. In the Finder locate one of your Library folders (either your home or root Library).
Because Apple decided to start hiding Library folders from users, you may need to take some special steps to reveal the Library folder. The easiest is to use the Finder menu Go > Library.
4. In the Library folder, find the “Spelling” subfolder. If no such folder exists you can create it.
5. From the Hunspell materials you downloaded and extracted in step 2 above, find both the “.dic” and “.aff” files and move them into the Spelling folder:
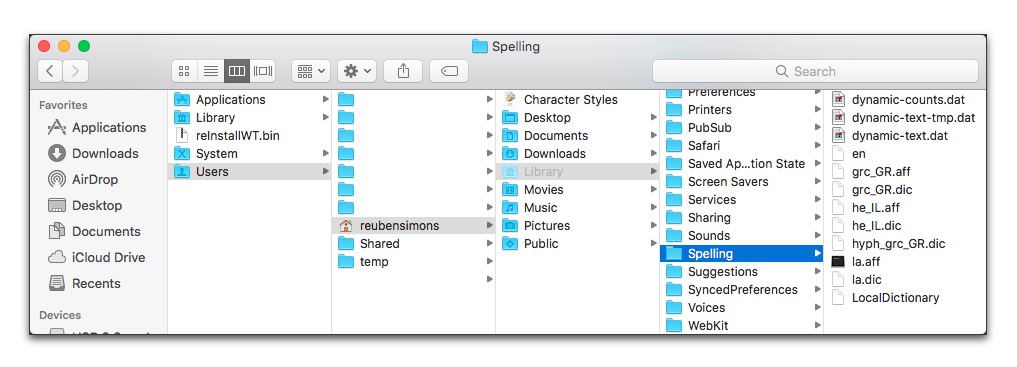
Figure 44
The Spelling folder in the Finder with alternate (ancient Greek, Hebrew and Latin) dictionary (and hyphenation) files added
That completes the process. When you relaunch Nisus Writer Pro you will see the installed dictionary in your Nisus Writer Pro Languages preferences.
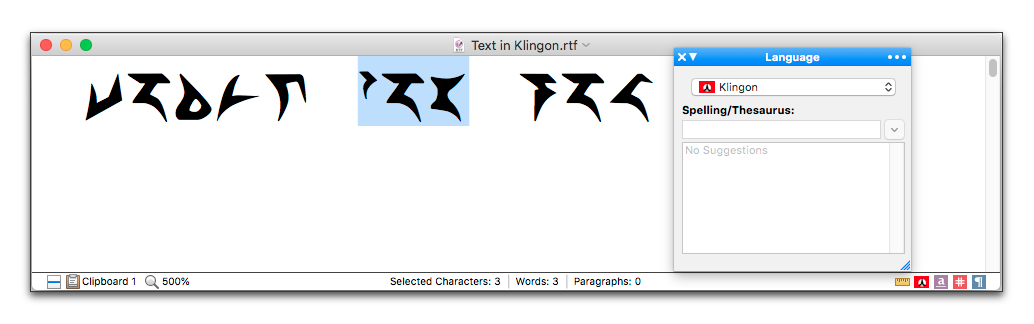
Nisus Writer allows you to choose from a wide variety of built-in languages, as explained in “Preferred languages”. However if a language is not provided you can also add your own “designer” language (Tok Pisin4, Jawi5, Syriac6, Klingon7 for example). To add a custom language:
1. Open the Language preferences.
2. Click the button Add Custom.
3. Edit the name of your new language.
⚠️ The name you choose is important, and cannot be easily changed. Custom languages are uniquely identified by their names as they are applied in documents.
4. Choose a language for the Based on setting, which governs behaviors that aren’t used customizable like word boundary detection.
5. Configure any remaining language settings, just as with other languages.
Each language has an icon. Usually this icon shows a national flag of the associated country, but some languages may show a generic icon depicting the United Nations flag. You may want to customize this flag.
Once you have a new flag image ready, you can customize a language’s flag icon in the following ways:
1. Copy the image to the clipboard.
2. Select the language in the Language preferences pane (as shown in Figure 35 above).
3. From the settings on the right, next to the Language label, click the flag icon to select it.
4. Paste the image.
Alternatively you can drag and drop the new image onto the language icon in the preferences pane.
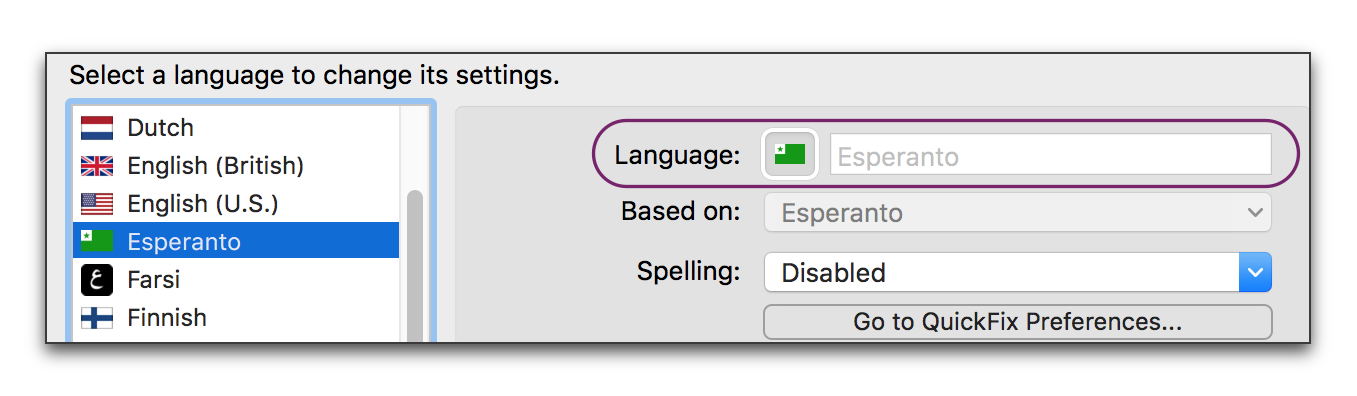
Figure 46
Using a custom language icon in the Languages preferences
| Previous Chapter Enter (Type) Text |
<< index >> |
Next Chapter Select Text |