Clipboards temporarily store copied (or cut) text and/or images.
You can:
• Place a single character or an entire document on the Clipboard
• Edit text you have put on your Clipboard, using actions such as
• Transfer text or images from another application into Nisus Writer Pro.
Nisus Writer Pro offers you as many Clipboards as you like. On these you can store different materials. You can choose which Clipboard you want to use from the Clipboards submenu at the bottom of the Edit menu or from the Clipboard tag on the Status Bar, or from the Clipboards Preferences of Nisus Writer Pro.
☞ While you can store many different items on the various Clipboards, only one Clipboard is active for cutting and pasting at a time. This Clipboard is called the Current Clipboard. When copying and pasting from other applications, Nisus Writer Pro uses the current Clipboard.
Add text or images to the Clipboard
► Select what you want to add (not replace) to the current Clipboard, then choose Append Copy or Append Cut from the Copy or Cut submenus of the Edit menu respectively.
You can also show the Clipboard and add text by typing or dragging items into the Clipboard’s window.
1. Press ⌘ and choose that Clipboard’s name from the menu Edit > Clipboards, or choose the menu Clipboard > Edit Current Clipboard that appears from the Clipboard tag on the Status Bar.
2. Complete your editing tasks.
You can do almost anything on the Clipboard that you can do in any Nisus Writer Pro document.
◦ Enter text
◦ Drag and drop text (this allows you to copy and paste on the current Clipboard)
◦ Use most of the commands of the Edit menu and the Transform Text submenu
◦ Change the font, size and style of your text using the commands of those menus and the palettes.
◦ Delete text
◦ Add text
◦ Find and replace text
3. Close the Clipboard window.
☞ Warning!
Nisus Writer Pro only transfers the contents of the Current Clipboard to the System Clipboard when you quit the application. Anything you have on any other clipboards is eliminated.
To be sure you do not lose any material that may be on your clipboards you may want to paste it into one or more documents before quitting Nisus Writer Pro.
Nonetheless, Nisus Writer Pro comes with a set of macros designed to help you work with, and even save, your Clipboards. You can learn more about them on page 634.
When you copy formatted text and then paste it into an area with other formatting Nisus Writer Pro pastes in the text with the formatting as it existed in that text’s original location. To override this behavior choose the commands Copy Text Only or Paste Text Only as explained above.
You can copy and paste the shape of a paragraph with all the settings related to that paragraph as they display on the ruler and in the Paragraph palette.
1. Click your insertion point in the paragraph the ruler of which you wish to copy.
2. Either…
► choose the menu command: Edit > Copy > Copy Paragraph Formatting
► press ⌃ or “right click” your mouse or “secondary click” your trackpad and choose the menu command: Copy Paragraph Formatting
3. Click your insertion point in the paragraph where you want the copied ruler to appear.
4. Either…
► choose the menu command: Edit > Paste > Paste Paragraph Formatting
► press ⌃ or “right click” your mouse or “secondary click” your trackpad and choose the menu command: Paste Paragraph Formatting
☞ If a ruler icon appears on the Status Bar or in the gutter, you can choose the appropriate command from the pop-up menu that appears there.
Since its earliest versions, Nisus Writer and its various predecessors has enabled multiple, editable Clipboards where you can store and manipulate text of various lengths without modifying the main text of your document. In addition to its multiple clipboards and the preferences to control them, Nisus Writer has an enhanced palette and Status Bar tag that make the Clipboards’ capabilities even more available.
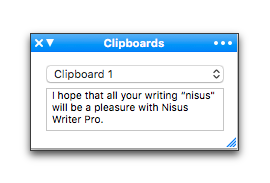
As mentioned above, on page 25, when you first start Nisus Writer Pro the Writing group of palettes is displayed, including the Clipboards palette, illustrated in Figure 48. The palette contains a number of tools.
• The pop-up menu at the top enables you to quickly switch from one Clipboard to another. Nisus Writer Pro comes with four Clipboards, but you can create as many as you need.
• A text display area below the pop-up menu shows the (plain text) contents of the current window.
• The right edge of the palette’s title bar holds the “…” (Ellipsis, or Options menu). This enables you to:
◦ Edit Current Clipboard
opens the current Clipboard in its own window where you have complete editing control of the text as though it was in a separate document. When finished you can close the Clipboard window and paste its contents wherever text can be pasted.
◦ Remove All Formatting
so that you can paste the Clipboard’s contents as text only, assuming the formatting of the text into which it is pasted,
◦ Preview Font Size
so you can see the contents of the Clipboard at various sizes (while not altering the size of the text itself).
You want to adjust the size of the preview in order to fit more text in the tiny palette area, or the reverse, if you have poor eyesight and can't read the default font size.
◦ Attach Palette to Dock
which causes the (floating) palette to become part of the current group of palettes displayed in the Dock.
Figure 48
The Clipboards palette
The Clipboard tag on the Status Bar
As mentioned above, on page 18, the Clipboard tag on the Status Bar offers quick access to the Clipboard related commands of the Edit menu. When the pointer hovers over the Clipboard tag a help tag appears indicating which Clipboard is active. To its right, the first, up to, approximately 30 characters of the contents of the current Clipboard appear (in plain text). You can double-click the help tag to open the Clipboard. In addition a Tag Display Mode submenu is available which allows you to choose to display the tag as:
• Icon Only
which removes the space for the text of the Clipboard
• Clipboard Name
which displays only the name of the current Clipboard
• Short Preview
which displays only approximately 10 characters
• Medium Preview
which displays approximately 20 characters
• Long Preview
which displays approximately 30 characters
Nisus Writer Pro is shipped with Short Preview selected.
The Nisus Writer Pro Clipboard preferences are described in the section: “Clipboards Preferences” on page 607. There you can…
► Choose the Clipboard’s number from the menu Edit > Clipboards, or from the Clipboard menu that appears from the Clipboard tag on the Status Bar, or from the Clipboard Preferences of Nisus Writer Pro.
Nisus Writer Pro allows you to have as many Clipboards as you like.
► See “Clipboards Preferences” on page 607.
Change the name of a Clipboard
Nisus Writer Pro allows you to name your Clipboards anything you like. This allows you to use dedicated clipboards for specific tasks.
► See “Clipboards Preferences” on page 607.
► See “Clipboards Preferences” on page 607.
| Previous Chapter Move, Delete, and Replace Text |
<< index >> |
Next Chapter About Lists |