To display your text, Unicode or not, Nisus Writer Pro must know how to draw the letters on the screen. A “font” tells Nisus Writer Pro how to do this. A font contains drawing instructions for various letters and combinations of letters. These are called “glyphs”. It also contains information on how to map letters of text to glyphs.
If you have a Unicode font, that means that the fonts “knows” how to convert text stored in the Unicode format (remember, text in a computer is just a bunch of numbers) to glyphs. That’s it. Nothing special. Because the font understands Unicode, it generally includes the ability to draw letters from lots of different alphabets instead of just Roman or Japanese or whatever. But that is not always the case.
Incidentally, mapping your text to glyphs is not always a simple process. For example, usually it’s a one to one mapping. The letter ‘A’ maps to glyph 1, etc. Sometimes, however, it can be quite complex, as in ligatures or the cursive Arabic characters that have initial, medial and final forms.
To see an example of this, open Nisus Writer Pro and choose the Mac system font Zapfino. Now, type the word “Zapfino”. As soon as you type the whole word, you will see the whole thing change to a specialized cursive form. In the following two occurrences of the word Zapfino, the first has ligatures turned off, the second turned on:
Zapfino → Zapfino
The reason for this is that the Zapfino font contains a special glyph that is displayed whenever it encounters the text “Zapfino” (with ligatures on), but no other time.
How Nisus Writer Pro Displays Your Text
Whenever you open an existing (or a Nisus Writer Classic) file in Nisus Writer Pro…
• First Nisus Writer Pro converts the text to Unicode (if it was not already such). No matter what type of file you open, when your file is open and displayed on the screen, we keep a copy of your file as Unicode stored in memory. When you save the file you can choose the encoding to use.
• Second Nisus Writer Pro determines how to draw each letter of your text. To do this, it uses the font you have applied from a style, the Character palette, etc. Nisus Writer Pro checks each letter of your text to make sure the font you have chosen can draw that letter. If not, then a substitute font is found and used.
• Third Nisus Writer Pro places each letter on lines of text. The application may place this text going left to right or right to left, depending on the direction of your paragraph and the text involved.
• Finally, Nisus Writer Pro must place the lines of text on the page. This depends on your paragraph alignment.
So you can see, that to take your text—even if it is “pure” Unicode—Nisus Writer Pro must pick:
◦ alignment
◦ other paragraph settings
to display it with. Even if you think there is “no” formatting applied, there has to be something. It’s a bit like asking for a car with only “fuel” and no vehicle.
Here are some rules to remember
• Type only one space between sentences.
The fractional fonts (in which an “m” uses more space than an “l”) that the computer uses make the extra spacing between sentences superfluous.
Compare a fractional font (11 point Bookman Old Style)
The quick brown fox jumps over the lazy dog. How razorback-jumping frogs can level six-piqued gymnasts!
With a monospaced font (9 point Courier)
The quick brown fox jumps over the lazy dog. How razorback-jumping frogs can level six-piqued gymnasts!
• Press ⇥ only to line up columns, not to begin a paragraph with an indentation.
If you want an indent at a new paragraph you use the first line indent indicator on the ruler.
• Press ⏎ only to begin a new paragraph, not at the end of each line or to “double-space.”
The Macintosh makes its sound only when you try to do something that it cannot do at that time—not, as in the days of typewriters (if you’re old enough to remember them) when you reach the end of a line.
Macintosh provides you with a wide variety of characters. Among these characters you can find symbols (often called dingbats15) and characters from almost every written language.
For more information about entering text in various languages see “Write in Multiple Languages” on page 40, and the section “Enter special characters into your text” on page 36.
☞ While you can type these unusual characters, Nisus Writer Pro supports entering them directly from the menus and from a Special Characters palette as explained in “Enter special characters into your text” on page 36. All the characters available in this manner are listed beginning on page 668.
Turn on display of the Input (keyboard “flag”) menu
The following information is based on Sierra (macOS 10.12).
1. Choose the menu command: Apple > System Preferences… and choose (click) Keyboard from the second row of icons.
2. In the Keyboard preferences click Input Sources the second tab from the right at the top.
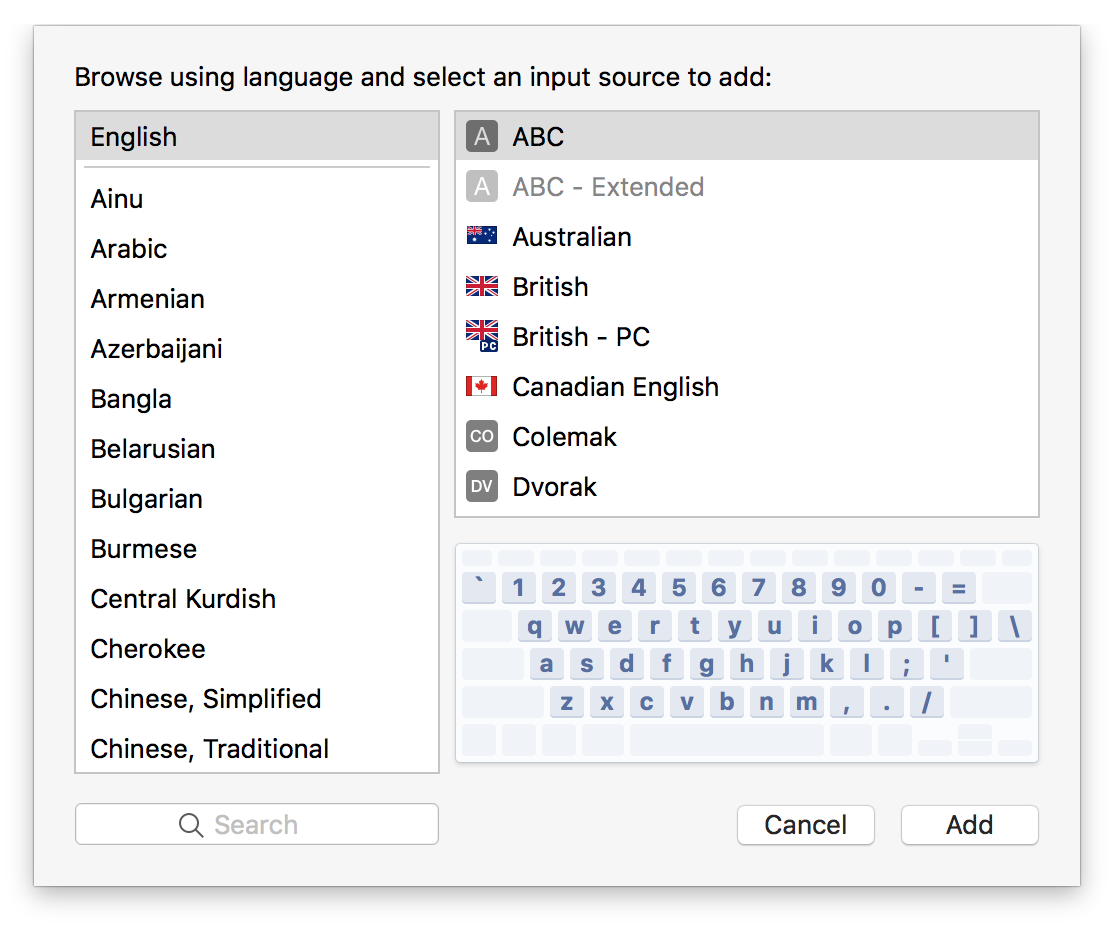
3. Click the Plus + button and check any input methods (keyboards) you want to have appear on the menu as illustrated in Figure 552.
Figure 552
The input source selection panel
4. Select each language’s input source you want to have appear on your Input menu and click Add.
5. Check Show Input menu in menu bar.
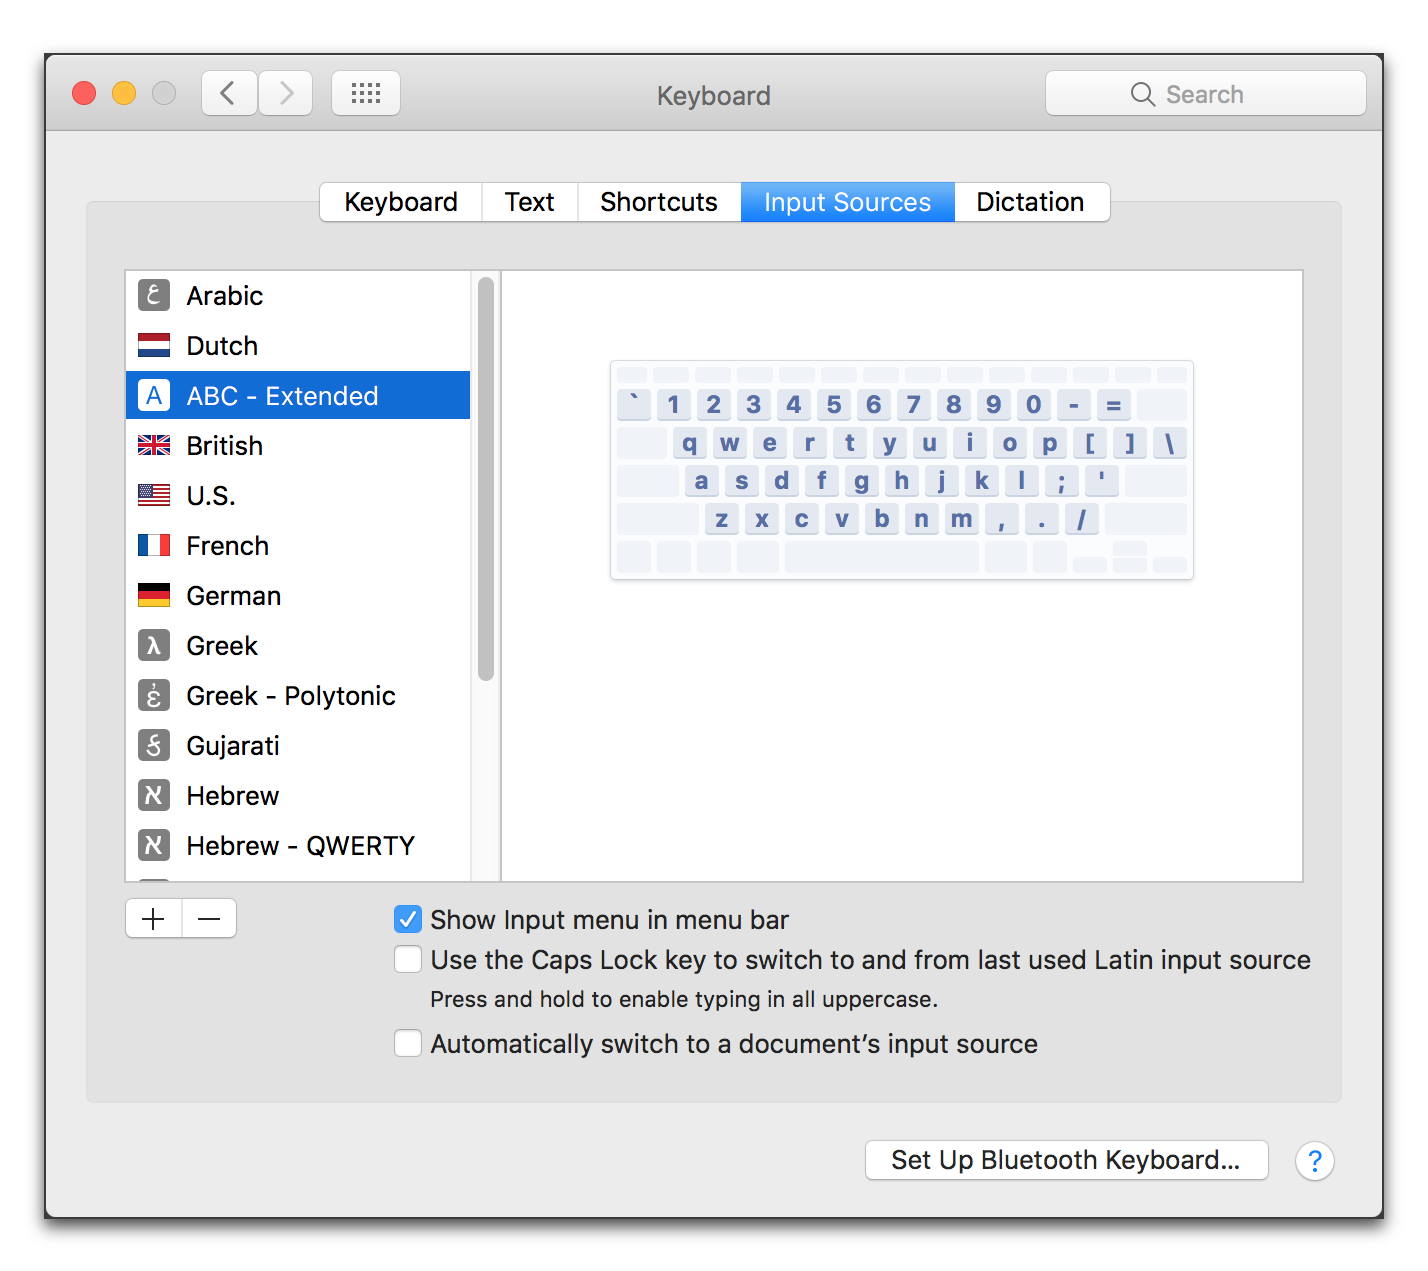
Figure 553
The Input Sources tab of the Keyboard (System) preferences (in macOS 10.13 (High Sierra)
6. Close the dialog.
Enter a character using the keyboard
Most of the unusual (Roman based) characters are made by pressing a combination of a key on the keyboard and a “modifier” key such as ⌥. For example, you can also create the symbol “§” as illustrated in Figure 554 below, in the small application called Keyboard Viewer which is available from the bottom of the Input (keyboard) menu) if you have turned it on.
Other unusual characters are called delayed strike characters. As illustrated in Figure 555 below, these require you to press ⌥ and then two keys to give you the character you want. To help you find these keys (in this instance ü) which (in the Keyboard Viewer) when you release the ⌥ key illustrates all the characters that can have the umlaut above them.
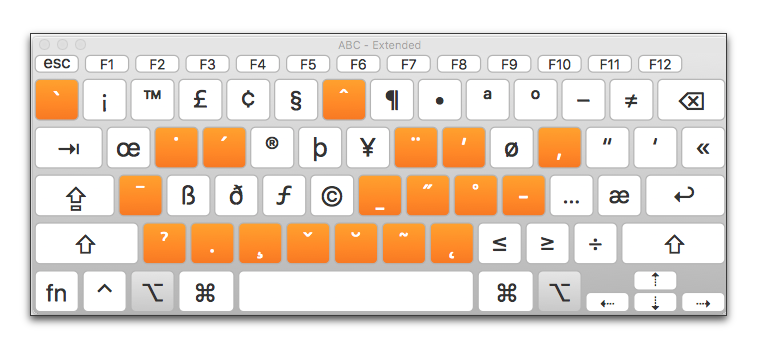
Figure 554
Sierra Keyboard Viewer of the ABC - Extended keyboard after pressing ⌥
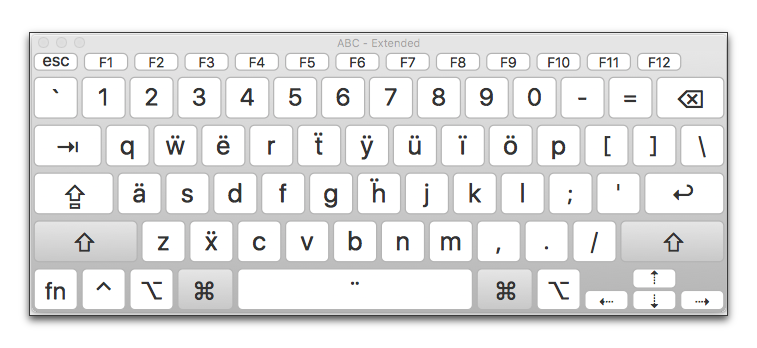
Figure 555
Tiger Keyboard Viewer of the ABC - Extended keyboard after pressing ⌥ u
Table 33 below identifies many of these alphabetic characters and how you create them.
|
Typing Special (Extended Roman) Characters |
||
|
To type: |
|
press |
|
à, è, ì, ò, ù |
Accent Grave |
|
|
À, È, Ì, Ò, Ù |
UPPERCASE Accent Grave |
|
|
á, é, í, ó ú |
Accent Acute |
⌥ e and then the letter. |
|
Á, É, Í, Ó Ú |
UPPERCASE Accent Acute |
⌥ ⇧ e and then the letter. |
|
â, ê, î, ô, û |
Circumflex |
⌥ 6 and then the letter. |
|
Â, Ê, Î, Ô, Û |
UPPERCASE Circumflex |
⌥ ⇧ 6 and then the letter. |
|
ã, õ, ñ |
Tilde |
⌥ n and then the letter. |
|
Ã, Õ, Ñ |
UPPERCASE Tilde |
⌥ ⇧ n and then the letter. |
|
ä, ë, ï, ö, ü, ÿ |
Umlaut |
⌥ u and then the letter. |
|
Ä, Ë, Ï, Ö, Ü, Ÿ |
UPPERCASE Umlaut |
⌥ ⇧ u and then the letter. |
|
ā, ē, ī, ō, ū, ȳ, z̄, etc. |
Macron |
⌥ a and then the letter. |
|
ḥ, ṭ, ḳ, etc. |
under dot |
⌥ x and then the letter. |
Table 33
Typing Special characters using the U.S. Extended keyboard
The computer uses many other (“invisible”) characters to affect the display of your text on screen and on paper. Each space, tab and Return is counted as an individual character, a “value” added to your file. Additional characters that affect the format of your document include
• Page Break
Choose the menu command: Insert > Page Break to force succeeding text to begin at the top of a new page.
• Soft Return
Press the ⇧ and ⏎ keys on your keyboard to force succeeding text to begin a new line without beginning a new paragraph.
• Tab
Press the ⇥ key on your keyboard to force succeeding text to begin at the next tab stop.
• Space
Press the Space Bar on your keyboard to enter a space between numbers and letters, etc.
• Non-Breaking Space
Press ⌥ and the Space Bar on your keyboard to enter a space between numbers and letters, etc. that prevents the “words” on either side from breaking at a line wrap.
☞ You can see how Nisus Writer Pro displays these “invisible” or “formatting” characters in Table 32 on page 590. To turn on their display, choose the menu command: View > Show Invisibles.
Type “special” Yiddish characters
• “Veis” (בֿ the Vet with an “overline” which appears at the beginning of a word)
1. Type the vet ב
2. Type the “overline” which appears under the “Delete” key ֿ .
• “Fay” (פֿ the Pey with an “overline” which appears at the beginning of a word)
1. Type the pey פ
2. Type the “overline” which appears under the “Delete” key ֿ .
• “Ḥirik Yod” (י with a dot under it)
1. Type the Yod י .
2. Press ⌥ and type the “4” on the numbers row “ ִ
” This displays יִ .
• “Kaf” (כ with a dot in it)
1. Type the Kaf כ.
2. Press ⌥ and type the “comma” (or when in the Standard Hebrew keyboard, the Taf ת; or, when in the Hebrew QWERTY keyboard, the “tilde” ~) “ּ ”
This displays כּ.
• “Pey”(פ with a dot in it)
▷ See “Kaf” above.
• “Taf” (ת with a dot in it)
▷ See “Kaf” above.
• “Sin” (ש with a dot above and to the left)
1. Press ⌥ (and with the key still pressed)…
2. Type (using whatever version of the Hebrew keyboard you prefer, that key that produces) the “ש”.
This displays שׂ.
• “Kometz-Alef” (אָ)
1. Type the Alef א.
2. Press ⌥ (and with the key still pressed)…
3. Type (using whatever version of the Hebrew keyboard you prefer, that key that produces) the “7”.
• “Tzvei-Yudin” (ײַ) Using the Hebrew keyboard…
1. Press ⌥ (and with the key still pressed)…
2. Type a י as illustrated in Figure 556.
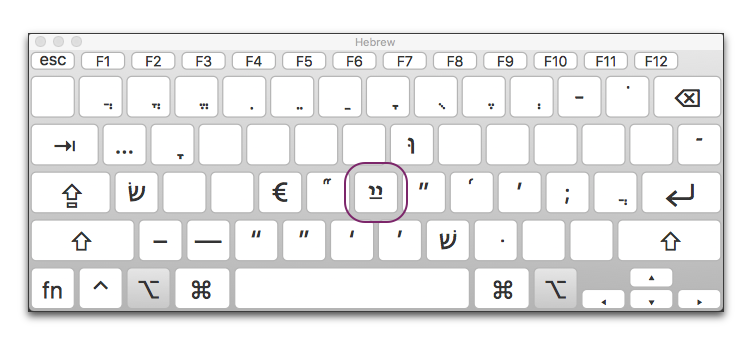
Figure 556
Option-modified Hebrew keyboard
• “Tzvei-Yudin” (ײַ) Using the Hebrew – QWERTY keyboard…
1. Press ⌥ (and with the key still pressed)…
2. Type a ט as illustrated in Figure 557.

Figure 557
Option-modified Hebrew- QWERTY keyboard
Set up language support on your Macintosh
You can learn more about Unicode and its implementation in Mac system from these very old resources
• What is Unicode?
• Two Bytes of the Cherry Unicode and Mac OS X (by Matt Neuburg)
• Michael Everson develops fonts
• Alan Wood’s Unicode Resources
• Unleash your Multilingual Mac by Tom Gewecke
All text in Nisus Writer Pro is Unicode. You can enter any Unicode character at the insertion point in your document.
1. Choose the menu command: Edit > Special Characters > Show Character Catalog…, as illustrated in Figure 410 on page 468.
2. Double-click the character you want to have appear in your document.
| Previous Chapter Appendix III |
<< index >> |
Next Chapter Appendix IV |