At first blush, the Macintosh seems a little like a typewriter (if you can remember what that was)2. It has a keyboard that looks pretty much like that of a typewriter and it enables you to put letters together to put words on paper. However, there the analogy ends.
On a computer you type letters and spaces, numbers and punctuation marks, combining them into recognizable, meaningful configurations. The keyboard sends electronic signals to the central processing unit (CPU) which then sends the signals further on to become images that appear in thousands of points of light on the monitor in front of you.
• When you type on the computer keyboard, the words that do not fit on one line automatically “wrap” to the beginning of the next line.
• Press ⏎ only to begin a new paragraph, not when you come to the end of a line.
• Indent the beginnings of your paragraphs using the tools on the ruler (as explained in “Format Paragraphs” beginning on page 112). Do not press ⇥ or the space bar.
For detailed information that explains how fonts work and how Nisus Writer Pro displays your text on opening a file see “Appendix III - Displaying Fonts and Text” on page 709.
Enter special characters into your text
The vast majority of the characters you are likely to use in a document are available easily from the keyboard. Of the approximately 0 characters in this document (this calculation was made before the text was completed so all these numbers are approximate) slightly more than 1,077,136 are alphabetics, approximately 212,820 are spaces, 41,633 are various punctuation marks, and 14,548 are numerals, making a total of approximately 1,346,137. That leaves approximately 38,464 characters in this document that are not regular text (many are images). This wide variety of characters are more unusual and it can be hard to remember what keys to press to have them display. Access to many of these characters is explained in “Appendix III - Typing Unusual Characters” on page 710. You can, however, enter most of these characters in a more direct fashion.
► Choose the character desired directly from the menu Insert > Special Character, or
► Choose the character desired directly from the menu Edit > Special Characters.
All of the special characters available from the menus are listed beginning on page 668.
► Click the characters as they appear in the Special Characters palette.
You can modify the Special Characters submenus and palette to suit your needs.
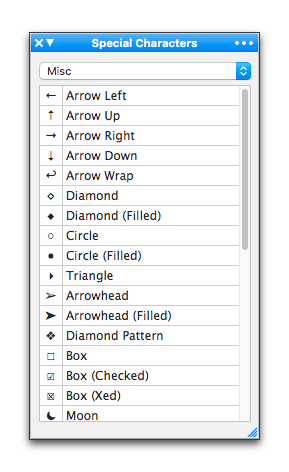
Figure 32
The Special Characters palette displaying the Misc (miscellaneous) set
Use the Special Characters palette
The Special Characters palette, illustrated in Figure 32 above, is in the Writing group of palettes. You can also open it from four different locations on the menus.
► Choose the menu command: Edit > Special Characters > Show Special Characters Palette….
► Choose the menu command: Insert > Special Character > Show Special Characters Palette….
► Choose the menu command: View > Palettes > Floating Palettes > Special Characters.
► Choose the menu command: Window > Palettes > Floating Palettes> Special Characters.
The Special Characters palette has two menus. The pop-up menu below the title bar offers the different sets of characters that appear in the menu Insert > Special Character and the menu Edit > Special Characters. Their contents are listed in alphabetical order beginning on page 668. They are:
• Misc (short for “miscellaneous”)
As with all other palettes, you can leave this open wherever you like on your monitor and click the characters you want on an as-needed basis.
The “…” (Ellipsis, or Options menu) on the right of the Special Characters palette enables you to change the display of the characters in the palette:
Toggles the display to show the characters as well as their names.
Contains a submenu that enables you to display the contents of the palette in various sizes: 10, 11, 12, 14, 16, 18, 20, 24, 28, 32, and 36.
Opens a dialog that enables you to customize the special characters and their availability.
Customize the Special Characters palette
You can also edit existing special character sets, remove existing sets and even add new ones.
If you know how to type the character:
1. Choose Customize Special Characters… from the bottom of
◦ the menu Insert > Special Character, or
◦ the menu Edit > Special Characters, or
◦ choose Customize Characters… from the “…” (Ellipsis, or Options menu) in the Special Characters palette.
The Edit Special Characters window appears as illustrated in Figure 33.
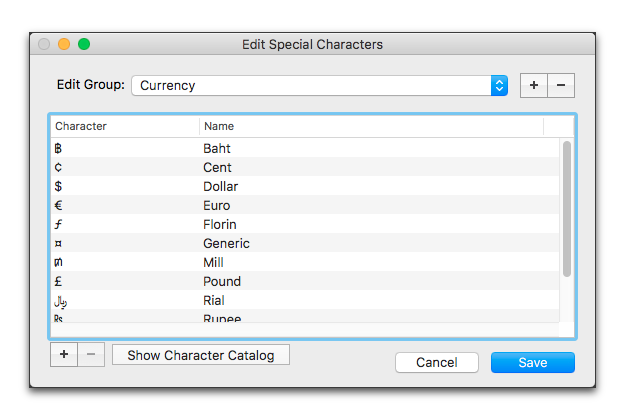
Figure 33
The Edit Special Characters window
2. Click the Plus (+) button at the bottom left corner of the window.
3. Type the character you want in place of the two question marks (??) that appear on the left edge of the window.
4. Press ⇥ and type the name of the character.
If you have more than one character you wish to add at one time, repeat step 2. You can even switch to a different set and continue to add characters to those as well using step 2.
5. When you are satisfied with your entries click Save to close the dialog.
If you do not know how to type the character, begin with step 1 above, then, instead of continuing with step 2,
6. Click Show Character Catalog at the bottom of the window.
7. Find the character you want in the Character Viewer panel.
8. Drag the character you want from the Character Viewer panel to the Edit Special Characters window as illustrated in Figure 34.
Dragging the character places it in the Character field and the character’s Unicode value appears in the Name field.
9. Double-click the Name field and either type over the Unicode value that appears there or add the name of the character.
You can even copy the name from the Character Viewer panel.
10. When you are satisfied with your entries click Save to close the dialog.
☞ Clicking Cancel forfeits all your work in that session of editing special characters.
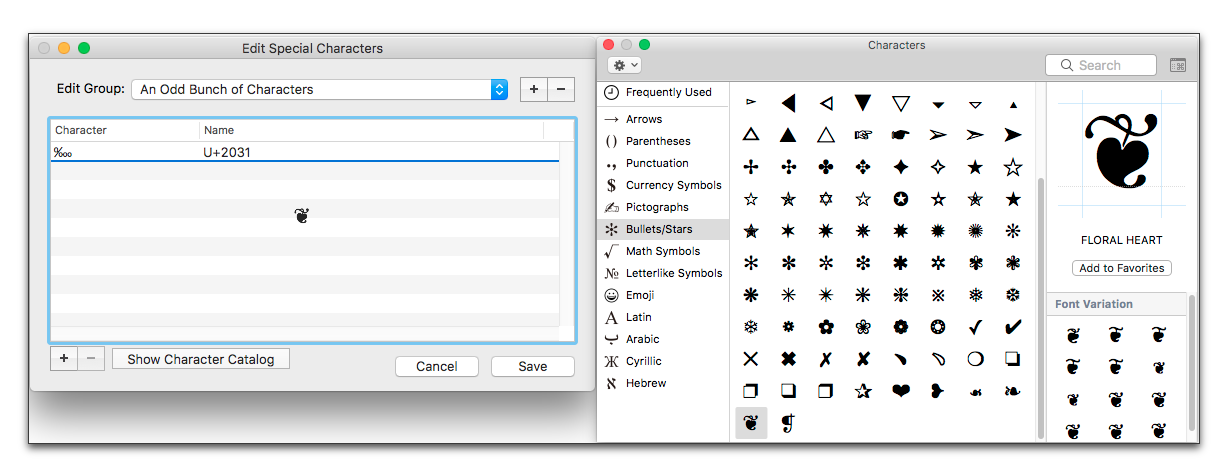
Figure 34
Customizing the Special Characters palette
Add your own set to the palette and menu
You can even create your own personal set of special characters that you tend to use most often.
1. Choose Customize Special Characters… from the bottom of
◦ the menu Insert > Special Character, or
◦ the menu Edit > Special Characters, or
◦ the “…” (Ellipsis, or Options menu) in the Special Characters palette.
The Edit Special Characters window appears as illustrated in Figure 33.
2. Click the Plus (+) button in the upper right corner of the window.
3. Give your new group of characters a name.
5. Enter the characters you want in this group as explained in “Add characters to a set” on page 37.
Remove characters from a set or an entire set
1. Select the character(s) you want to remove, then
2. Click the Minus (-) button in the lower left corner of the Edit Special Characters window to delete a character from a set.
► Click the Minus (-) button in the upper right corner of the Edit Special Characters window to remove a set from the palette and menus.
An alert appears asking you to confirm your choice. This action is undoable (though you can reconstruct your work).
| Previous Chapter Write and Edit |
<< index >> |
Next Chapter Write in Multiple Languages |