The simplest means of finding things with Nisus Writer Pro is by using “Normal Find.” You can find words, sentences, entire paragraphs, individual spaces, tabs, even the Return characters at the end of paragraphs. You simply tell Nisus Writer Pro what you want to find by entering it into the Find & Replace window. Nisus Writer Pro offers you a variety of methods to accomplish this.
When you choose the menu command: Edit > Find > Show Find… Nisus Writer Pro opens the Find & Replace window.
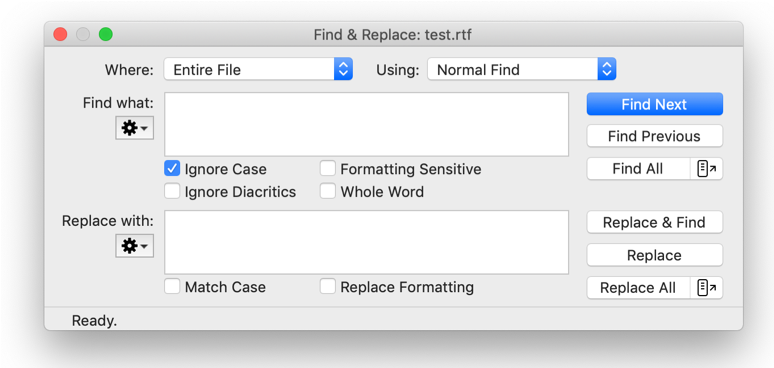
Figure 385
The Find & Replace panel.
Enter something into the Find box
► Choose the menu command: Edit > Find > Show Find… and type the text you want to find.
Or
► Select the text you want to find in your document, choose Copy to Find from the Copy or Find submenus of the Edit menu.
Nisus Writer Pro puts the text into the Find box without using the Clipboard.
If you simply press ⇥ Nisus Writer Pro moves the insertion point to the Replace box. If you press ⏎ Nisus Writer Pro searches for what you have in the Find box.
Enter something into the Replace box
► Choose the menu command: Edit > Find > Show Find… press ⇥ and type the text you want to replace.
Or
► Select the text you want to replace in your document, choose Copy to Replace from the Copy or Find submenus of the Edit menu.
☞ You can paste a table into the “Replace with” field of the Find & Replace window to replace all found objects with a table. This enables you to add a placeholder for a table in your document and then at a later time replace those placeholders with a specified table that you can edit at will.
Find text, or find and replace text
1. Choose the menu command: Edit > Find > Show Find….
2. Make sure Normal Find is the search type in the Using pop-up menu at the top of the dialog.
3. Enter what you want to find in the Find box.
4. Enter what you want as a replacement in the Replace box.
5. Click the appropriate button to start the procedure.
◦ Click Find Next to find the next occurrence of the Find expression.
Nisus Writer Pro selects the next match in your document text and scrolls it into view.
◦ Click Find Previous to find the preceding occurrence of the Find Expression.
Nisus Writer Pro selects the preceding match in your document text and scrolls it into view.
◦ Click the Find All button to find all matches in your document. You have two options depending on which side of the Find All button you click:

▪︎ Click the left side of the Find All button to select all matches in your document text, as shown in Figure 386 below. The bottom left corner of the Find & Replace window indicates the total number of matches.
▪︎ Click the right side of the Find All button (the icon showing a rectangular list with an arrow emerging) to display all matches in a separate floating window, as described in “Find All results list window”.
◦ Click Replace & Find to replace the current selection with the Find expression and find the next occurrence of the Find expression.
Nisus Writer Pro selects the Find Expression in your document and scrolls to display it in your window, as if you had clicked the two buttons Replace and then Next.
◦ Click Replace to replace the selection in your document with what is in the Replace box.
Nisus Writer Pro places the Replace Expression at the insertion point or replaces the selection with the Replace Expression.
◦ Click Replace All to find and replace all occurrences of the Find Expression with what appears in the Replace box.
Nisus Writer Pro replaces the Find Expression with the Replace Expression.
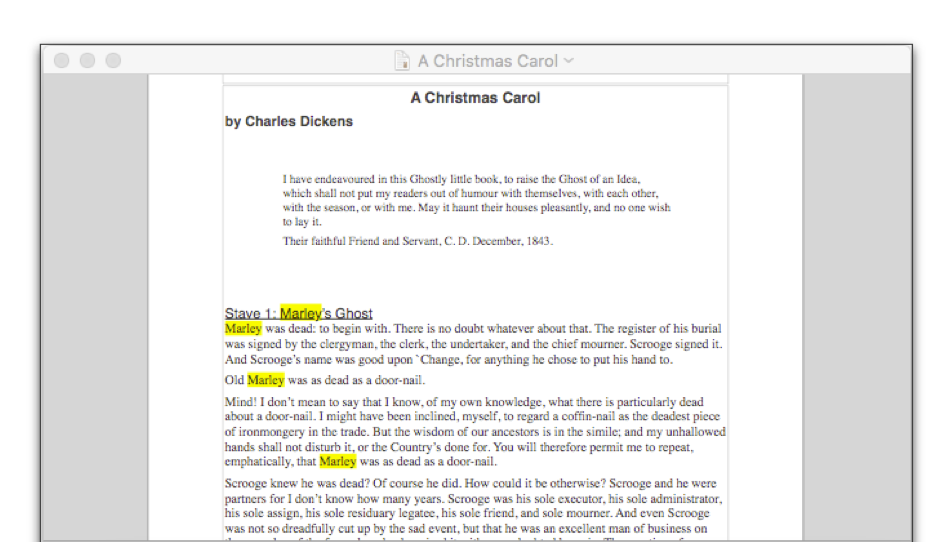
Figure 386
The results of a Find All search for the word Marley.
☞ When Nisus Writer Pro finds what you search for, it selects and highlights it with a particular color that you can modify as explained in “Appearance Preferences” on page 570.
6. Click the Close button when you finish or just click back into your document and leave the Find & Replace window open in the background to use later.
Find and/or replace the next occurrence(s) of the Find expression
Nisus Writer Pro enables you to find what you are looking for, whether or not the Find & Replace window is open.
► If the Find & Replace window is open, simply click the Find Next button (illustrated in Figure 384 on page 442) to find the next occurrence.
► If the Find & Replace window is closed choose the menu command: Edit > Find > Find Next.
The Find & Replace window opens with Entire File as the setting (that is, if the insertion point is somewhere other than the beginning of the text, it will wrap around), however, the check boxes and pop-up menus in the Find & Replace window allow you to alter the search in a variety of ways.
The Where pop-up menu offers a variety of options to either expand or constrict your search area. Each of these options are exclusive. You can search in the Tables only, or in the Comments only, but not only in the Tables & Comments at the same time and not all the other areas of your document.
• All Open Files
Nisus Writer Pro will search not just the active document, but all your open documents. This option works well with the Find All results list window, so you can see a summary list of all matching documents the matches within them.
• Entire File
Nisus Writer Pro will search for the find expression through any text in the main text, the comments headers and/or footers and the notes, whether the Comments sidebar or split view is open or not, or if the headers/footers do not display because your document is in Draft View. However, using Entire File will not find the text if it is in your tracked changes, or if you have used that text as a part of the sample text in the Style Sheet view. Nisus Writer Pro will open the Comments sidebar and/or switch to Page View if needed in order to display the found text.
• Visible Text
Nisus Writer Pro will search for and or replace the find expression through any text in the main text, the comments headers and/or footers and the notes, only if the Comments sidebar or split view is open, or if the headers/footers display because your document is in Page View. Nisus Writer Pro will not open the Comments sidebar and/or switch to Page View if needed in order to display the found text. The searched-for text does not need to be scrolled and visible on screen for it to be considered “visible”.
• In Selection
Nisus Writer Pro will search for and select or replace the find expression only in any text you have selected. The selection(s) do not need to be contiguous, but can be not only multipart but can even include selections in the comments.
• Here to End
Nisus Writer Pro will search for, select, and/or replace, the find expression from the location of the insertion point to the end of the document. The search does not “wrap around”.
• Here to Start
Nisus Writer Pro will search for, select, and/or replace, the find expression from the location of the insertion point to the beginning of the document. The search does not “wrap around”.
• Tables
Nisus Writer Pro will search for, select, and/or replace, the find expression only in any tables that exist in the document.
• Comments
Nisus Writer Pro will search for, select, and/or replace, the find expression only in any comments that exist in the document, opening the Comments sidebar or split in order to display them if necessary.
• Footnotes & Endnotes
Nisus Writer Pro will search for, select, and/or replace, the find expression only in any footnotes and/or endnotes that exist in the document.
• Headers & Footers
Nisus Writer Pro will search for, select, and/or replace, the find expression only in any headers and/or footers that exist in the document.
• Tracked Additions
Nisus Writer Pro will search for, select, and/or replace, the Find Expression only in any tracked additions to the document.
• Tracked Deletions
Nisus Writer Pro will search for and select the Find Expression only in any tracked deletions from the document, opening the Tracked Changes sidebar or split in order to display them if necessary.
• All Tracked Changes
Nisus Writer Pro will search for and select the Find Expression only in any tracked changes (whether they are additions to or deletions from the document), opening the Tracked Changes sidebar or split in order to display them if necessary.
The checkboxes beneath the Find what text box offer options that refer to the nature of the text in and for which you are searching.
Ignore Case When checked (which is the default), Nisus Writer Pro finds both upper and lowercase occurrences of the Find Expression.
When unchecked, Nisus Writer Pro finds the exact match of upper and/or lower case characters in the Find Expression.
Suppose you have the sentence
“I hope that the writer in you will blossom with Nisus Writer Pro.”
With Ignore Case checked (turned on), Nisus Writer Pro finds both upper and lowercase occurrences of the Find Expression.
“I hope that the writer in you will blossom with Nisus Writer Pro.”
With Ignore Case turned off (unchecked) and the word “writer” as a Find Expression, Nisus Writer Pro would find only the first instance of the word (the noun not the proper noun).
“I hope that the writer in you will blossom with Nisus Writer Pro.
Whole Word When checked, Nisus Writer Pro finds the Find Expression only if it forms an entire word.
When unchecked, Nisus Writer Pro finds the Find Expression even if it makes up only a portion of a word.
For example, with Whole Word checked, Nisus Writer Pro would not find the word “hat” in “that.”
Suppose you have the sentence
“I hope that the writer in you will blossom with Nisus Writer Pro.”
With Whole Word unchecked (turned off), Nisus Writer Pro finds all occurrences of the Find Expression “hat”.
“I hope that the writer in you will blossom with Nisus Writer Pro.”
With Whole Word checked (turned on) and the word “hat” as a Find Expression, Nisus Writer Pro would not any occurrences.
“I hope that the writer in you will blossom with Nisus Writer Pro.”
Ignore Diacritics
When checked (turned on) ignores those glyphs added to a letter. Different diacritics are specific to both Latin (Roman) and non-Latin writing systems.
When unchecked (turned off) Nisus Writer Pro finds only those words that are a precise match for the Find Expression
When checked (turned on) Nisus Writer Pro finds words that may, or may not, have diacritical marks.
For example, with Ignore Diacritics turned on…
“Francoise” will find it in the sentence:
“If you’re looking of a mini-dress, consider Françoise, which is chic and easy-to-wear.”.
היה אומר will find it in the sentence:
הוּא הָיָה אוֹמֵר, עַל שְׁלשָׁה דְבָרִים הָעוֹלָם עוֹמֵד
When checked (turned on), Nisus Writer Pro searches for and finds the Find Expression only if it matches the formatting assigned from the Format menu.
You can search for an expression with different formatting, if the formatting is applied to a single contiguous literal region at the start or end of a pattern.
If you remove all formatting from the Find what box, the Formatting Sensitive checkbox automatically turns itself off.
Using the expression:
“This That Another”
(where the Red highlight has been added to the word “That”, while Formatting Sensitive is unchecked (turned off) Nisus Writer Pro can find:
This That Another
even though “Another” has additional formats associated with it that are not part of the Find Expression.
Similarly, using the expression:
“This That Another”
(where the Red highlight has been added to the word “That”, and the emphatic Character Style has been added to the word “This” and Nisus Writer Pro will find:
“This That Another”
as well as any other instance of the phrase… regardless of whether or not the phrase in the Find & Replace window shows formatting. You can apply the menu command: Format > Any Formatting to any portion of the Find Expression to turn off format sensitivity to that selected portion of the Find Expression. Doing so, removes the visible formatting from the text in the Find & Replace window.
The important thing to remember is that this is a “literal” region with formatting.
This behavior is different for PowerFind and PowerFind Pro searches.
The commands in the pop-up menus at the top of the Find & Replace window apply to the find and replace action. However, the check boxes for the Find what and Replace with text boxes relate only to the fields immediately above them. These check boxes allow you to limit the replace in two ways.
Match Case When checked, Nisus Writer Pro replaces all the found text (whether uppercase or lowercase depending on the setting for the Find field and matches the original case of the Find expression regardless of what appears in the Replace field. If the found text was uppercase Nisus Writer Pro replaces it with uppercase characters, if the found text was lowercase Nisus Writer Pro replaces it with lowercase characters.
When unchecked, Nisus Writer Pro replaces the exact match of upper and/or lower case characters that appears in the Replace Expression.
Suppose you have the sentence
“I hope that the writer in you will blossom with Nisus Writer Pro.”
With Match Case checked (turned on), Nisus Writer Pro replaces both upper and lowercase occurrences of the Find Expression.
“I hope that the writer in you will blossom with Nisus Writer Pro.”
With Match Case turned off and the word “writer” as a Find Expression, Nisus Writer Pro would replace both instances of the word with a lowercase “w”.
“I hope that the writer in you will blossom with Nisus writer Pro.”
When checked, Nisus Writer Pro replaces the Replace Expression with the formatting assigned from the Format menu and replaces it with the Replace Expression and the formats assigned to it from the Format menu.
An example of Normal find using formatting replacement is illustrated in Figure 387 and Figure 388. The Find expression searches for “this” (Capitalized, UPPERCASE or not; italic, underlined or not), so long as it is Blue. Leaving all other occurrences of “this” untouched, the Replace expression matches the case and formatting already there, and has only one format associated with it, which it adds: Bold.
.png)
Figure 387
Normal Find Replace Formatting (before)
.png)
Figure 388
Normal Find Replace Formatting (after)
An example of PowerFind (explained beginning on 458) using formatting replacement is illustrated in Figure 389 and Figure 390. The Find expression searches for and “captures” “AnyText” (Capitalized, UPPERCASE or not; of any color or size, and almost any format), so long as it is emphatic. Leaving all other text untouched, the Replace expression matches the case and formats already there, and has two formats associated with it, which it adds: Underline and 14 point.
.png)
Figure 389
PowerFind Replace Formatting (before)
.png)
Figure 390
PowerFind Replace Formatting (after)
☞ It may be easier to reformat a large multipart selection than it is to concoct the proper Find/Replace expression. After finding all the Emphatic text, you could use the commands of the menus and the tags on the Status Bar to remove one or more styles and apply new ones.
☞ Find/Replace only matches text that is visible in the current document view. To limit a Replace All action from changing text in the headers/footers and/or footnotes/endnotes, temporarily hide these portions of the document by choosing the menu command: View > Draft View.
This window floats above any open document windows and lists all matches for an earlier find operation. You can keep any number of Find Results windows open indefinitely.
There are a variety of ways to create a new Find Results window. The most common method is to use the Find All or Replace All button in the Find & Replace window. Clicking the icon (a rectangular list with an emanating arrow) on the right side of either button will open a new Find Results window. You can use a similar button in the Go to Content window.
Another way to create a Find Results window is from an existing multipart selection. For example, perhaps you selected all text in a particular style using the command Select All in Style. Once you have a multipart selection you can show it in a results window using the menu:
Edit > Select > Show Selection in Results Window
That command opens a new Find Results window listing the existing selection, so you can easily jump between each constituent selection in the original multipart selection.
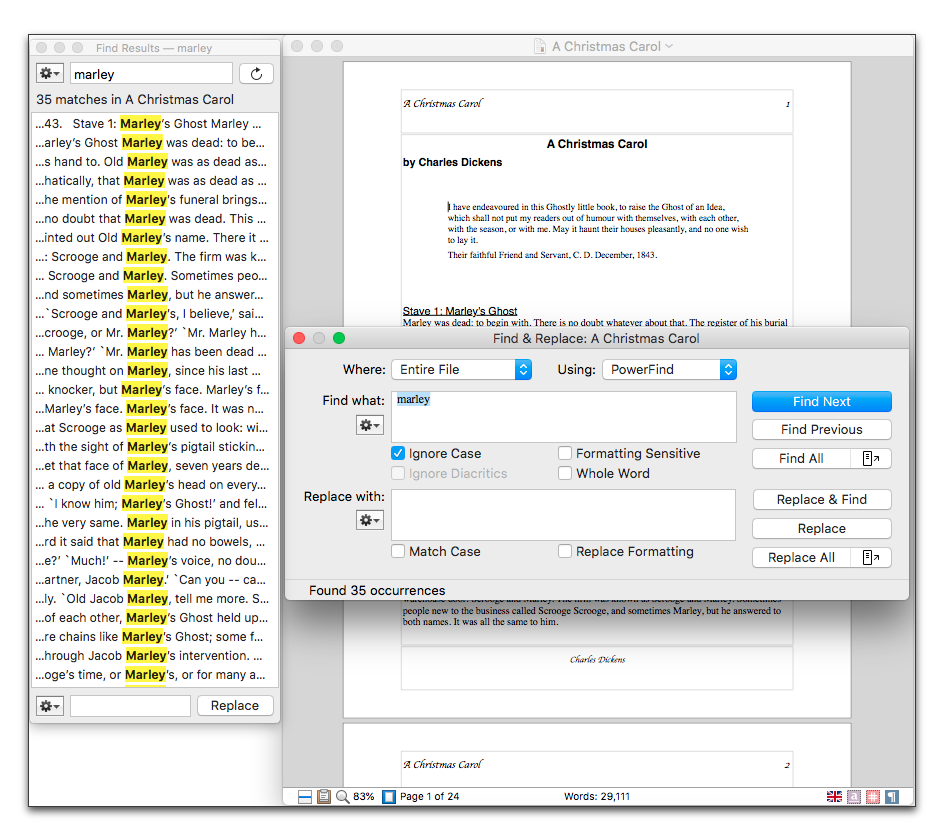
Figure 391
Find Results window floating alongside a document window.
You can adjust your search criteria and refresh the results using the controls along the top of the Find Results window.
You can select any match in the Find Results window listing to jump to its location in your document window. Nisus Writer will select the corresponding text and scroll it into view.
Alternatively you can use either of the following menus:
Edit > Select > Select Next in Results Window
Edit > Select > Select Previous in Results Window
Those commands allow you to select the next/previous match from the active Find Results window. This is especially useful if you want to move through a list of matches using keyboard shortcuts, so you don’t have to reach for the mouse to click the next match in the list.
Replace text using the results list
You can use the Find Results window to pick and choose which matches you want to replace:
1. Select the desired matches in the Find Results window listing. You can use standard macOS methods to create a noncontiguous selection. For example: hold the Command key down when clicking a particular match to toggle its inclusion in the selection.
2. Enter a replace expression using the controls at the bottom of the Find Results window.
The text of the selected matches will be replaced in your document text. The Find Results list will however continue to show the original matching text, from before the replacement.
If you keep a Find Results window open while you edit your document text, Nisus Writer will attempt to keep your list of matches current. For example, if you insert some text into your document, the list of matches will automatically update to take the new text into account; your matches are shifted as necessary and remain valid.
However, Nisus Writer cannot accommodate all kinds of editing. For example, if you completely overtype (or otherwise obliterate) the matched text in your document.

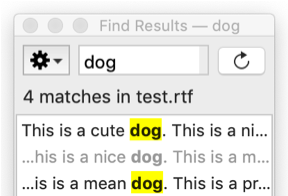
Figure 392
A find results list before and after editing. The right image shows the second match has become invalid.
The example in Figure 392 above shows what happens if the text “nice dog” is overtyped with completely new text. Such editing may cause the match to become stale (invalid). Stale matches show using a disabled color in the listing. Nisus Writer will not allow you to select or replace stale matches.
Reuse find and/or replace expressions
Nisus Writer Pro makes it easy for you to reuse recent find and replace expressions in your documents. These expressions are automatically stored in the Recent Find and Recent Replace sets of the Gear menu in the Find & Replace window and in the PowerFind Browser as explained in detail on page 460.
☞ Nisus Writer Pro stores recent expressions until you quit the application.
Use a recently used find or replace expression
Once you have defined your expression and used it
► Choose the expression you want from the Recent Find or Recent Replace submenu of the Gear menu in the Find & Replace window.
Nisus Writer Pro places whatever expression you choose in the Find & Replace window dialog as illustrated in Figure 393.
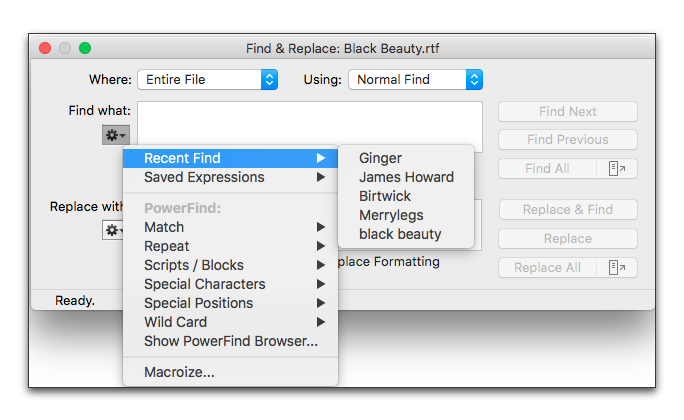
Figure 393
The Recent Find submenu of the Gear menu in the Find & Replace window
Save a find or replace expression
You can even save any Normal Find, PowerFind or PowerFind Pro expression.
Once you have defined your expression and tested it, for example the complex expression illustrated in Figure 413 below. You can save it then and there.
1. Inside the Find & Replace window, choose the menu command Gear > Saved Expressions > Save Expression….
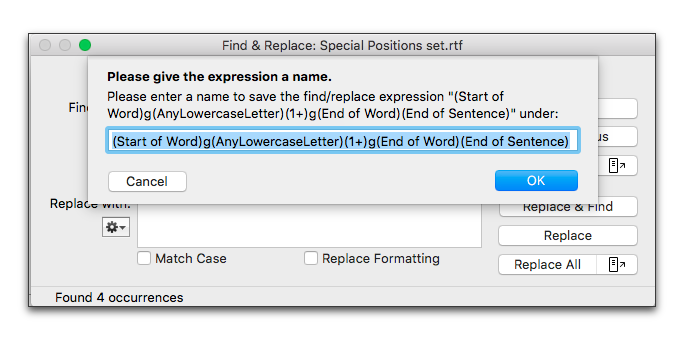
Figure 394
The Save Expression sheet
2. Give your expression a name.
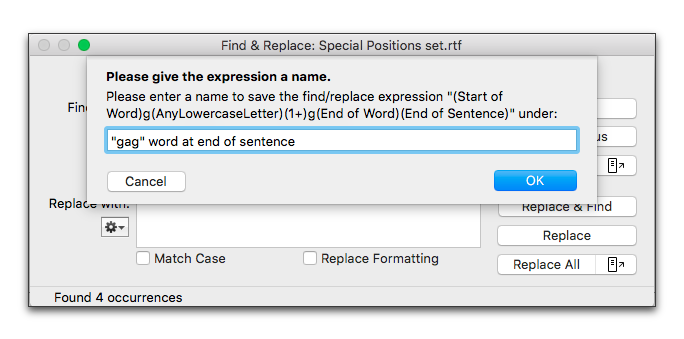
Figure 395
Naming a saved expression
If, however, you have gone on to other tasks and you later remember that you want to save that complex expression you can do that.
4. Choose Show PowerFind Browser… from the Gear menu in the Find & Replace window.
5. Click Recent Find Expressions or Recent Replace Expressions from the PowerFind column in the PowerFind Browser.
6. Click the expression you want to save from the Recent Find Expressions or Recent Replace Expressions column in the PowerFind Browser as illustrated in Figure 396 and click Save.
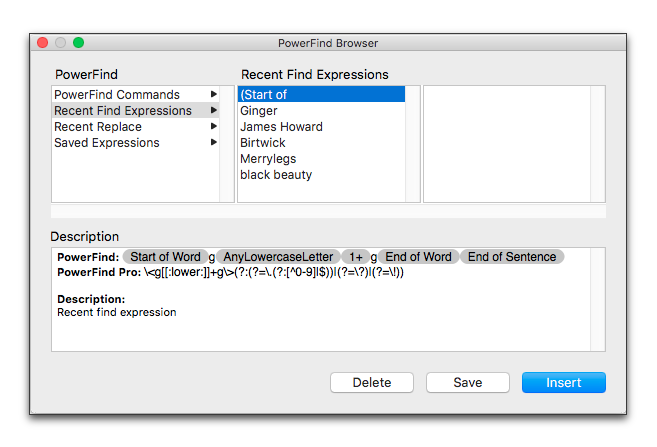
Figure 396
Saving a recent expression
Once again, the Save Expression sheet appears, as in Figure 394 above. Continue as in steps 2 and 3 above in the section Save a find or replace expression.
When you quit, Nisus Writer Pro automatically saves your Find what and Replace with expressions.
Use a saved find or replace expression
► Choose the saved expression you want from the menu: Gear > Saved Expressions inside the Find & Replace window.
If you choose the command from the Gear menu beside the Find what text edit box Nisus Writer Pro inserts the expression in the top box; if you choose the command from the Gear menu beside the Replace with box, Nisus Writer Pro inserts the lower box.
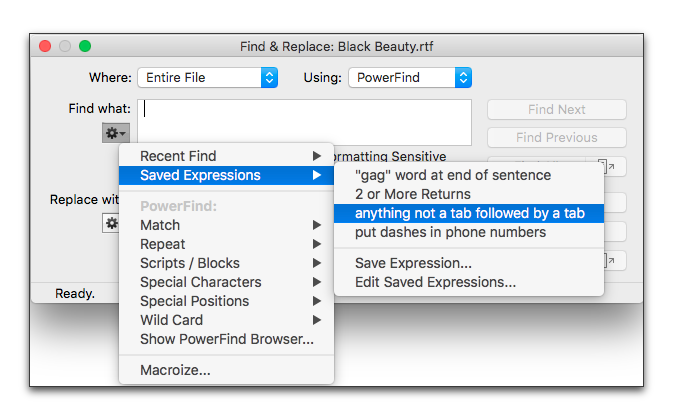
Figure 397
The Saved Expressions submenu
Delete a saved find or replace expression
1. Click Recent Find Expressions or Recent Replace Expressions from the PowerFind column in the Find/Replace browser.
2. Click the expression you want to delete from the Recent Find Expressions or Recent Replace Expressions column in the Find/Replace browser as illustrated in Figure 396 and click Delete.
Create a macro from Find and Replace expressions
Nisus Writer Pro can automatically create a macro out of any find or find/replace expression you build in the Find & Replace window. (For an explanation of macros see “Macros, an Introduction” and “Macros, the Deeper Workings” on pages 629 and 638 respectively.) All you need do is choose the menu command: Gear > Macroize… in the Find & Replace window. Nisus Writer Pro takes all the information you have set there and builds expression for your macros. This allows you to test your find/replace expression thoroughly before adding a line to your macro.
1. Test your find/replace expression. Be sure that the settings in the Find & Replace window are set appropriately.
The Macroize… command takes these settings as the “options” argument in the macro. (For more information see “Adding macros”.
2. Choose the menu command: Gear > Macroize… inside the Find & Replace window.
A sheet appears in the Find & Replace window that offers a variety of choices.

Figure 398
The Macroize sheet in the Find & Replace window
From the pop-up menu inside the sheet you can choose from a number of options.
3. Choose the appropriate options for your macro command.
▸Find Next Finds and selects the next occurrence of the “Find what” expression.
▸Find Previous Finds and selects the previous occurrence of the “Find what” expression.
▸Find All Finds all occurrences of the “Find what” expression and selects them as a multipart selection.
▸Replace Next Finds the next occurrence of the “Find what” expression and replaces it with the “Replace with” expression.
▸Replace Previous Finds the previous occurrence of the “Find what” expression and replaces it with the “Replace with” expression.
▸Replace All Finds and replaces all occurrences of the “Find what” expression and with the “Replace with” expression.
Once you have made your choice you can either save those settings to create a one-line macro or copy the settings to the Clipboard to either edit or add to an existing macro.
Nisus Writer Pro presents a variant of the Save as dialog set to the Macros folder. The name of the file begins with the kind of action you chose in 3 above followed by the first few characters of the “Find what” expression in the Save as: field.
Or…
5. Click Copy to Clipboard to put the same information on the current Clipboard so that you can paste it into whatever macro you’re working on. This is for advanced users.
Or…
6. If you decide not to proceed, click Cancel.
☞ An example of using PowerFind and Macroize is detailed in the section “Convert Styles to HTML Code” beginning on page 475.
| Previous Chapter Find and Replace Text and Formatting |
<< index >> |
Next Chapter PowerFind |