When you are ready to add a comment to your document you can follow the procedure described above, using the menu commands, or click the Comments button on the Toolbar illustrated in Figure 437. In addition, Nisus Writer Pro presents an extensive variety of tools to work with your comments. The following six subsections explore the various tools and how to use them.
The Comments commands on the Tools menu
All the commands for controlling your comments are available from the menu: Tools > Comments. Each of these is described in Appendix I on page 694. The vast majority of these commands appear in the menus available from the Comments Sidebar, tag on the Status Bar and icon in the margin as explained below.
The Comments tools on the Toolbar
When you first open Nisus Writer Pro the Toolbar at the top of the document window displays a two-part Comments button: Show or Hide Comments on the left and Add New Comment on the right. The number of comments in your document (if there are any) appears to the right of the Show or Hide Comments portion.
• Clicking the left portion of the button opens the Comments sidebar (or, as an alternative, a Split, which is discussed in detail in the section “Main Text with Comments” on page 369). This enables you to scroll through and examine the various comments in your document.
This is the same result as choosing the menu command: Tools > Comments > Show Comments (though the Show Comments command does not indicate how many comments your document has).
• Clicking the right portion of the button opens the Comments sidebar (if it is not already open, or, as an alternative, a Split). and moves your insertion point into the comment windoid that appears, ready for you to enter your comment associated with the selected text (as explained above in “A quick intro to comments”.
This is the same result as choosing the menu command: Tools > Comments > Add Comment.
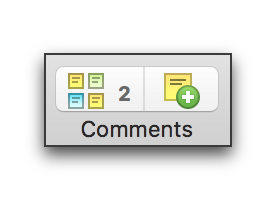
Figure 437
The Comments buttons on the Toolbar (Show Comments on the left & Add Comment on the right)
As illustrated in Figure 436 above and Figure 438 below and elsewhere throughout this section:
• A sidebar opens to the left of the text of your document displaying a “PostIt™” type note area where you can write your comment.
• Nisus Writer Pro adds a background highlight to the commented text in the same color as the comment note background and draws a line from the comment to the text in the document to which it is attached in that same color.
Nisus Writer Pro is shipped so that the background color of “My Comments” is set to a soft pale yellow. You can customize this color in the Appearance Preferences of Nisus Writer Pro (see “Appearance Preferences” on page 570).
Nisus Writer Pro enables an unlimited number of commentators. However, the application enables customization of the comment windoid background for up to 6.
• The User Name of the person who wrote the note appears in the title bar of the note along with the local date and time.
Nisus Writer Pro is shipped so that the title bars of comments show the author’s name. You can customize this for the application as explained in “The View portion of the New File preferences w” on page 587. You can change this on an individual file basis as explained in the section: “Sidebar - with comments” on page 512.
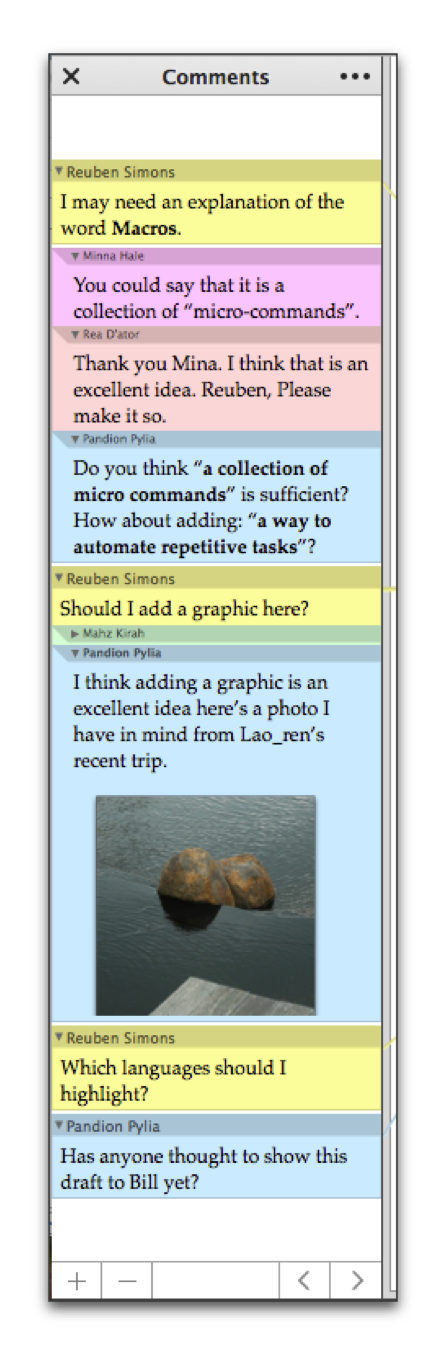
Figure 438
The Comments sidebar displaying a couple of threaded conversations
Nisus Writer Pro adds a new style to your document called Comment. This style is automatically applied to every comment created. If a style called Comment already exists in your Nisus New File, Nisus Writer Pro uses the formatting associated with that style. To add your own Comment style to your Nisus New File see “Create your own Comment style for your Nisus New File” on page 519. You can add any character formatting you want to the comment.
You can also add images, and tables, but you cannot add footnotes or endnotes.
When your insertion point is in any particular comment area, Nisus Writer Pro brightens the corresponding portion of the document to which that comment is applied.
Conversely, when comments are showing and your insertion point is in a paragraph that has one or more comments, Nisus Writer Pro brightens those comments. Otherwise comments are dimmed.
The title bar of the Comments sidebar displays (from left to right)
• a “Close Button” designated as an “x” which highlights when the pointer is on the title bar,
• the word “Comments” and
• an “…” (Ellipsis, or Options menu), which highlights when the pointer is on it.
Many of the commands of the menu Tools > Comments are also available from the Ellipsis, or Options menu.
These options are detailed in the section: “Additional controls for the display of comments” on page 508.
Show Comments is like a power strip with a variety of items plugged into it.
Perhaps you’ve put your toaster and TV into the power strip, but you prefer to just have the microwave plugged into the power strip. Either way toggling the power strip will turn back on whatever was previously plugged into it. There are a few exceptions:
◦ The Comments button on the Toolbar (if it is there) displays the number of comments in the document illustrated in Figure 437. Clicking the button opens and closes the Comments sidebar.
◦ Comment icons in the margin appear when your pointer hovers in the margin to the left of the beginning of any paragraph (if your document has at least one comment and Show Comment Icons in Margin is turned on).
• Show Comment Icons in Margin
When you hover your pointer in the margin opposite the beginning of any paragraph, Nisus Writer Pro can display little Comment icons as illustrated in Figure 439. Clicking the icon selects the text to which the comment is attached (or if there is no comment, the entire paragraph) and gives quick access to most of the commands in the Comments submenu of the Tools menu.
☞ The icon only appears if there is at least one comment in the document.
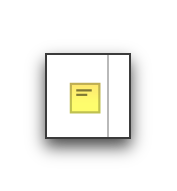
Figure 439
A Comment icon in the margin
• Show Comment Highlighting in Text
Nisus Writer Pro is shipped with this setting turned on when you first add a comment to your document. As described above, Nisus Writer Pro draws a line from the comment to the text to which it is attached and adds a background highlight to the commented text in the same color as the comment note background.
Using the commands of this submenu you can display your comments in any of two areas, or not at all.
Hides the display of the comments sidebar, or split view, whichever is displayed, without turning off any of the display options such as the Comment icons in the margin and the highlighting in the text.
Nisus Writer Pro is shipped with this setting on turned so that the sidebar opens on the left of the main text. You can switch the sidebar so that it opens on the right. If the Navigator is open, the Comments sidebar appears between the Navigator and the main text.
As explained in the section: “Main Text with Comments” beginning on page 369, you can split your document window so that your main text and comments are one above the other or side by side.
☞ The side by side split view is similar to, though not the same as using the Comments sidebar.
The commands in the menu depend on the authors of the comments.
If nobody sharing the document has added any comments only the name of the current editor appears on the menu, even if they have not added any comments. As others make their comments, their names appear, in alphabetical order by first name, on the menu as illustrated in Figure 440.
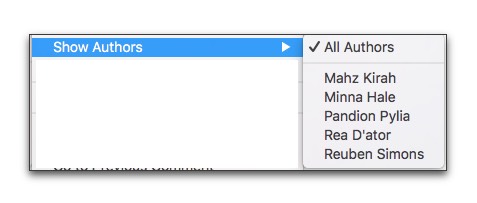
Figure 440
The Show Authors submenu displaying the names of the authors in Figure 438
Comments are grouped in “threaded conversations”. The first comment appears flush with the left edge of the Comments sidebar. Succeeding comments, added by clicking the Plus + in the lower right corner inside the comment, they appear slightly indented beneath the initial comment.
Creates a new Nisus Writer Pro document with the name “‘Filename’ - Comments” containing all the comments added to your document, including the author of the comment and the date it was added.
This is explained in the section: “Select the next or previous comment in your document” on page 505.
This is explained in the section: “Select the next or previous comment in your document” on page 505.
This is explained in the section: “Collapse or expand the comments in your document” on page 506.
This is explained in the section: “Collapse or expand the comments in your document” on page 506.
The bottom of the Comments sidebar has two additional tools:
• on the left are a Plus + and a Minus - which add and delete comments respectively.
• If there is no selection, but only an insertion point, the comment is added to the closest text character (i.e. not a space, tab or Return).
• The Minus - is only enabled if your insertion point is in a comment or text that has a comment associated with it.
• on the right are forward and backward pointers that move your selection to the next or preceding comments respectively.
• Your insertion point does not need to be in or near a comment to use these pointers.
• These pointers will not circulate through the document. Once you reach the first or last comment of the document they will go no further.
When you add a comment to your document the windoid in which it appears has a few controls..
As illustrated in Figure 438 the title bar of the comment initially displays only the author’s name. You can change this in any individual file to include either:
You may need to widen the Comments sidebar to see all the information available in the title bar. You can change the display by choosing the menu command: Tools > Comments > Display Options….
Clicking the title bar alternately collapses and expands the comment.
Clicking the Plus + or Minus - in the lower right corner of the windoid, as illustrated in Figure 441, alternately adds a comment to a conversation or deletes the comment where the Minus - appeared, even if it is the primary comment in a conversation.
If you are a secondary reader/editor/author, click the Plus + in the lower right corner of the windoid to add a subordinate comment. Subordinate comments are slightly indented from the original comment. Clicking the title bar of any comments in a conversation collapses only that comment, not all those subordinate to it.
A secondary reader/editor/author can delete any comment, but can only edit their own comment.
If your comment text exceeds 250 points in height, Nisus Writer Pro will reduce the comment’s height to display only the first 150 points and display an Expand button in the comment’s lower left corner as illustrated in Figure 441.
There is no way for the user to un-expand after you have clicked the button. However, the next time you open the file it will revert to its un-expanded state.

Figure 441
The Expand button in a comment windoid
The Comment icon in the margin
As illustrated above in Figure 439, the Comment icon appears in the margin (if there is at least one comment in the document) when you hover your pointer in the margin opposite the beginning of any paragraph or in front of a paragraph that has a comment associated with it. Clicking the icon selects the text to which the comment is attached (or if there is no comment, the entire paragraph) and gives quick access to most of the commands in the Comments submenu of the Tools menu.
If you have the Comments sidebar closed and hover over a Comment icon in the margin a help tag appears showing the comments associated with it, as illustrated in Figure 442
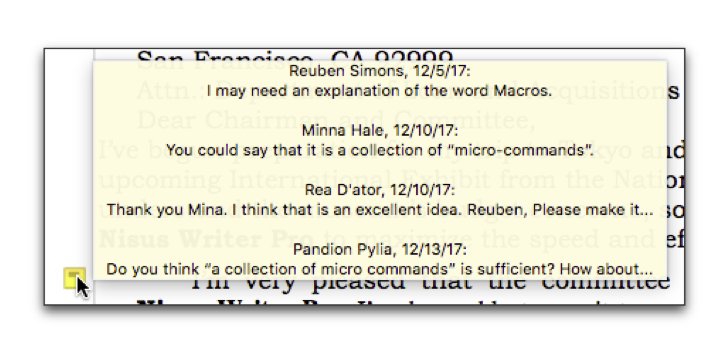
Figure 442
The help tag associated with a Comment icon in the margin
The Comment related tags on the Status Bar
Similar in appearance to the Comment icon in the margin, the left edge of the Status Bar displays two tags that offer tools for working with your comments. The Split Window tag indicates whether the window will split vertically or horizontally. Clicking it reveals a menu from which you can choose Add Split Showing Comments. To its right is a tag that uses the same image as the Comment icon in the margin illustrated above in Figure 439. Click it to gain access to the same commands as available from the Comment icon in the margin.
| Previous Chapter A quick intro to comments |
<< index >> |
Next Chapter Remove comments |