The following section will discuss character formatting which includes aspects of text like the font, size and color. It’s called “character” formatting because it can vary from character to character; each character in your document can potentially be formatted differently.
Here’s a quick demonstration of text with various kinds of character formatting:
Character
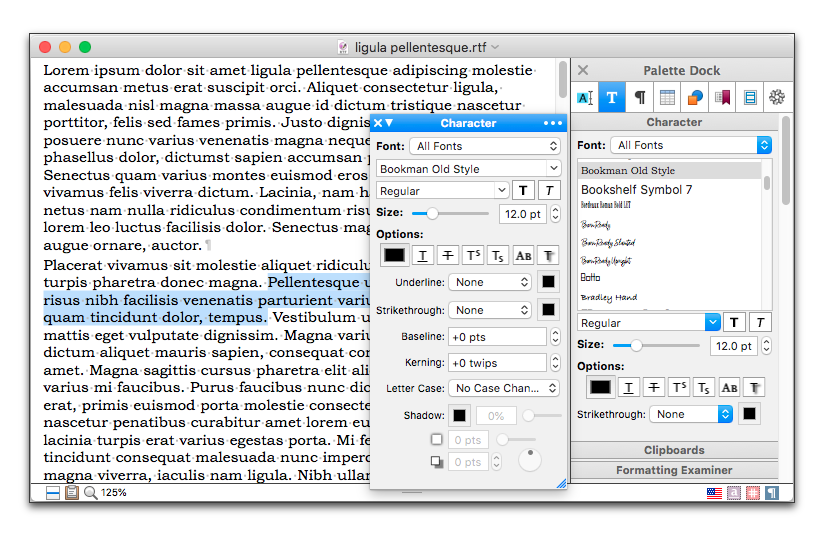
Use the Character palette to format text
The Character palette contains a number of tools that enable you to easily format your text.
These tools are illustrated in Figure 83, Figure 84, Figure 85 and Figure 86. While they both offer the same control, as illustrated in Figure 83, you can display more than one copy of the Character palette at the same time: one floating and another in the Dock. One can have all of its tools visible, while the other remains in a more “condensed” state.
The Character palette contains all the commands of certain submenus of the Format menu, giving you nearly one-click access to their commands. These include:
Figure 83
Using the Character palette to format text
☞ Whenever you change the font of characters in your text from its underlying style as set in your Nisus New File or an applied style sheet, as explained in “Style Sheets” on page 136, the Font/Character Formatting Tag appears on the Status Bar at the bottom of your document window. This is considered a “manual override” of the formatting of your document, as explained in detail on page 111.
1. Select the text you wish to change.
2. Using the Character palette in the Writing group inside the Palette Dock, choose the font you want from the Family pop-up menu.
Or
1. Select the text you want to have a different font.
2. Choose the font you want from the menu Format > Font.
You can choose from any font you have loaded in your System. The selected text appears in the chosen font.
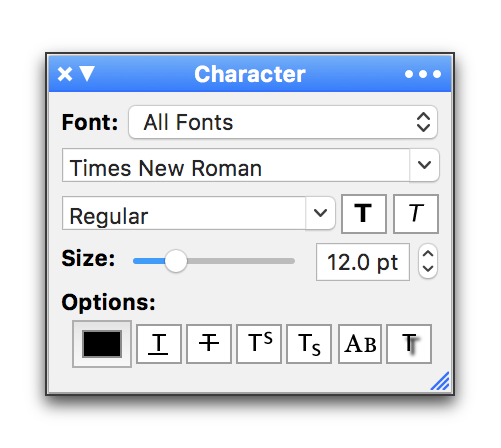
Figure 84
The Character palette in Condensed Mode
When you first start using Nisus Writer Pro all the palettes display in Condensed Mode. You can enlarge the Character palette by dragging the enlarge corner (if the palette is outside the Palette Dock) or, the drag bar (if it is inside the Palette Dock). Or you can use the “…” (Ellipsis, or Options menu) in the upper right corner of the palette and choose Expanded Mode.

Figure 85
The Character palette in Expanded Mode
If you have many fonts available, a scroll bar appears. You can drag this scroll bar to display additional fonts.
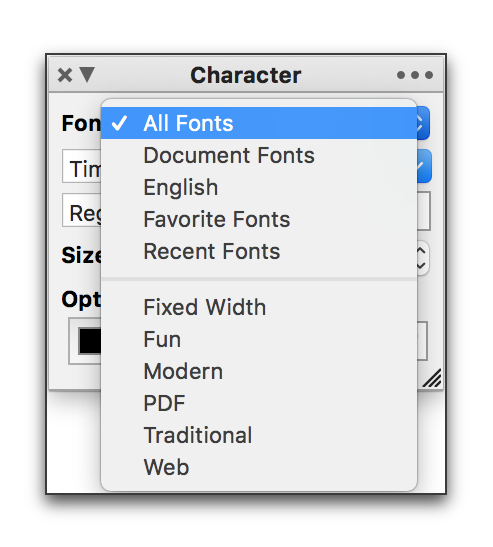
Figure 86
The Character palette showing the Font pop-up menu in Condensed Mode
Nisus Writer Pro groups your fonts as they are organized in the Font Book application. You can choose to display:
◦ Document Fonts (only and all those appearing in the active document)
◦ English (those fonts designated as English, or whatever language is the primary language you have set for macOS)
◦ whatever fonts you designate as your Favorite Fonts using the Fonts panel
☞ Favorite Fonts is a collection of fonts that you maintain.
1. Choose the menu command: Format > Font > Show Fonts.
2. From the Gear menu in the upper left corner of the Fonts panel choose Add to Favorites or by dragging and dropping their names from the Typeface or Family column to Favorites in the Collection column as illustrated in Figure 87 and Figure 88.
You can also add your own named collections to gather certain categories of fonts, for example, Hebrew, Arabic, etc. and they will also appear under that named collection in the Fonts menu in Nisus Writer Pro. To accomplish this you need to use Apple’s Font Book.app.
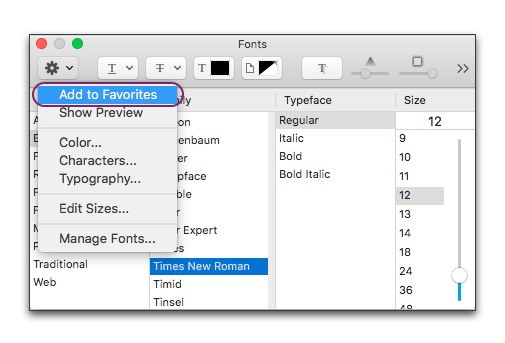
Figure 87
The Gear menu in the Fonts panel
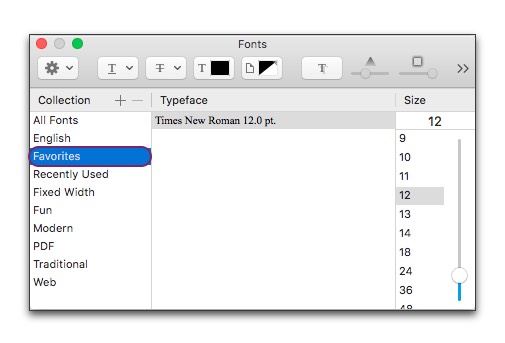
Figure 88
The Favorites group in the Fonts panel
◦ your Recent Fonts (which displays the 10 most recent fonts you have used).
Nisus Writer Pro can use all the fonts installed on your system. To view, install, or modify the fonts on your system you should use the Font Book application provided by macOS.
☞ You can cause the menu Format > Font to display the fonts available in their own font (WYSIWYG) by turning on Font menu shows previews in the Appearance preference window of Nisus Writer Pro. See “Appearance Preferences” for more information.
Scroll through a longer list of fonts
► Drag the resize tab at the bottom of the Character palette down to display a longer list of available fonts.
If you know the name of the font you want, you can click and select the font name in the Font display and type the first few characters. Nisus Writer Pro uses “auto-fill” to sense what font you want, displaying the closest match (in alphabetical order). When you see the font you want, press ⏎ to confirm your choice.
To learn more about using fonts (how to install them, where they belong in your System, etc.) see pages 684 and (for non-Roman text) 40.
If you want to move on to change the typeface and/or size, you can press ⇥ to confirm and select the next field in the palette.
Although Nisus Writer Pro can show you WYSIWYG previews of font names in various font listings (eg: Figure 85), it’s sometimes much more helpful to see previews of your document’s actual text. In other words: see your actual text displayed by various fonts, not font names.
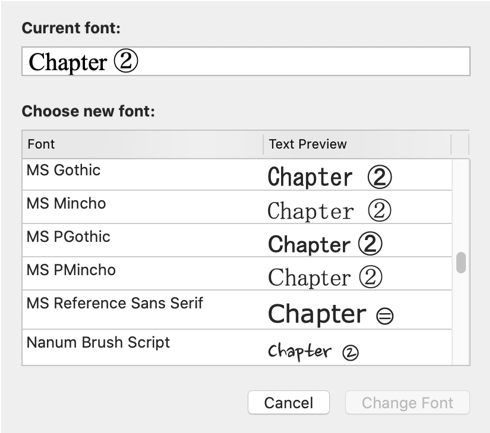
How to preview text in all available fonts:
1. Select the text that you’d like to preview (eg: a particular symbol, word, or heading).
2. Use the menu Format > Font > Show Font Previews…
→ The font preview dialog appears (see Figure 89 below), listing only fonts which have the ability to display all of the selected text.
3. Select one of the fonts and click the Change Font button.
→ The selected text’s font has been changed in your document.
Figure 89 The Font Preview dialog.
☞ Whenever you change the size of characters in your text from its underlying style as set in your Nisus New File or an applied style sheet, as explained in “Style Sheets” on page 136, the  , the Font/Character Formatting Tag appears on the Status Bar at the bottom of your document window. This is considered a “manual override” of the formatting of your document, as explained in detail on page 111.
1. Select the text you wish to change.
2. Click and drag the Size slider to the size you want.
The Size box updates to display the actual size of the characters,
If you know the size you want, you can click and select (or double-click) the size display and type the size you want. Nisus Writer Pro uses only whole number sizes. When you are satisfied, press ⏎ or ⇥ to confirm your choice.
The slider only goes up to 128 pt., you can enter any size you like in the size display text box.
Or
1. Select the text you want to have a different size.
2. Choose the size you want from the menu Format > Size.
You can choose from a variety of sizes or you can increase or decrease the size of your text by designated increments. The selected text appears in the selected size.
Change the size of characters to a size not listed on the menu
1. Select the text you want to have a different size.
2. Click and drag the Size slider to the size you want.
Or
1. Choose the menu command: Format > Size > Other….
2. Type the number for the size you want and Click OK.
☞ You can set the size to decimal fractions as well as whole numbers.
Increase or decrease the size of characters by a specific amount
1. Select the text you want to have a different size.
2. Choose Increase By… or Decrease By… from the menu Format > Size.
3. Type the number for the amount you want the size to change.
Every bit of text in your document has a primary font. This is either the font you applied directly to the text (e.g.: using the Format menu) or a font enforced by an applied style. If the primary font cannot display the text to which it’s applied, then a different fallback font must be used to show the text on screen. This process is called font substitution.
The fallback font is calculated using a variety of factors, including your language’s Secondary Font, your document styles, and the characters in the text.
Fonts that have undergone font substitution display their names using a special color on the menu Format > Font and in the Character palette. The default color is red but can be customized. You can also choose to have text that underwent font substitution highlighted on screen by choosing a “Font substituted” color in the Appearance preferences.
If you just typed or inserted some text that required font substitution, Nisus Writer Pro immediately shows an alert dialog. This alert is not shown when opening documents with existing text.
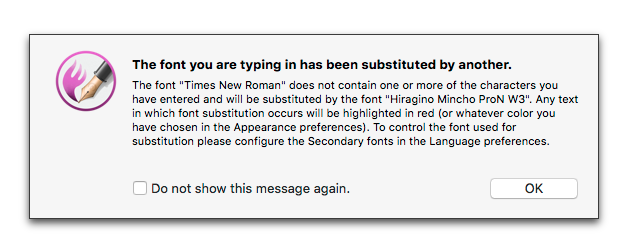
Figure 90 The “font substitution” alert
If your text has unwanted font substitution, the only way to fix it is to ensure that a font is in effect that can properly display all the desired characters. There’s a few different ways to correct the font:
► Select the affected text and apply a different font, see “Change the font of text”.
► Adjust your document’s style sheet to enforce different fonts.
► Change the “Secondary Font” settings for the relevant language in your preferences.
No matter how you choose to fix the font substitution, you will need to pick a font that can properly display all of your text. Nisus Writer Pro can help you find an appropriate font.
How to find a replacement font:
1. Select the character (or characters) where font substitution has occurred.
2. Use the menu Format > Font > Show Font Previews…
→ The font preview dialog appears (see Figure 91 below), listing only fonts which have the ability to display your text.
3. Select one of the fonts and click the Change Font button.
→ The selected text’s font has been changed in your document.
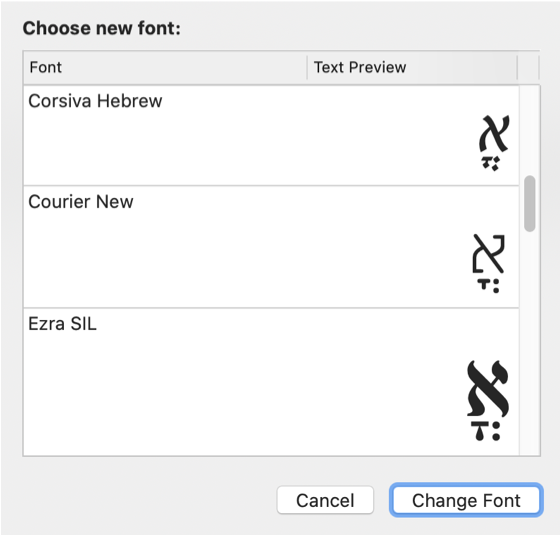
Figure 91 The Font Preview dialog, showing which fonts can display a voweled Hebrew character.
If you see that font substitution has occurred, it’s likely that you want to search out all other such text, so you can be sure your document text is displayed properly. Nisus Writer Pro can help you find all text where font substitution has occurred:
1. Select any single piece of text where font substitution has occurred.
2. Use the menu Format > Font > Font Substituted > Find All in New Window.
→ A Find All results list window will appear that shows all font substitution.
You can use the results list to inspect and fix all font substitution in your document.
After you have purchased a font and you have it on your hard drive, or you have a CD of your fonts loaded in to your computer you can add these fonts to your System.
► Double-click the font’s icon.

Apple’s application Font Book opens and presents you with a dialog offering to install the font.
Change the format of characters
☞ Whenever you change the format of characters in your text from its underlying style as set in your Nisus New File or an applied style sheet, as explained in “Style Sheets” on page 136, the  , the Font/Character Formatting Tag appears on the Status Bar at the bottom of your document window. This is considered a “manual override” of the formatting of your document, as explained in detail on page 111.
As stated above in the section “Use the Character palette to format text” on page 102, the Character palette contains many of the controls needed to format the characters in your text. You can display the palette, minimized or “Condensed” or “Expanded” as illustrated in Figure 84 on page 104, and Figure 85 on page 104.
In addition, as you click any of the buttons in the Options at the bottom of the Character palette (except for the Text color swatch that opens the Colors panel), the palette enlarges to display additional controls. You can choose to have these options display as a matter of course by choosing any one, or more of them from the menu “…” (Ellipsis, or Options) > Always Show Options >
To change the format of characters…
1. Select the text you want to have a different format.
2. Then, either:
a. Choose the format you want from the appropriate submenu of the Format menu, or
b. Click the appropriate control in the Character palette.
The selected text appears with the chosen format.
☞ For more information about special “style” formatting in Nisus Writer Pro see page 428.
Change the format of characters using the “Dropper”
If you have added the Dropper to your Toolbar (see the section: “Customize the Toolbar” on page 611) you can easily “pick up” and “drop” the formatting of selected text.
1. Select the text with the formatting you wish to apply elsewhere.
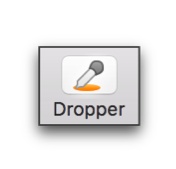
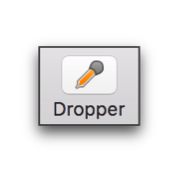
Figure 93
The Dropper with nothing in it (left, before clicking in text), then with something in it (right, after clicking in text)
2. Click the Dropper on the Toolbar.
The dropper has “absorbed” the format(s). You are now in format duplication mode.
3. While the Dropper is “full”, click and drag your pointer to select the text to which you want to apply the formats.
4. Repeat step 3 until you no longer want to duplicate formats.
5. Click anywhere in your text, or click the dropper button.
You have now left the format duplication mode.
☞ The Dropper “absorbs” and “drops” highlight color and any formatting of Styles (though not the (named) Styles themselves). The underling Style remains but the new format(s) have been laid “on top of” the Style; they “override” the Style.
All the above sections from “Change the font of text” on page 103 through “Change the format of characters using the “Dropper”” refer to the act of manually overriding the formatting of your document. Manual formatting is any formatting applied to text directly, not through Styles. Applying a Heading 1 paragraph style may change the text’s font and size, but that is not manual formatting. That is formatting by way of Styles. On the other hand, if you select some text and change the Font, Face, Size or Color using the Character palette, that is manual formatting.
The Font Tag (the little black underlined “a” icon on the Status Bar) represents all manual font-like formatting applied to the selection. When you choose the command Select All from the Font Tag’s menu, it selects only all text in the document that has all of the manual formatting applied. What the Font Tag selects will depend on where the selection rests in your document.
You may have some text in your document where only the Normal style is applied. If you select that text, the Font Tag won’t appear at all, because there is no manual formatting applied.
If you again select that text where only the Normal style is applied, and then add an Underline by choosing the menu command: Format > Underline > Single, the Font Tag will appear. The text now has some manual formatting applied, specifically an underline format. If you then choose Select All command from the Font Tag’s pop-up menu, all text in the document with a manual single underline format will be selected. But only text with manual underlines will be selected; if the underline was enforced via a Style, it would not be selected.
Continuing with the text we have so far (Normal style + single underline), let’s now change the font family as well. Say we change the font to Cochin, then the selected text now has manual formatting of (single underline + Cochin font family). If we then choose Select All from the Font Tag, this time only text in the document with both an underline and Cochin will be selected. And again, only if those formats were manually applied, and were not enforced via Styles.
| Previous Chapter Text Formatting Topics |
<< index >> |
Next Chapter Format Paragraphs |